All disclosures, notices and warranty conditions are being written on EKWB web page. Please check terms of use. Revision 1.3. Released on 27
th
of November, 2012.
STEP 2.11: Heat Sink/Block Mounting:
It is imperative that the heat sink or water block is aligned correctly before it makes
contact with the ETI. Avoid any twisting on the ETI as the heat sink is
bolted/clamped down. Apply a uniform pressure to the sink (while clamping) to
prevent it from shifting. Visit the website for application notes specific to your cooler.
For Clip and Bolt mounted sinks/blocks:
Initially tighten each bolt to latch onto
the clip support threading. Apply uniform torque to all of the bolts (by alternating the
tightening of bolts) until fully tightened.
For plastic Push-Pin mounted
sinks/blocks:
Start with the two push-pins opposite the socket hinge and apply
enough force to lock the final two push-pins.
STEP 2.12: ETI Reflow:
As part of installation, the Indigo Xtreme ETI must first be heated with the CPU running under load
in order to reflow (melt) the PCMA.
The interface is highly thermally resistive without a complete reflow. Failure to perform
the exact reflow procedure may result in unacceptable thermal performance.
A video demonstration of ETI reflow can be found at EKWB product page:
http://www.ekwb.com
STEP 3: ETI REFLOW PROCEDURE:
1.
Orient the computer such that the motherboard and CPU are in a horizontal position.
2.
Unplug the CPU (heat sink) fan and case fan(s). For water cooled systems, turn off liquid pump. However, you may need to plug in the CPU fan to get the computer to boot.
3.
Boot the computer into BIOS. Clock frequency and voltage must be set back to default. Be certain the “Hardware Thermal Control” is enabled. Following boot into BIOS, unplug the CPU fan.
4.
Once in BIOS, proceed quickly into “PC Health Status” typically located at the bottom of the list of options.
5.
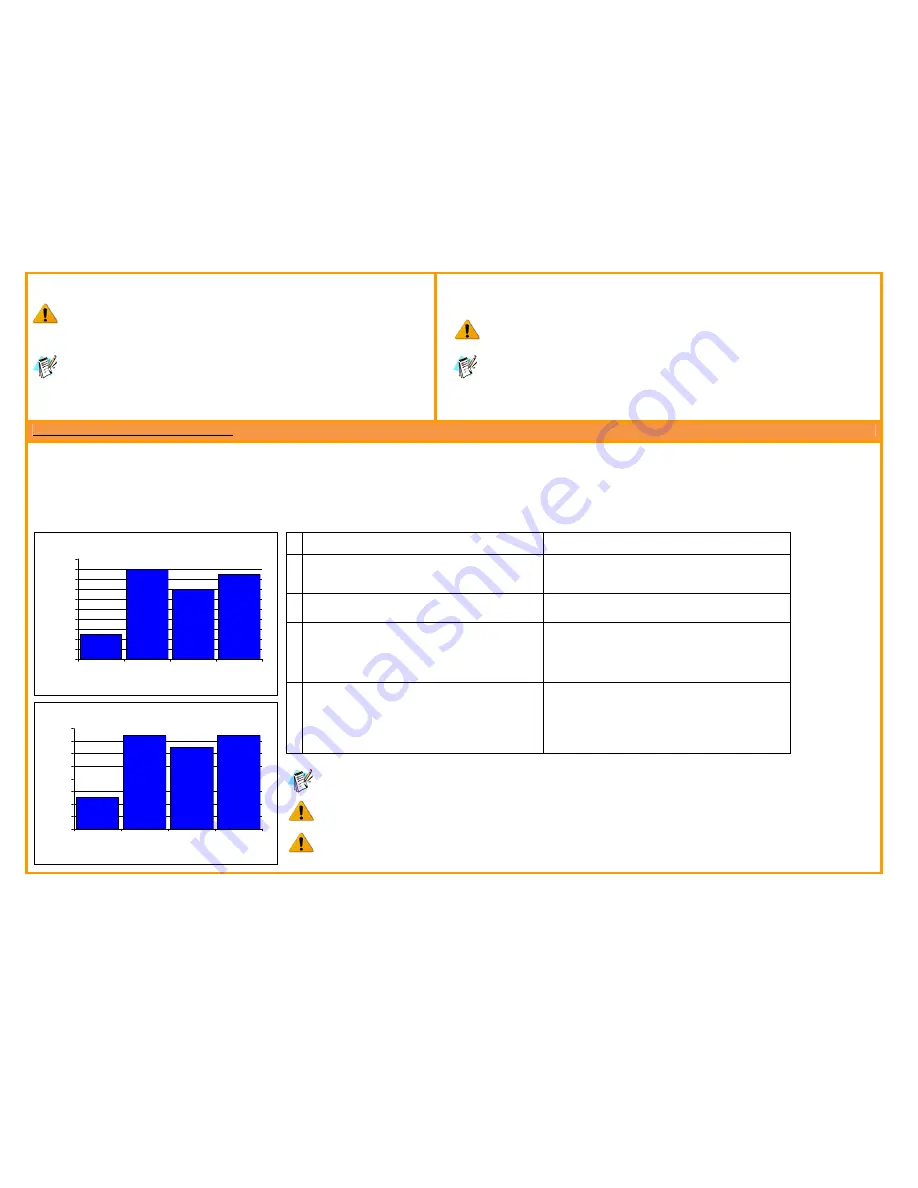
Within PC Health Status, follow the “Current CPU Temperature” (as a single temperature point) as illustrated in the bar graphs and corresponding tables below for your CPU. Larger heat
sinks and full copper water blocks will require longer reflow times.
#
All FX CPUs
All other AM3 CPUs
1
PC is off (at room temperature), motherboard is in a
horizontal position, and all pumps and fans are
unplugged.
PC is off (at room temperature), motherboard is in a
horizontal position, and all pumps and fans are
unplugged.
2
Upon booting into BIOS, displayed CPU temperature will
steadily rise to a peak temperature of ~80-90°C.
Upon booting into BIOS, displayed CPU temperature will
steadily rise to a peak temperature of ~75°C.
3
Following the peak, CPU temperature will slowly drop to
a bottoming point of ~70-75°C. However, during
descent, CPU temperature may stabilize for a moment at
~80°C. Continue to watch the temperature until it drops
to a bottoming point of ~70-75°C.
Following the peak, CPU temperature will slowly drop to a
bottoming point of ~65-70°C. However, during descent,
CPU temperature may stabilize for a moment at ~70°C.
Continue to watch the temperature until it drops to a
bottoming point of ~65-70°C.
4
Following the bottoming point, the CPU temperature will
slowly rise again.
Once CPU temperature has reached
~85°C, shut down computer; allow PC to cool for at least
10 minutes (for heat sinks) or at least 20 minutes (for
water blocks) before booting and connecting fans and/or
pumps.
Following the bottoming point, the CPU temperature will
slowly rise again.
Once CPU temperature has reached
~75°C, shut down computer; allow PC to cool for at least
10 minutes (for heat sinks) or at least 20 minutes (for
water blocks) before booting and connecting fans and/or
pumps.
AMD multi-core processors have built-in protection (Hardware Thermal Control) that prevents the processor
from exceeding maximum core temperatures, thereby preventing any damage to the CPU.
Avoid any bumping or excessive pressure on the heat sink/water block and keep the computer in the
horizontal position while cooling down.
If the CPU temperature does not follow a similar temperature profile as seen in the previous graphics, then
improper reflow may have occurred. Proceed to Step 4 and re-install a new ETI.
All FX CPUs
#4
#3
#1
#2
0
10
20
30
40
50
60
70
80
90
100
0
20
40
60
Time (seconds)
C
P
U
T
e
m
p
e
ra
tu
re
(
C
)
All other AM3 CPUs
#4
#3
#1
#2
0
10
20
30
40
50
60
70
80
0
20
40
60
Time (seconds)
C
P
U
T
e
m
p
e
ra
tu
re
(
C
)


