


- 8 -
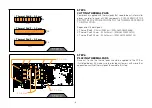
CHECKING FOR CONTACTS
If necessary remove the water block to check for uniform surface
contact between the block and the components, pay special
attention to the VRM section of the graphics card. Check whether
the water block makes contact with the intended integrated circuit.
Then repeat sub-steps in previous section to re-attach the block.
In case you fail to obtain good contact, please check again that
your thermal pad thickness or contact our support service at:
http://www.ekwb.com/support.
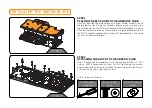
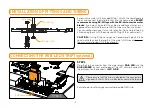
INSERTING THE CARD IN YOUR PC CASE
Carefully lift your graphics card with block installed and insert it into
the correct PCIe expansion slot on your PC’s motherboard (consult
motherboard manual). Please consider that your graphics card
might be heavier than it was with the stock cooler, so be very careful
when handling it. Avoid excessive manipulation of the graphics card
assembly which may damage your graphics card, motherboard or
water block during installation.


