background image


Rear

13

12

10

9

11

8

16

17

11

14

15

7

6

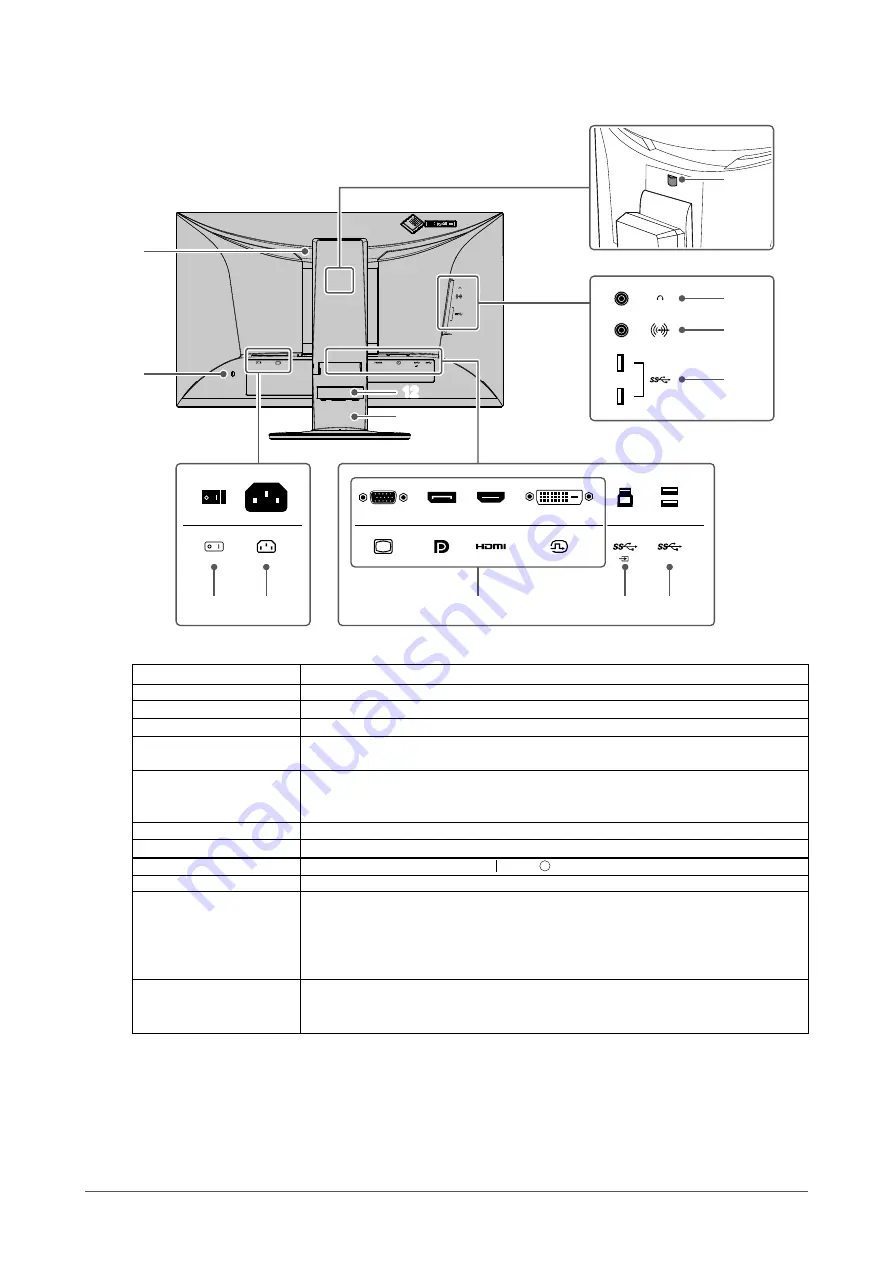
6.  Handle

This handle is used for transportation.

7.  Security lock slot

Complies with Kensington’s MicroSaver security system.

8.  Lock button

Use this button to remove the monitor from the stand.

9.  Headphone jack

Connects to headphones.

10.  Stereo mini jack

If you connect an external device using the stereo mini jack cable, external audio 

can be output from the monitor.

11.  USB Type-A 

connector (USB 

downstream port)

Connects to a peripheral USB device (

page 38

).

12.  Cable holder

Holds the monitor cables.

13.  Stand

*1

Adjusts the height and angle (tilt and swivel) of the monitor.

14.  Main power switch

Turns the main power on or off.  : On,   : Off

15.  Power connector

Connects the power cord.

16.  Input signal 

connectors

The following connectors are available on the monitor rear in order of left to right.

D-Sub mini 15-pin connector

DisplayPort connector

HDMI connector

DVI connector

17.  USB Type-B 

connector (USB 

upstream port)

Connect the USB cable when using software that requires USB connection or when 

using the USB hub function (

page 38

).

*1  An optional arm (or optional stand) can be attached by removing the stand section.

9

Chapter 1 Introduction

Содержание FlexScan EV2460

Страница 1: ...ly to familiarize yourself with safe and effective usage Refer to the Setup Guide for information on the installation connection of the monitor For the latest product information including the User s...

Страница 2: ...smitted in any form or by any means electronic mechanical or otherwise without the prior written permission of EIZO Corporation EIZO Corporation is under no obligation to hold any submitted material o...

Страница 3: ...should be set to a lower brightness to prevent a loss in the screen quality caused by long term use and to maintain stable use When the screen image is changed after displaying the same image for ext...

Страница 4: ...h water or by using ScreenCleaner available as an option Attention Chemicals such as alcohol and antiseptic solution may cause gloss variation tarnishing and fading of the cabinet or LCD panel and als...

Страница 5: ...ent Setting 16 3 1 Basic Operation of the Setting Menu 16 3 2 Setting Menu Functions 17 Color Adjustment 17 Signal Settings 20 Preference Settings 23 Language 24 Information 24 Chapter 4 Administrator...

Страница 6: ...his product can be used as an external monitor of a notebook computer By attaching the monitor to an arm the screen can be rotated 180 upward downward rotation and used in a multi monitor configuratio...

Страница 7: ...he brightness specified by the input signal 1 Reference values Maximum power consumption 50 W when a USB device is connected and the speakers are working standard power consumption 10 W brightness 120...

Страница 8: ...ccording to the ambient brightness page 14 2 Operation switches Displays menus Operate the switches according to the operation guide page 16 3 Power switch Turns the power on or off 4 Power indicator...

Страница 9: ...ice page 38 12 Cable holder Holds the monitor cables 13 Stand 1 Adjusts the height and angle tilt and swivel of the monitor 14 Main power switch Turns the main power on or off On Off 15 Power connecto...

Страница 10: ...6 50 Hz Progressive 720 576 50 Hz Interlaced 800 600 60 317 Hz Progressive 1024 768 60 004 Hz Progressive 1280 720 50 Hz Progressive 1280 720 59 94 Hz Progressive 1280 720 60 Hz Progressive 1280 800 5...

Страница 11: ...ors including notebook PC screens are connected to the computer select Extend these displays in the Multiple displays menu and then click Apply Click Keep changes on the confirmation screen 4 Select a...

Страница 12: ...hod 1 Displaying the operation guide 1 Touch any switch except The operation guide appears on the screen 2 Adjusting setting 1 Touch a switch for adjustment setting The Adjustment Setting menu appears...

Страница 13: ...tones and contrast similar to that of paper to produce a printed paper effect It is suitable for displaying images from media such as books and documents Movie This mode displays moving images bright...

Страница 14: ...the color mode the Auto EcoView setting is turned Off EcoView Optimizer 2 On Off The monitor automatically adjusts the screen brightness according to the white level of the input signal This function...

Страница 15: ...brightness is adjusted by changing the brightness of the backlight light source from the LCD back panel Setting Value 0 to 100 2 6 Adjusting Volume The volume of the speakers and headphones can be se...

Страница 16: ...elect The Setting menu appears 2 Adjusting setting 1 Select a menu to adjust set with and select The Sub menu appears 2 Select an item to adjust set with and select The Adjustment Setting menu appears...

Страница 17: ...minutes or more after power to the monitor has been turned on before adjusting the monitor The same image may be observed in different colors on multiple monitors due to monitor specific characteristi...

Страница 18: ...ure Off 4000 K to 10000 K in increments of 500 K 9300 K is included Adjust the color temperature The color temperature is normally used to express the hue of White and or Black with a numerical value...

Страница 19: ...tion 50 to 50 Adjust the color saturation Note Using this function may prevent some color gradations from being able to be displayed The minimum value 50 changes the screen to monochrome Gain 0 to 100...

Страница 20: ...ing to the aspect ratio and resolution information from the PC Full Screen Images are stretched to full screen Since aspect ratios are not maintained images may be distorted in some cases Aspect Ratio...

Страница 21: ...yed on the monitor black will appear faint and white will appear dull leading to a reduction in contrast The output range of such signals can be extended to match the actual contrast ratio of the moni...

Страница 22: ...n of 800 600 SVGA or higher Auto Range Adjust Every color gradation 0 to 255 can be displayed by automatically adjusting the signal output level Selecting Auto Range Adjust displays a message Select Y...

Страница 23: ...mode images are not displayed on the screen How to exit power saving mode Press the operation switches excluding on the front of the monitor The monitor automatically exits power saving mode when the...

Страница 24: ...n Swedish Japanese Simplified Chinese Traditional Chinese Attention The display language of the Administrator Settings menu cannot be changed Information Monitor information product name serial number...

Страница 25: ...ch for more than 2 seconds to turn on the monitor The Administrator Settings menu appears 2 Setting 1 Select an item to set with and select The Adjustment Setting menu appears 2 Set with and select Th...

Страница 26: ...oduct automatically recognizes the connector through which PC signals are input and displays images on the screen accordingly regardless of whether this function is set to On or Off just after the mai...

Страница 27: ...ll In order to prevent changes to settings the operation switches on the front of the monitor can be locked Off default setting Enables all switches Menu Locks the switch All Locks all switches except...

Страница 28: ...and white This symptom may occur during DisplayPort input Use a signal cable recommended by us for the connection Turn the monitor off and on 2 The message below appears This message appears when the...

Страница 29: ...image for a long time Use the screen saver or power saving function to avoid displaying the same image for extended periods of time Depending on the image an afterimage may appear even if it was displ...

Страница 30: ...r Position page 22 If the problem persists use the graphics board s utility if available to change the display position 2 Vertical bars appear on the screen or a part of the image is flickering Use Cl...

Страница 31: ...g for Compatibility Mode to On refer to Compatibility Mode page 26 If the peripheral devices work correctly when they are directly connected to the PC contact your local EIZO representative Depending...

Страница 32: ...monitor or stand this may cause damage or injury due to the weight of the monitor and stand 1 Lay the LCD monitor on a soft cloth spread over a stable and flat surface with the LCD panel surface faci...

Страница 33: ...ttachments such as cables When attaching an arm or stand the installable orientations and movement range tilt angle are as follows Orientation 1 Movement range tilt angle Up 45 Down 45 1 If you positi...

Страница 34: ...fixing screws on the optional arm or optional stand and detach the optional arm or optional stand 3 Attach the original stand Insert the four tabs on the stand into the four holes on the back panel 1...

Страница 35: ...e following procedures 1 Lay the LCD monitor on a soft cloth spread over a stable and flat surface with the LCD panel surface facing down 2 Raise the lever on the bottom of the stand base 3 Turn the s...

Страница 36: ...wing procedures 1 Lay the LCD monitor on a soft cloth spread over a stable and flat surface with the LCD panel surface facing down 2 Attach the stand base onto the stand brace FRONT FRONT 3 Turn the s...

Страница 37: ...parately sold accessory DD200 DVI D cable DVI D DVI D Separately sold accessory MD C87 D Sub cable D Sub D Sub Separately sold accessory Note You can select the input signal to display using the opera...

Страница 38: ...nufacturer of each device for information about USB compatibility Even when the monitor is in power saving mode devices connected to the USB downstream port are operational Due to this the power consu...

Страница 39: ...z to 68 kHz 59 Hz to 61 Hz 69 Hz to 71 Hz at 720 400 Frame Synchronization Mode 49 0 Hz to 61 0 Hz Max Dot Clock 148 5 MHz USB Port Upstream 1 Downstream 4 Standard USB Specification Revision 3 1 Gen...

Страница 40: ...Tilt 0 Tilt Up 35 down 5 Swivel 344 Vertical Rotation Left 90 right 90 Operating Environmental Requirements Temperature 5 C to 35 C Humidity 20 to 80 R H no condensation Air Pressure 540 hPa to 1060...

Страница 41: ...s of Microsoft Corporation in the United States and other countries Adobe is a registered trademark of Adobe Systems Incorporated in the United States and other countries Apple macOS Mac OS OS X Macin...

Страница 42: ...Copyright 2019 2021 EIZO Corporation All rights reserved 03V28046B1 UM EV2460 2nd Edition February 2021...

Отзывы: