background image

31

Computer Input

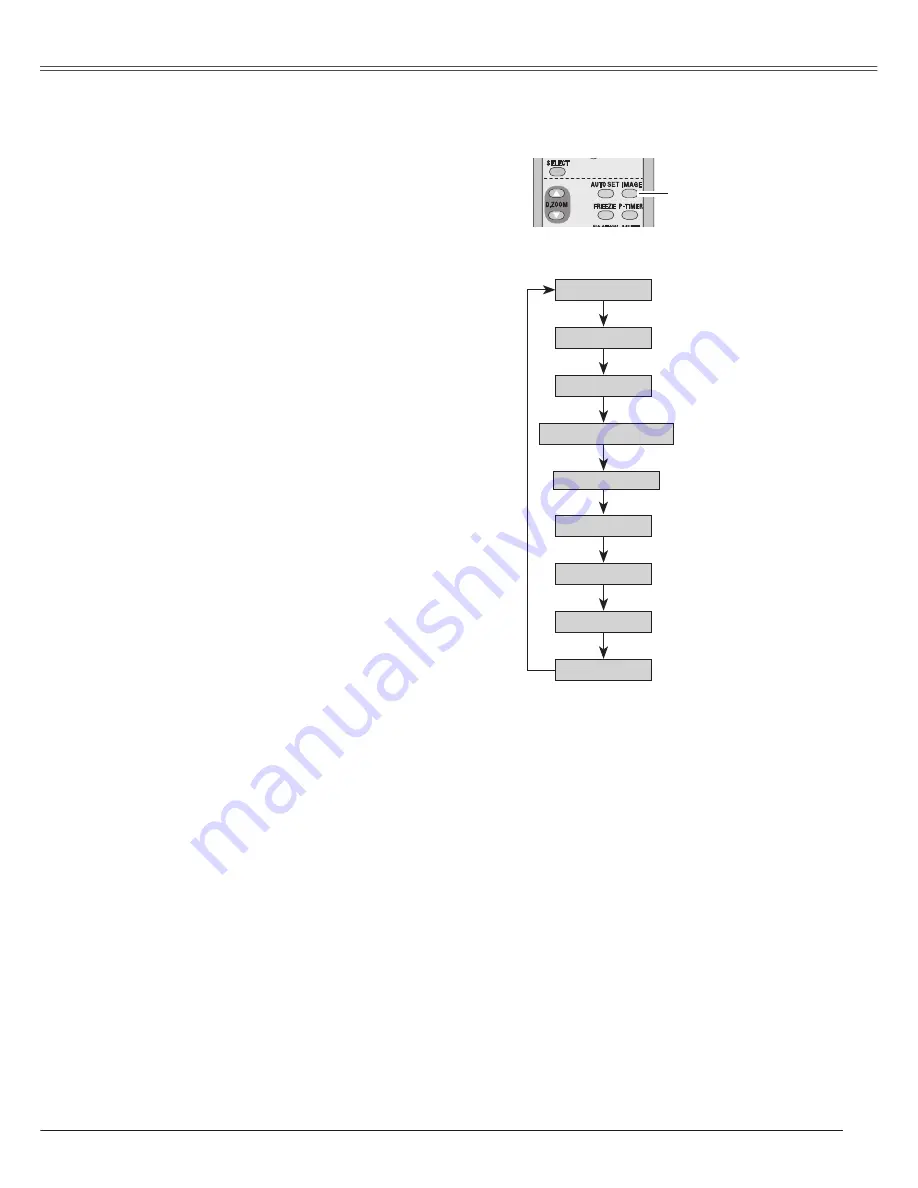
Select  an  image  level  among  Dynamic,  Standard,  Real, 
Blackboard (Green), Colorboard, Image 1, Image 2, Image 
3,  and  Image  4  by  pressing  the  IMAGE  button  on  the 
remote control.

Normal picture level preset on this projector.

Picture level with improved halftone for graphics.

Standard

Real

Image 1 ~ 4

Image Level Selection 

Direct Operation

Blackboard (Green)

Picture  level  suitable  for  the  image  projected  on  a 
blackboard.    This  mode  assists  to  enhance  the  image 
projected  on  a  blackboard.    This  is  mainly  effective  on  a 
green colored board, not truly effective on a black colored 
board.

Picture level suitable for viewing picture in a bright room.

Dynamic

User preset image in the Image Adjust Menu. (pp.33-34)

IMAGE button

Image 4

Blackboard (Green)

1

2

+

_

Remote Control

IMAGE button

Dynamic

Standard

Real

Image 1

Image 2

Image 3

Colorboard

At  the  time  of  simple  projection  on  the  colored  wall,  you 
can get the close color image to the color image projected 
on a white screen by selecting the similar color to the wall 
color from the preset four colors.  

Colorboard

Содержание LC-XS25

Страница 1: ...Multimedia Projector Owner s Manual LC XS25 LC XS30 MODEL ...

Страница 2: ...s function enables Input search Auto Keystone correction and AUTO PC adjustment by simple pressing the AUTO SETUP button on the top control or the AUTO SET button on the remote control p 46 Notes The On Screen Menu and figures in this manual may differ slightly from the product The contents of this manual are subject to change without notice Multilanguage Menu Display Operation menu is available i...

Страница 3: ...e Correction 22 Sound Adjustment 23 Remote Control Operation 23 Computer Input 25 Input Source Selection RGB Computer 1 Analog Computer 2 25 Input Source Selection RGB PC digital RGB AV HDCP 26 Computer System Selection 27 Auto PC Adjustment 28 Manual PC Adjustment 29 Image Level Selection 31 Image Level Adjustment 33 Screen Size Adjustment 34 Video Input 37 Input Source Selection Video S video 37...

Страница 4: ...pose of this equipment at your local community waste collection recycling centre In the European Union there are separate collection systems for used electrical and electronic products Please help us to conserve the environment we live in Safety Precaution WARNING THIS APPARATUS MUST BE EARTHED TO REDUCE THE RISK OF FIRE OR ELECTRIC SHOCK DO NOT EXPOSE THIS APPLIANCE TO RAIN OR MOISTURE This proje...

Страница 5: ...ge points or short out parts that could result in a fire or electric shock Never spill liquid of any kind on the projector Do not install the projector near the ventilation duct of air conditioning equipment This projector should be operated only from the type of power source indicated on the marking label If you are not sure of the type of power supplied consult your authorized dealer or local po...

Страница 6: ...Do not point the projector down to project an image Do not put the projector on either side to project an image Install the projector properly Improper Installation may reduce the lamp life and cause a fire hazard Installing the Projector in Proper Position USE CAUTION IN CARRYING OR TRANSPORTING THE PROJECTOR Do not drop or bump the projector otherwise damages or malfunctions may result When carr...

Страница 7: ...rs Laboratories UL and certified by the Canadian Standard Association CSA AC Power Cord has a grounding type AC line plug This is a safety feature to be sure that the plug will fit into the power outlet Do not try to defeat this safety feature Should you be unable to insert the plug into the outlet contact your electrician GROUND AC Power Cord Requirement AC Power Cord for the United Kingdom This ...

Страница 8: ...eat sensitive objects near this side Lamp Cover Speaker Top Controls and Indicators Terminals and Connectors Filter Cover Adjustable feet Kensington Security Slot This slot is for a Kensington lock used to deter theft of the projector Kensington is a registered trademark of ACCO Brands Corporation Security Bar A commercially available anti theft chain or wire can be attached to the security bar on...

Страница 9: ...N Connect the audio output from video equipment connected to or to this jack When the audio output is monaural connect it to L MONO jack p 15 VIDEO IN Connect the composite video output from video equipment to VIDEO jack p15 AUDIO OUT VARIABLE Connect an external audio amplifier to this jack pp 14 16 This terminal outputs sound from AUDIO IN terminal or S VIDEO IN Connect the S VIDEO output signal...

Страница 10: ...ling down MENU button Open or close the On Screen Menu p 20 POINT buttons Select an item or adjust the value in the On Screen Menu p 20 Pan the image in Digital zoom mode p 36 SELECT button Execute the selected item p 20 Expand or compress the image in Digital zoom mode p 36 Part Names and Functions Part Names and Functions POINT buttons Select an item or adjust the value in the On Screen Menu p 2...

Страница 11: ...r function p 24 NO SHOW button Temporarily turn off the image on the screen p 24 KEYSTONE button Correct the keystone distortion pp 22 47 Point buttons Select an item or adjust the value in the On Screen Menu p 20 Pan the image in Digital zoom mode p 36 SELECT button Execute the selected item p 20 Expand or compress the image in Digital zoom mode p 36 LAMP CONTROL button Select the lamp mode pp 24...

Страница 12: ...stall new batteries Risk of explosion if a battery is replaced by an incorrect type Dispose of used batteries according to the instructions Open the battery compartment lid Install new batteries into the compartment Replace the compartment lid Two AA size batteries For correct polarity and be sure battery terminals are in contact with pins in the compartment Remote Control Battery Installation 1 2...

Страница 13: ...3 5 m 4 6 1 4 m 17 4 5 3 m 23 2 7 1 m 34 8 10 6 m 41 8 12 7 m For projector positioning see the figures below The projector should be set horizontally to the flat screen Projection angle can be adjusted up to 10 0 degrees with the adjustable feet Lift the front of the projector and push the feet lock latches on the projector 1 Release the feet lock latches to lock the adjustable feet and rotate th...

Страница 14: ...OMPUTER 1 AUDIO IN terminal when using the COMPUTER IN 1 DVI I terminal as input When the AUDIO OUT is plugged in the projector s built in speaker is not available Unplug the power cords of both the projector and external equipment from the AC outlet before connecting cables External Audio Equipment V G A cable Audio cable stereo Monitor Output COMPUTER 2 COMPONENT COMPUTER 1 AUDIO IN AUDIO OUT st...

Страница 15: ...the power cords of both the projector and external equipment from the AC outlet before connecting cables Note When the AUDIO OUT is plugged in the projector s built in speaker is not available External Audio Equipment Audio cable stereo S VIDEO IN S video cable Video and Audio cable Composite Video and Audio Output S video Output Audio Input AUDIO OUT stereo R L R L Video Video R L R L Audio cable...

Страница 16: ...ojector s built in speaker is not available See page 76 for ordering optional parts Unplug the power cords of both the projector and external equipment from the AC outlet before connecting cables External Audio Equipment COMPUTER IN 1 COMPONENT IN COMPUTER2 COMPONENT AUDIO IN Audio cable stereo Audio cable stereo Audio Input Component Video Output Y Pb Cb Pr Cr RGB Scart 21 pin Output Audio Output...

Страница 17: ... Power Cord NOTE ON THE POWER CORD AC power cord must meet requirement of the country where you use the projector Confirm the AC plug type with the chart below and proper AC power cord must be used If supplied AC power cord does not match your AC outlet contact your sales dealer To power cord connector on your projector Projector side AC outlet side Ground To the AC outlet 120 V AC For the U S A a...

Страница 18: ...ation Number code that allows the person who knows it to operate the projector Setting a PIN code prevents unauthorized use of the projector A PIN code consists of a four digit number Refer to the PIN code lock function in the Setting on pages 53 and 54 for locking operation of the projector with your PIN code CAUTION ON HANDLING PIN CODE If you forget your PIN code the projector can no longer be ...

Страница 19: ...cooling fans is changed according to the temperature inside the projector Do not put the projector in a case before the projector is cooled enough If the WARNING TEMP indicator blinks or emits a red light see Indicators and Projector Condition on pages 71 72 While the POWER indicator is blinking lamp is being cooled down and the projector cannot be turned on Wait until the POWER indicator stops bl...

Страница 20: ...djustment To close the On Screen Menu press the MENU button again Press the MENU button to display the On Screen Menu Note The selected item is not active until the SELECT button is pressed 1 2 3 Top Control 1 2 _ SELECT button POINT buttons Remote Control MENU button Menu bar Pointer red frame Menu icon Item data Press the Point buttons to adjust the value SELECT button Pointer red frame Press th...

Страница 21: ...ute the sound p 23 PC Adjust Menu U s e d t o a d j u s t parameters to match with input signal format pp 28 30 Input Menu U s e d t o s e l e c t input source either Computer or Video pp 25 26 For video source Input Menu Used to select input source either Video or Computer pp 37 38 Image Select Menu Used to select an image level among Dynamic Standard Cinema Blackboard Green Colorboard and Image ...

Страница 22: ...ion of the arrow being corrected turns red The arrows disappear at the maximum correction If you press the KEYSTONE button on the remote control once more while the keystone dialog box is being displayed the keystone adjustment is canceled The adjustable range is limited depending on the input signal Remote Control Top Control 1 2 _ Auto setup function is provided to automatically execute the sett...

Страница 23: ...tton to turn up the volume and press the Point button to turn down the volume Menu Operation Remote Control Operation For some frequently used operations using the remote control is advisable Just pressing one of the buttons enables you to make the operation and no need for calling up the On Screen Menu Press the FREEZE button on the remote control to freeze the picture on the screen To cancel the...

Страница 24: ...Press the P TIMER button again then the P timer display disappears P TIMER button Press the IMAGE button on the remote control to select a desired image level of the screen For more detail see pages 31 and 40 IMAGE button For detail see page 22 KEYSTONE button LAMP CONTROL button Press the LAMP CONTROL button on the remote control to select the lamp mode for changing the brightness of the screen N...

Страница 25: ...ress the Point buttons to move the red arrow pointer to either Computer 1 Analog or Computer 2 and then press the SELECT button 2 When selecting Computer 1 Analog RGB input source will be selected directly When selecting Computer 2 the Source Select Menu appears Move the pointer to RGB and then press the SELECT button 3 Menu Operation Notes When the Input Search function is set On1 or On2 the inpu...

Страница 26: ...B PC digital or RGB AV HDCP and then press the SELECT button 3 Menu Operation Notes HDCP High bandwidth Digital Content Protection is a system for protecting digital entertainment content delivered by DVI Digital Visual Interface from being copied The specification of HDCP is decided and controlled by Digital Content Protection LLC Should the specification be changed this projector may not display...

Страница 27: ...ignal input from computer Check the connection between your computer and the projector See Troubleshooting on pages 65 67 Auto The preset system is manually adjusted in the PC Adjust Menu The adjusted data can be stored in Mode 1 5 pp 29 30 PC Systems provided in this projector is chosen The projector chooses a proper system provided in the projector and displays it Mode 1 and SVGA 1 are examples ...

Страница 28: ...to PC Adj Menu Operation 1 2 Move the red frame pointer to the Auto PC Adj item and press the SELECT button Please wait message appears while Auto PC adjustment is in process PC Adjust Menu PC Adjust Menu icon To store adjustment parameters Adjustment parameters from Auto PC Adjustment can be memorized in this projector Once parameters are memorized the setting can be done just by selecting Mode i...

Страница 29: ...the setting for a specific computer 1 2 Eliminate flicker from the image displayed Press the Point buttons to adjust the value From 0 to 31 Fine sync Adjust the number of total dots in one horizontal period Press the Point buttons to adjust number to match your PC image Total dots Press the Point buttons to adjust the horizontal picture position Horizontal Press the Point buttons to adjust the ver...

Страница 30: ...e confirmation box appears and then select Yes All adjustments return to their previous figures Mode free To clear the stored data move the red frame pointer to the Mode free item and then press the SELECT button Move the red arrow pointer to the Mode that you want to clear and then press the SELECT button Note Display area H V cannot be selected when 480i 575i 480p 575p 720p 1035i or 1080i is sel...

Страница 31: ...s mode assists to enhance the image projected on a blackboard This is mainly effective on a green colored board not truly effective on a black colored board Picture level suitable for viewing picture in a bright room Dynamic User preset image in the Image Adjust Menu pp 33 34 IMAGE button Image 4 Blackboard Green 1 2 _ Remote Control IMAGE button Dynamic Standard Real Image 1 Image 2 Image 3 Color...

Страница 32: ... the level that you want to set and then press the SELECT button Menu Operation 1 2 Normal picture level preset on this projector Standard Picture level with improved halftone for graphics Real Picture level suitable for the image projected on a blackboard See above for further description Blackboard Green Picture level suitable for viewing picture in a bright room Dynamic At the time of simple pr...

Страница 33: ...ten the red tone and the Point button to deepen the red tone From 0 to 63 White balance Red Press the Point button to lighten the green tone and the Point button to deepen the green tone From 0 to 63 White balance Green Press the Point button to lighten the blue tone and the Point button to deepen the blue tone From 0 to 63 White balance Blue Press the Point button or the Point button for Color te...

Страница 34: ...024 x 768 this projector enters panning mode automatically Pan the image with Point buttons When adjusted the arrows turn red When reached to the correction limit the arrows disappear 1 Move the red frame pointer to any of Image 1 to 4 where y o u w a n t t o s e t and then press the SELECT button The confirmation b o x a p p e a r s then select Yes Store item Press the SELECT b u t t o n a t t h ...

Страница 35: ...ELECT button at Common to display a confirmation box To save the scale press the SELECT button at Yes When Custom is selected the saved scale is used Reset Reset the all adjusted values Press the SELECT button at Reset to display a confirmation box To reset press the SELECT button at Yes Press the SELECT button at Common or Reset to display a confirmation box Computer Input Notes When no signal is...

Страница 36: ...om mode press any button except the D ZOOM buttons SELECT and Point buttons To return to the previous screen size select a screen size from the Screen Size Adjustment or select an input source from the Input Source Selection p 26 again or adjust the screen size with the D ZOOM buttons Digital zoom For zooming in and out the images 1 2 _ Remote Control D ZOOM button POINT buttons SELECT button D ZO...

Страница 37: ...y p 46 Input Menu Input Menu icon Video Press the MENU button to display the On Screen Menu Press the Point buttons to move the red frame pointer to the Input Menu icon 1 Press the Point buttons to move the red arrow pointer to Video and then press the SELECT button 2 Move the pointer to the desired source and then press the SELECT button 3 Menu Operation Computer 1 Analog Computer 2 Computer 1 Di...

Страница 38: ...MENU button to display the On Screen Menu Press the Point buttons to move the red frame pointer to the Input Menu icon Note When the Input Search function is set to On1 or On2 the input signal will be searched automatically p 46 When the input source is coming from video equipment connected to the COMPUTER IN 2 COMPONENT IN terminal with a Component VGA Cable select Component When the input source...

Страница 39: ...itself to optimize its performance If the projector cannot reproduce proper video image it is necessary to select a specific component video signal format among 480i 575i 480p 575p 720p 1035i and 1080i COMPONENT VIDEO SIGNAL FORMAT Video or S video Component The projector automatically detects incoming video system and adjusts itself to optimize its performance When Video System is PAL M or PAL N ...

Страница 40: ...mage projected on a blackboard This is mainly effective on a green colored board not truly effective on a black colored board Picture level suitable for viewing picture in a bright room Dynamic User preset image in the Image Adjust Menu pp 42 43 1 2 _ Remote Control IMAGE button IMAGE button Image 4 Blackboard Green Dynamic Standard Cinema Image 1 Image 2 Image 3 Colorboard At the time of simple p...

Страница 41: ...ou want to set and then press the SELECT button Menu Operation 1 2 Normal picture level preset on this projector Standard Picture level adjusted for the picture with fine tone Cinema Picture level suitable for the image projected on a blackboard See above for further description Blackboard Green Picture level suitable for viewing picture in a bright room Dynamic At the time of simple projection on...

Страница 42: ...n the red tone From 0 to 63 White balance Red Press the Point button to lighten the green tone and the Point button to deepen the green tone From 0 to 63 White balance Green Press the Point button to lighten the blue tone and the Point button to deepen the blue tone From 0 to 63 White balance Blue Press the Point button or the Point button for Color temp level that you want to select XLow Low Mid ...

Страница 43: ...e Image Level Selection on pages 40 41 Store Exit the Image Adjust Menu Quit Note Noise reduction and Progressive cannot be selected when 480p 575p 720p 1035i or 1080i is selected p 39 Interlaced video signal can be displayed in a progressive picture Select one of the following Off disabled L1 Select L1 for an active picture L2 Select L2 for a still picture Film Select Film for watching a film Wit...

Страница 44: ...me pointer to a function and press the SELECT button Screen Menu Screen Menu icon Adjust the screen scale and position manually with this function Press the SELECT button at Custom and the Custom is displayed on the screen for a few seconds and then the Aspect dialog box appears Scale H V Adjust the Horizontal Vertical screen scale H V When set to On the aspect ratio is fixed The Scale V appears d...

Страница 45: ...sian Chinese Korean or Japanese Press the Point buttons to move the red frame pointer to the item that you want to set and then press the SELECT button The Setting dialog box appears Setting This projector has Setting menu that allows you to set up the other various functions described as follows 1 2 Set the red frame pointer to the item and press the SELECT button Press the SELECT button at Langu...

Страница 46: ...ressed while Input search is on Input search will stop Auto PC Adj On Enables Auto PC Adjustment when pressing the AUTO SETUP button on the top control Off Disables Auto PC Adjustment Auto Keystone Auto Always works and corrects keystone distortion according to the projector s tilt Manual Works only when pressing the AUTO SETUP button on the top control or the AUTO SET button on the remote control...

Страница 47: ... is unplugged Display Press the Point buttons to switch Off Countdown off On This function decides to display On Screen Displays Off Do not show On Screen Displays except Countdown off Show the input image instead of the countdown when turning on the projector Use this function when you want to project the image as early as possible even when the lamp is not bright enough On Show all the On Screen...

Страница 48: ...urning on the projector next time or pressing the NO SHOW button p 24 To capture the image select Yes To cancel the Capture function select No Notes Before capturing an image select Standard in the Image Select Menu to capture a proper image pp 31 32 40 41 A signal from a computer can be captured up to XGA 1024x768 A signal from video equipment can be captured except for 720p 1035i and 1080i When ...

Страница 49: ...by pressing the Point button Press the SELECT button so that you can change the Logo PIN code lock setting If you entered an incorrect Logo PIN code Logo PIN code and the number turns red Enter a correct Logo PIN code all over again To Change the Logo PIN code Logo PIN code can be changed to your desired four digit number Select Logo PIN code change with the Point button and press the SELECT butto...

Страница 50: ...when the projector is not used for a certain period When the input signal is interrupted and no button is pressed for more than 30 seconds the timer display with No signal appears The countdown starts to turn off the lamp Select one of the operations Ready When the lamp has been fully cooled down the POWER indicator changes to green blinking In this condition the projection lamp is turned on if th...

Страница 51: ...to stabilize after the power is turned on Stored lamp mode will be active after the lamp is stabilized Closed Caption Closed Caption is a function that displays the audio portion of a TV program as text on the screen If the input signal contains closed captions you can turn on the feature and switch the channels Press the Point buttons to select CC1 CC2 CC3 or CC4 If the closed caption is not clea...

Страница 52: ...g the code make sure the remote control operates properly Remote control Press and hold M E N U a n d IMAGE buttons for more than 5 seconds Note If the batteries are removed from the remote control for a long period of time the remote control code will be reset Filter control You can replace the filter with this function Press the SELECT button at Filter control to display a confirmation box To re...

Страница 53: ...d person and provides the following settings for security options Off the projector is not locked with a PIN code On1 require to enter a PIN code every time turning on the projector On2 require to enter a PIN code to operate the projector once the power cord is disconnected as long as the AC power cord is connected the projector can be operated without a PIN code Whenever to change the PIN code lo...

Страница 54: ...er by pressing the Point buttons And then press the Point button to fix the number and move the pointer Repeat it to complete entering a four digit number After entering the four digit number move the pointer to Set by pressing the Point button Then press the SELECT button To Change the PIN code caution when you have changed THE PIn code write down the new pin code in column of the pin code no mem...

Страница 55: ...p replacement counter without implementation of lamp replacement Be sure to reset the Lamp replacement counter only after replacing the lamp Warning log This function records anomalous operations while the projector is in operation and use it when diagnosing faults Up to 10 warning logs are displayed with the latest warning message at the top of the list followed by previous warning messages in ch...

Страница 56: ...s function is used to set a frequency for the filter replacement Use the Point buttons to move the red frame pointer to Filter counter and then press the SELECT button A dialog box appears showing the Used time option and the Scrolls remaining option Used Time Show the total accumulated time of the filter use timer setting option and the Reset options When the projector reaches a time set in the t...

Страница 57: ...led properly or the filter scroll is not working properly Fig 1 Filter replacement icon Fig 4 Filter cartridge replacement icon Fig 3 Last scroll icon Note Fig 1 Fig 2 Fig 3 Fig 4 and Fig 5 will not appear when the Display function is set to Off p 47 during Freeze p 23 or No show p 24 The filter cannot be rewinded The filter can be scrolled 9 times since the filter cartridge has 10 scrolls The fil...

Страница 58: ...ge Rotate the handle of the filter and pull out the filter cartridge Screws Filter cartridge RECOMMENDATION We recommend avoiding dusty smoky environments when operating the projector Usage in these environments may cause a poor image quality When using the projector under dusty or smoky conditions dust may accumulate on a lens liquid crystal panels or optical elements inside the projector Such co...

Страница 59: ...oint buttons to move the red frame pointer to the Setting Menu icon Use the Point buttons to move the red frame pointer to Filter counter and then press the SELECT button A dialog box appears showing the Used time option and the Scrolls remaining option Use the Point buttons to select Used time 1 2 Resetting the Filter Counter Another confirmation dialog box appears select Yes to reset the Filter ...

Страница 60: ...n become very hot CAUTION CAUTION When replacing the lamp because it has stopped illuminating there is a possibility that the lamp may be broken If replacing the lamp of a projector which has been installed on the ceiling you should always assume that the lamp is broken and you should stand to the side of the lamp cover not underneath it Remove the lamp cover gently Small pieces of glass may fall ...

Страница 61: ...he lamp cover and tighten the screw Loosen the screw with a screwdriver slide and open the lamp cover Connect the AC power cord to the projector and turn on the projector Reset the lamp replacement counter See Resetting the Lamp Counter on the next page 1 2 3 4 5 6 ORDER REPLACEMENT LAMP Replacement lamp can be ordered through your dealer When ordering a projection lamp give the following informat...

Страница 62: ...nment of use There is no guarantee of the same life for each lamp Some lamps may fail or terminate their life in a shorter period of time than other similar lamps If the projector indicates that the lamp should be replaced i e if the LAMP REPLACE indicator lights up replace the lamp with a new one IMMEDIATELY after the projector has cooled down Follow carefully the instructions in the Lamp Replace...

Страница 63: ...w Did you provide appropriate space for the projector to be ventilated Check the installing condition to see if ventilation slots are not blocked Is the projector not installed near the ventilation duct of air conditioning equipment which may be hot Install the projector away from the ventilation duct of air conditioning equipment Is the air filter clean Replace the filter periodically p 52 The pr...

Страница 64: ...he projector is not in use put the projector in an appropriate carrying case to protect it from dust and scratches Cleaning the Lens Cover Disconnect the AC power cord before cleaning Follow these steps to clean the lens cover Softly wipe the lens cover with a cleaning cloth that contains a small amount of non abrasive camera lens cleaner or use lens cleaning paper or a commercially available air ...

Страница 65: ...r Off are not chosen at Logo select as the default set see page 48 Input signal switches automatically or does not switch automatically Make sure Input search function is adjusted properly See page 46 Image is out of focus Adjust the focus of the projector See page 22 Provide proper distance between the projector and the projection screen See page 13 Check the lens cover to see if it needs cleanin...

Страница 66: ...adjusting setting Some settings can not be stored if not registered with Store see pages 30 43 Some displays are not seen during operations Check the Display item See page 47 Power management does not work Power management function can not work while Freeze or No Show function is running see pages 23 24 Capture function does not work Check the connection and the input signal to see if there is sig...

Страница 67: ... Give the model number and explain about the problem We will advise you how to obtain service This symbol on the nameplate means the product is Listed by Underwriters Laboratories Inc It is designed and manufactured to meet rigid U L safety standards against risk of fire casualty and electrical hazards The CE Mark is a Directive conformity mark of the European Community EC Indicator blinks or ligh...

Страница 68: ...isplay area H Reset Mode free 0 31 PC Adjust Mode 3 Mode 4 Mode 5 Quit Yes No H sync freq V sync freq Quit Mode 1 Mode 2 Display area V Store Mode 3 Mode 4 Mode 5 Quit Mode 1 Mode 2 Quit Video Auto Go to System 3 Go to System 3 Video Go to System 3 Go to System 1 S video Quit Quit Quit RGB AV HDCP Computer 1 Digital RGB PC digital Computer 1 Analog Go to System 2 Component Go to System 1 Computer ...

Страница 69: ...Common Reset Quit H V H V Yes No Yes No Colorboard Dynamic Cinema Blackboard Green Image 1 Image 2 Image 3 Image Select Image 4 Standard Video Input Auto 1080i 1035i 720p 575p 480p 575i 480i System 2 Auto PAL SECAM NTSC NTSC 4 43 PAL M PAL N System 3 Colorboard Image Adjust Contrast Brightness Color temp Red Green Blue Gamma Store Quit 0 63 0 63 High 0 63 0 63 0 63 0 15 Image 1 Image 2 Image 3 Ima...

Страница 70: ...o Code 1 Code 2 Key lock Off Projector Remote Control Quit PIN code lock entry PIN code lock Off On1 PIN code change Quit Quit Reset Quit Yes No Lamp counter Custom Scale H V Position Common Reset Quit H V H V Yes No Yes No On2 Language Setting English Italian Spanish Portuguese Dutch Polish Chinese Korean Japanese Quit Russian Swedish Finnish Romanian Hungarian German French Auto setup Input sear...

Страница 71: ...ase wait off blinking slow approx 2 seconds ON 2 seconds OFF blinking fast approx 0 5 seconds ON 0 5 seconds OFF red The temperature inside the projector is elevated close to the abnormally high level The temperature inside the projector is abnormally high The projector cannot be turned on When the projector is cooled down enough and the temperature returns to normal the POWER indicator lights red...

Страница 72: ...pear when the Display function is set to Off p 47 during Freeze p 23 or No show p 24 Fig 2 Filter replacement icon Fig 4 Filter cartridge replacement icon Fig 3 The filter cartridge is not installed in the projector Check the filter compartment to see if the filter cartridge is installed in the projector When the filter cartridge is installed and the indicators continue to light and blink read the...

Страница 73: ...900 71 40 75 60 SXGA 11 1152 x 900 61 20 65 20 SVGA 10 800 x 600 32 70 51 09 SXGA 13 1280 x 1024 50 00 86 00 Interlace ON SCREEN DISPLAY RESOLUTION H Freq kHz V Freq Hz VGA 1 640 x 480 31 47 59 88 VGA 2 720 x 400 31 47 70 09 VGA 3 640 x 400 31 47 70 09 VGA 4 640 x 480 37 86 74 38 VGA 5 640 x 480 37 86 72 81 VGA 6 640 x 480 37 50 75 00 SXGA 1 1152 x 864 64 20 70 40 ON SCREEN DISPLAY RESOLUTION H Fr...

Страница 74: ...x 768 1280 x 768 1280 x 768 D SXGA1 D SXGA2 D SXGA 1 D 720p D SXGA3 D VGA D 480p D 575p D SVGA D WXGA 1 D XGA D WXGA 2 D WXGA 3 D WXGA 4 D WXGA 5 D WXGA 6 D WXGA 7 ON SCREEN DISPLAY H Freq KHz V Freq Hz 31 47 59 94 31 47 59 88 31 25 50 00 37 879 60 32 48 36 60 00 43 363 60 00 47 70 60 00 48 36 60 00 56 160 72 000 46 500 50 000 47 776 59 870 60 289 74 893 RESOLUTION 1280 x 720 1920 x 1035 1920 x 10...

Страница 75: ...ideo Input Jack RCA Type x 1 S video Input Jack Mini DIN 4 pin x 1 Audio Input Jacks RCA Type x 2 Computer Input 1 DVI I Digital Analog RGB DVI I Terminal x 1 Computer Input 2 Component Input Analog RGB Mini D sub 15 pin Terminal x 1 Monitor Output Analog RGB Mini D sub 15 pin Terminal x 1 Computer2 Component Audio Input Jack Mini Jack stereo x 1 Computer1 Audio Input Jack Mini Jack stereo x 1 Con...

Страница 76: ...s are manufactured to the highest possible standards Even though 99 99 of the pixels are effective a tiny fraction of the pixels 0 01 or less may be ineffective by the characteristics of the LCD panels Model No COMPONENT VGA Cable AH 98771 SCART VGA Cable AH 98881 The parts listed below are optionally available When ordering those parts specify the item and Model No to the sales dealer Optional Pa...

Страница 77: ...12 11 14 15 Appendix R X D T X D SG RTS CTS Serial 1 2 3 4 5 6 7 8 9 DVI I DIGITAL ANALOG 1 9 17 2 10 18 3 11 19 4 12 20 5 13 21 6 14 22 7 15 23 8 16 24 C1 C2 C3 C5 C4 T M D S Data2 No Connect T M D S Data2 No Connect T M D S Data2 Shield DDC Clock DDC Data Analog Vert sync 1 5 2 4 3 6 7 8 T M D S Data1 No Connect T M D S Data1 No Connect T M D S Data1 Shield 5V Power Ground for 5V Hot Plug Detect...

Страница 78: ... 0 410 0 5 91 150 2 3 04 77 3 3 52 89 4 2 17 55 2 10 35 262 8 10 50 266 8 3 35 85 0 4 04 102 7 4 38 111 2 2 81 71 5 2 17 55 0 56 3 143 0 230 0 50 0 50 8 102 0 97 0 30 0 1 97 16 14 Unit inch mm Screw Holes for Ceiling Mount Screw M4 Depth 0 47 12 0 ...

Страница 79: ...ce station PIN Code Number Memo Factory default set No 1 2 3 4 Should the four digit number be changed the factory set number will be invalid PIN Code Lock No Logo PIN Code Lock No Factory default set No 4 3 2 1 While the projector is locked with the PIN code Put the label below supplied on in a prominent place of the projector s body while it is locked with a PIN code Appendix ...

Страница 80: ... O Box 156 310 First St Unit 2 Midland ON L4R 4K8 Canada Tel 800 563 3454 705 527 4084 Fax 800 567 4069 705 527 4087 E Mail canada eiki com Eastern Europe EIKI CZECH spol s r o Um lecká 15 170 00 Praha 7 Czech Republic Tel 42 02 20570024 42 02 20571413 Fax 42 02 20571411 E Mail easterneurope eiki de South East Asia EIKI Industrial M Sdn Bhd No 3A 2C 4th Floor Jalan PJU 8 3A Perdana Business Centre...

Отзывы: