background image

8

2

3

1

Operator’s Manual Park Ranger 2150

Operator’s Manual Park Ranger 2150

1.1  Safety - continued

Avoid crushing fingers

Keep your hands and fingers away from areas where 

there is a danger of crushing.

The A-frame

Take care not to catch your fingers in the A-frame for 

the various attachments. (Picture 1)

Exhaust pipe

Make sure not to touch the exhaust pipe as this 

becomes very hot when the machine is operating. 

(Picture 2)

The Engine

Caution! All components in the Engine can become 

very hot!

Fan belt

Make sure not to catch your fingers in the fan or the 

fan belt. (Picture 2)

Avoid damage to your hearing

Always wear approved ear protectors when 

using the machine. (Picture 3)

Other hazards

There may be other circumstances and 

situations than those mentioned above 

where it may be dangerous to use the Park 

Ranger 2150.

Maintenance

Before carrying out servicing and 

maintenance please make sure to pull the 

hand brake, stop the engine and turn off 

the main switch of the machine.

Protection against lightning strike

The driver is protected from lightning 

strikes inside the cabin.

The cabin works like a Faraday cage.

Keep the windows closed and make sure 

you put

your hands close to your body.

Do not touch fittings or any metal parts.

Avoid crushing fingers

Exhaust pipe                     Fan belt

General information

Use approved hearing protection 

Содержание Park Ranger 2150

Страница 1: ...Operator s manual Basic machine Park Ranger 2150 ...

Страница 2: ...nt operator Do not lend it to anyone who has not been thoroughly trained and who has not read this manual carefully The operator s manual should be considered a permanent part of the machine and must remain with the machine if sold Warnings Some items in this operator s manual are marked with this warning symbol The warning indicates areas where extra care has to be taken to avoid personal injury ...

Страница 3: ...al 33 2 1 Daily checks before start up 33 2 2 Starting operating and stopping 35 2 2 Starting operating and stopping 36 2 3 Trailer 40 Service and Maintenance 42 3 1 Daily maintenance 42 3 2 Lubrication 43 3 3 Park Ranger 2150 service and maintenance chart 44 3 4 Hydraulic system 46 3 5 Engine maintenance 47 3 6 Fuel 49 3 7 Radiator 51 3 8 Air filter 52 3 9 Windscreen washer liquid 52 3 10 Battery...

Страница 4: ...Introduction ...

Страница 5: ...ng in spring and autumn mowing grass and lawn edge cutting in the summer and sweeping snow and spreading gravel and sand in the winter Easy attachment changeover Attachments can be changed quickly and easily in less than four minutes Publication This manual is made in accordance with the requirements in standard ISO 3600 1996 To order this manual please refer to this item number E97200000 This man...

Страница 6: ...General information ...

Страница 7: ...nsive Picture 2 Avoid accidents with battery acid and gases Batteries contain explosive gases and acid Please take the greatest care when handling batteries Picture 3 Avoid accidents with exhaust fumes Exhaust fumes can cause illness or even death If the engine is to run in an enclosed room the exhaust fumes must be led outside using an exhaust hose for example If there is no ventilation system in...

Страница 8: ... damage to your hearing Always wear approved ear protectors when using the machine Picture 3 Other hazards There may be other circumstances and situations than those mentioned above where it may be dangerous to use the Park Ranger 2150 Maintenance Before carrying out servicing and maintenance please make sure to pull the hand brake stop the engine and turn off the main switch of the machine Protec...

Страница 9: ...Grass Collecting 1000 LMC1000 Hopper for Grass Collecting GC500 Lawn Edger 22VKS1 Flail Mower Verticutter 21SLK Leaf Suction Unit LS100U Hedge Trimmer HK 1300 MINI 2200 Tipping Shovel VS200 Tipper Trailer ST2150 All Purpose Tipper Trailer TV600 Enviromental rake MR1100 Load carrier ST2150 Snow Sweeper 21SK1205 Dozer blade 21DZ1305 Snow V blade FS1300VLE Snow Blower SN100 Salt and Sand Spreader 215...

Страница 10: ...uilding or addition of implements accessories or other equipment not manufactured by Egholm automatically results in the cancellation of type approval CE approval any other approval as well as any warranty on machine and attachments Unless otherwise agreed in writing between the operator customer and Egholm Egholm is the data originator data originator of all data generated by the machine and atta...

Страница 11: ...es 2 650 kg Trailer without brakes 750 kg Trailer with overrunning brakes 1 500 kg Permitted axle load front 740 kg Permitted axle load rear 740 kg Tyres Tire size 18 x 9 5 8 74 A4 Tire pressure 1 6 bar or 24 psi Engine Type manufacturer Perkins Diesel Type 403J 11 Engine power 25 7Hk 18 9kW at 2800 rpm Cylinders 3 EU Norm Stage V Please refer to the engine operator s manual for additional technic...

Страница 12: ...ulic oil Hydraulic oil type Texaco Rando HDZ 68 Tank capacity 15 l Working pressure Up to 225 bar Brakes Operating brakes Hydrostatic Parking brakes Mechanical Sound measurements Running CR EU No 1322 2014 ann VIII 2018 830 76 dB A Pass by CR EU No 1322 2014 ann VIII 2018 830 75 dB A Machine operator position open windows CR EU 2018 895 80 dB A Machine operator position closed windows CR EU 2018 8...

Страница 13: ...nd fulfills OECD Code 7 Contact with harmful and unhealthy substances The classification of the cab is according to EN 15695 1 Category 1 This type of cab does not protect you from harmful and unhealthy substances Park Ranger 2150 can NOT be used in environments which require protection of the driver against harmful and unhealthy substances Park Ranger 2150 electrical diagram and hydraulic diagram...

Страница 14: ...en you press the door handle button Picture 1 To enter the cab simply step directly in Picture 2 To leave the cab open the door with the inside door handle The doors will open when you press the door handle down Picture 3 Both doors can be used as an emergency exit Outside door handle button Cab floor Inside door handle Press down General information ...

Страница 15: ...pull back the window handle Picture 1 2 Roof hatch The cab is equipped with a roof hatch The roof hatch will open when you push the handle upwards Picture 3 Safetybelt Picture 4 Handles for entering the machine Picture 5 Pull out small button Roof hatch handle Pull back handle for window to open General information Safety belt Handles for entering the machine ...

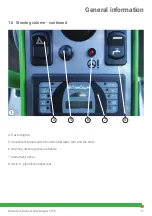
Страница 16: ...16 2 3 1 1 Operator s Manual Park Ranger 2150 1 6 Steering column Steering column 1 12V Connector 2 Horn switch 3 Ignition key General information ...

Страница 17: ...l Park Ranger 2150 1 6 Steering column continued 4 Hazard lights 5 Instrument panel switch to switch between rpm and the timer 6 Warning steering pressure failure 7 Instrument panel 8 Switch electrical socket rear General information ...

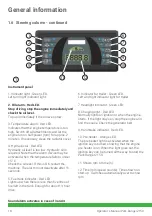
Страница 18: ...e oil level If this is OK restart the machine The alarm must deactivate after 15 seconds 5 Fuel tank indicator Red LED Lights up when there is less than five litres of fuel left in the tank Enough for about 1 hour drive 6 Indicator for trailer Green LED Left and right indicator light for trailer 7 Headlight indicator Green LED 8 Charging light Red LED Normally lights on ignition or when the engine...

Страница 19: ...19 2 3 1 4 1 Operator s Manual Park Ranger 2150 Steering column 1 Throttle 2 Handbrake 3 Indicator light switch stalk 4 Fuses See section 1 13 1 6 Steering column continued General information ...

Страница 20: ...os 1 Locked oil flow activated attachment operating Pos 0 Neutral depends on the attachment Pos 2 The attachment operates in the reverse direction 3 Lever C Activation of hydraulic connectors C1 and C2 for rear mounted attachments Pictures 1 2 3 Pos 1 Raises tilts the attachment depends on the attachment Lever C can be locked in pos 1 by using the locking handle This function must be used during w...

Страница 21: ... lifter completely by pushing lever C up to position 1 Picture 2 Unlock rear lift Pull the lock backwards and up in the locking slot Picture 3 Lock rear lift Pull the lock out of the locking slot and release it can be done with the rear lift in raised or lowered position Picture 4 Lock rear lift Rear lifter Unlock rear lift General information Lever C ...

Страница 22: ...y for external vacuum hose A Park the basic machine and lock the parking brake B Keep the start button for attachment operation depressed while operating lever D Start button must be pushed for min 1 sec for lever D to stay in Picture 2 6 Parking brake Activation of parking brake press the brake pedal to its lowest position The parking brake can then be slid forward Release the brake pedal and the...

Страница 23: ...the A frame in place so that the A frame cannot be lowered during driving Picture 1 2 10 Towing lever The towing lever under the machine is for moving the utility machine manually Picture 3 4 When the towing lever is in open position the machine can be towed without starting the engine The towing lever is in open position when the lever is horizontal Warning When the towing lever is in open positi...

Страница 24: ...Windscreen wipers Wipe 8 Cab heater Position 1 Half power Position 2 Full power 9 Plug for headphones 10 Ceiling light Position 1 White light Position 2 Red light 11 Radio see operator s manual for radio Adjustment ventilation and heating To switch on cab heating turn the lever pos 1 to horizontal position The cabin fan must also be activated To ventilate the cabin without heating turn the lever p...

Страница 25: ...m the rear of the Park Ranger 2150 Push it into place so that it is seated in the locking handle on the frame Picture 2 B Pull the locking handle out and turn it to the left while the load carrier is pushed into position Picture 3 C Make sure that the locking handle is locked in position in the locking eye Pull the load carrier to make sure that it is locked in position Picture 4 Load carrier Lock...

Страница 26: ...d The seat height can be adjusted both up Anticlockwise and down Clockwise by turning the height adjustment knob Picture 1 handle 3 Longitudinal adjustment Move the adjustment handle to the right to unlock the guides When adjustment is completed ensure that the handle clicks and locks the guides Check that the seat does not move longitudinally Picture 1 handle 1 Pneumatic suspension COBO Picture 2...

Страница 27: ...perator is seated so that the seat is loaded The seat height can be adjusted upward in 3 steps by turning the height adjustment knob Picture 1 handle 3 Longitudinal adjustment Move the adjustment handle upwards to unlock the guides When adjustment is completed ensure that the handle clicks and locks the guides Check that the seat does not move longitudinally Picture 1 handle 1 Lumbar support Set a...

Страница 28: ...The oil cooler cover is removed downwards at an angle Fitting A Insert the top edge of the oil cooler cover at an angle under the rim of the opening in the Park Ranger 2150 Picture 1 B Push the oil cooler cover into position Fitting the oil cooler cover General information ...

Страница 29: ... the utility machine behind the cover at the steering wheel panel To access these fuses remove 4 hand screws Picture 1 2 Main fuse To access the main fuse open the engine cover The fuse 50 Amp is located in the engine compartment below the exhaust pipe Picture 3 Main switch To start the Park Ranger 2150 the main switch on the left hand side of the machine must be ON The main switch controls all po...

Страница 30: ...railer Free Fuse 5 12 K1 Hyd level K2 water level Free Free Free KT5 KT1 Fuse Size Function F1 20A Oilcooler Fuel pump F2 10A Safety circuit F3 20A Plug left side F4 20A Plug V plough F5 15A Low beam Signal supply F6 10A Horn Rear Work light Radio F7 15A Fan cab Trailer plug F8 15A Beacon Wiper system F9 15A L Pos Light F10 15A R Pos Light Radio emergency line F11 10A Start relay F12 10A Control p...

Страница 31: ...r KT3 Seat timer K5 K6 KT4 Impuls relay intentional startup KT4 K3 Anti startup K7 K8 K4 Hot bulb timer feedback K5 Intentional startup safty KT2 K6 Intentional startup safty K7 Brake light K8 Lights General information 1 13 Fuses and relay overview continued Relay placed below the driver s seat ...

Страница 32: ...Operator s manual ...

Страница 33: ...C Open the engine cover lock by pushing the locking button with key for bonnet 1 down and then opening the catch 2 D Open the engine cover Picture 1 It is important to check the following before starting the machine Hydraulic oil The oil must be visible in the glass but not above the red dot Filling see Maintenance Section 3 4 Picture 2 Engine oil The oil level must be between the two lines on the...

Страница 34: ...he expansion tank Picture 1 Warning Never remove the radiator cap when the engine is hot You may risk scalding or burns Diesel oil Tank capacity 20 litres The control light comes on when 5 litres remain sufficient for approx 1 hours This light can only work when the Park Ranger 2150 is switched on Picture 2 3 Topping up Diesel Control light for diesel Check coolant Operator s manual ...

Страница 35: ...let the engine run in a closed area there is a risk of asphyxiation The braking distance of your vehicle increases when the road is wet and or when your vehicle is loaded Be aware of the steering sensitivity and reactivity Always put on the safety seat belt Never drive with an open door If an alarm lamp is on or flashing when driving please stop in a safe place and refer to this manual see Section...

Страница 36: ...ves the seat the Park Ranger will stop Warning If the hand breake is on it is possible to start the machine without anyone sitting on the driver s seat D Press the brake pedal 1 down to its lowest position and slide the parking brake 2 back Picture 4 E Pull the throttle 3 approx 1 4 of the distance F Insert the key and turn it 4 clockwise until the pre heater indicator 5 lights up along with the o...

Страница 37: ...ly when the oil the machine is cold The Park Ranger 2150 is optimized to run at an operating temperature mode The drive pedal can be used as a brake function The brake light comes on if the drive pedal is released quickly The stopping distance varies when the Park Ranger 2150 is cold Warning Out of consideration for the hydraulic system it is important that the machine reaches operating temperatur...

Страница 38: ... position counter clockwise and remove the key Picture 3 Operation with front mounted attachments If an attachment is fitted to the Park Ranger 2150 it must be raised above the ground before the machine is driven To lift the attachment push lever A to the top position Release lever A once the attachment has reached the appropriate height Picture 1 For transport over long distances the transport lo...

Страница 39: ...ions from the manuals have to be followed Warning Before stopping the Park Ranger always lower the front attachment or activate the transport lock Never leave a rear attachment in tipped position Warning always stop the machine before connecting the attachments hydraulics connectors Warning Always remove the key and turn of the main switch before working on the machine Operator s manual ...

Страница 40: ...trailer to the coupling and make sure that the connection lock is activated Lift the support wheel on the trailer NOTE If the trailer is fitted with overrun brakes remember to attach the security wire on the trailer to the coupling Light To connect the light on the trailer insert the cable plug from the trailer into the connector on Park Ranger 2150 Check its function Hydraulics If the trailer has...

Страница 41: ...Service and maintenance ...

Страница 42: ...side Picture 1 B Blow the radiator fins and the cover clean with compressed air C The radiator fins can be washed with clean water Warning Do not use hard implements when cleaning the body of the radiator as this can damage the fins Cleaning the oil cooler A Remove the oil cooler cover Picture 2 B Blow the cover and the cooler clean with compressed air Warning The cooler must be cleaned with compr...

Страница 43: ... of good quality grease every 15 hours or so There are two lubricating nipples by the A frame and four by the steering cylinders Picture 1 2 3 Cables and moving parts Lubricate with a few drops of oil every 15 hours or so Lubricating nipples A frame Lubricating nipples steering cylinders Service and Maintenance Lubricating nipples steering cylinders ...

Страница 44: ...Battery m m m l Brakes m m X m X Hydraulic connections 4 t t t t Lights m m m m Engine Air filter main 3 t l l l Air filter safety 3 t l l l Engine Oil m l l l Engine Oil filter l l l Fuel filter m l l l Belt Alternator m m l l Coolant m m m m l Coolant hoses and collars m m m Water Radiator 3 t m t t Water Radiator pressure cap m m Cooling fan clearance m m Water temperatur sensor m m Engine moun...

Страница 45: ...ydraulic oil filter return l l l Hydraulic oil cooler 3 t m t t Hydraulic oil filter transmission l l l PTO pressure relief valve m m Hydraulic hoses m m m Lubrication Steering cylinder left 5 X X X Steering cylinder right 5 X X X A frame 5 X X X 1 See manual for correct pressure 2 Tightning torque 3 If the machine is operated in a very hot or dusty environment more frequent service may be necessa...

Страница 46: ... and filling cap and pour in Texaco Rando HDZ 68 hydralic oil Picture 2 D Replace the cap and start the engine E Check that the oil fills of the glass while the engine is running F Close bonnet and mount the radiator cover Tank filter Replace the filter and clean the housing during service procedures Picture 3 Hydraulic oil filter A Remove the oil filter under the Park Ranger 2150 and let the oil ...

Страница 47: ...level is below the bottom line 7 Always check to make sure that the oil level is correct Filling with engine oil 1 Remove the oil cap Picture 2 2 Pour in oil until the engine contains approx 3 litres 3 Wait approx 5 minutes after pouring in the oil 4 Then check the oil level again It may take a little time for the oil to reach the oil pan Changing the oil in the engine Change the oil after the fir...

Страница 48: ...ches the temperature range in the surroundings where the machine is operating Picture 1 Changing the engine oil filter 1 Use a filter spanner to remove the oil filter Picture 2 2 Apply a thin layer of oil to the new filter gasket 3 Fit the new filter by hand DO NOT use a filter spanner as this will over tighten the filter 4 Turn the engine on and let it run for a while to check that the filter sea...

Страница 49: ...from dirt when filling up dirt can cause problems in the injection pump Do not let the engine run out of fuel as this can create air bubbles in the fuel system Cleaning and replacing the fuel filter Always clean the filter in a clean area 1 Unscrew the filter Picture 2 2 Fit the new filter 3 Bleed the fuel system It is important to bleed the fuel system 1 When the fuel filter and hoses have been r...

Страница 50: ...ts Warning Do not bleed the system while the engine is very hot If fuel is spilled on a hot exhaust manifold it can cause a fire Warning Switch off the engine before checking or replacing fuel hoses Damaged fuel hoses can cause a fire Checking the fuel hoses during every service 1 Check for loose clips Apply a little oil to the screw and tighten 2 If any fuel hoses or clips appear worn replace the...

Страница 51: ...lling up with coolant Filling coolant A Remove the radiator cap and pour coolant into the expansion tank so the level of coolant reaches above the cross rod in the upper part of the expansion tank Capacity approx 4 litres B The coolant should consist of 50 pure water and 50 radiator fluid or as described on the label on the packaging C Replace the radiator cap carefully after filling up with coola...

Страница 52: ...the vacuum valve every day to remove large particles of dirt and dust when the Park Ranger 2150 is being used in dusty environments A Open the air filter housing B Remove the filter unit C Clean the air filter housing with a clean cloth D Carefully blow the unit clean from the inside with compressed air E Replace the filter unit and close the filter housing Pictures 2 3 3 9 Windscreen washer liqui...

Страница 53: ...machine The short circuit caused by this happening will generate sparks D Avoid sparks and naked flames Do not smoke E When replacing the battery always connect the positive cable first and then the negative cable Warning Both the explosive gases and the sulphuric acid that the battery contains can cause blindness and serious burns Charging Connect the positive terminal of the charger to the posit...

Страница 54: ...th your finger It should give approx 7 9 mm under 10 kg of pressure B Also check the fan belt for cracks and tears Picture 1 Regulation of tension Loosen the two bolts that hold the generator in place and adjust its position to provide the necessary tension Remember to retighten the nuts and bolts after adjustment 3 12 Articulated joint If there is any play in the articulated joint the bearings ne...

Страница 55: ...pen position Tow the machine When you have finished towing turn the valve until the lever is in the vertical position The towing valve must be closed If not the machine will not run Warning Do not start the machine until the towing valve has been closed Attention When towing there is no servo system Always tow the machine at low speed These towing points are also used for safe transport of the Par...

Страница 56: ...Straps at the front Anchoring at the front 3 14 Transporting the Park Ranger 2150 To transport the vehicle if necessary cross the restraint straps and attach them to the four transport securing rings of the vehicle Picture 1 2 3 4 Straps at the rear Anchoring at the rear ...

Страница 57: ... wrench 1 Place the jack either in the front or at the rear depending on which tyre you need to change 2 When the jack is placed loosen the tyre bolts 3 Then lift up the utility machine with the jack until it is possible to remove the old tyre 4 Change the tyre and tighten the bolts with your hands 5 Lover the jack and tighten the bolts once again with the wheel wrench 6 Retighten the bolts again ...

Страница 58: ...ption 1 Check each break the mark on the wheel flange may not be covered by the brake drum If the mark is covered the drum needs replacement Picture 2 3 Option 2 Check each break find the bonnet key it is placed in the keychain with the tractor starter key Picture 3 4 The wheel flange must be outside the bonnet key If the flange is covered or almost covered the drum must be replaced Place the bonn...

Страница 59: ...Conditions ...

Страница 60: ...d defects which cannot be traced back to defects in material or production errors 5 This warranty is valid for persons who have legally acquired the machine within the warranty period 6 In the event of failure to perform and substantiate service in accordance with the applicable instructions Egholm reserves the right to reject any claim made within the warranty period 7 Egholm reserves the right t...

Страница 61: ...3 Disposal When many years from now your Park Ranger 2150 has reached the end of its working life it should be disposed of in a responsible manner that conforms to relevant disposal regulations 1 Used hydraulic oil engine oil diesel oil coolant and AC coolant are to be delivered at an approved waste disposal facility or site 2 Remove the plastic and rubber parts and dispose of them in accordance w...

Страница 62: ...Wearing parts ...

Страница 63: ...150 E01100250 Tyres and wheels E01006500 Air filter E04003050 Hydraulic filter E04003060 Hydraulic oil filter E01020020 Oil filter E90501643 Filter kit 2150 E05001080 Bulb main light E01020010 Fuel filter E50000656 Fan belt 2150 E05001050 Bulb rotary light Wearing parts ...

Страница 64: ...ndicator E05001090 Bulb indicator switch E05001040 Bulb parking light front E04501200 Hydraulic connector male 1 4 E04501230 Hydraulic connector female 1 4 E04501250 Hydraulic connector female E01006505 Safety element air filter E04501240 Hydraulic connector female 3 8 5 1 Wearing parts Park Ranger 2150 continued Wearing parts ...

Страница 65: ...65 Operator s Manual Park Ranger 2150 Notes ...

Страница 66: ...66 Operator s Manual Park Ranger 2150 Notes ...

Страница 67: ...67 Operator s Manual Park Ranger 2150 Notes ...

Страница 68: ...E97200000_C1_01 EN Egholm A S Transportvej 27 7620 Lemvig Denmark T 45 97 81 12 05 www egholm eu info egholm dk ...

Отзывы: