Egholm 22VKS1 Скачать руководство пользователя страница 14

14

Operator’s Manual City Ranger 2250 Lawn edger

Conditions

4.1 Warranty

The warranty period for the materials and manufacture of this lawn edger is 12 months from the date 
of purchase. In case of errors or defects on the machine within the warranty period, Egholm will carry 
out the necessary repairs at no charge to the customer, including materials and working hours, in 
accordance with the terms and conditions listed below.

The scope of the warranty:

1. The Egholm warranty is only valid on presentation of the original receipt supplied with model 
description, serial number and date of purchase.

2. Regular checks, adjustments, services and technical alterations are not covered by the warranty.

3. All inquiries concerning the warranty are to be addressed to the dealer where the machine was 
purchased.

4. This warranty does not cover faults and defects which cannot be traced back to defects in material or 
production errors.

5. This warranty is valid for persons who have legally acquired the machine within the warranty 
period.

6. In the event of failure to perform and substantiate service in accordance with the applicable 
instructions, Egholm reserves the right to reject any claim made within the warranty period.

7. Egholm reserves the right to make improvements and design-related alterations to the machine 
without being obliged to modify previously delivered models in relation hereto.

The warranty does not cover:

· Wear and tear, accidents, damage to the equipment caused by operating errors, negligence, changes 
to the construction of the machine or use of non-Nilfik Outdoor spare parts or attachments.

· Machines with illegible serial numbers.

· Damage caused by force majeure such as lightning, flood, fire, war, civil disturbance, wrongfully 
perfomed maintenance or lack of the same, consequential damages or other causes over which Egholm 
has no control.

Содержание 22VKS1

Страница 1: ...City Ranger 2250 LAWN EDGER Operator s manual ...

Страница 2: ...h training to become a competent operator Do not lend to anyone who has not been thoroughly trained and who has not read this manual carefully The operator s manual should be considered a permanent part of the machine and must remain with the machine if sold Warnings Some items in this operator s manual are marked with this warning symbol The warning indicates areas where extra care has to be take...

Страница 3: ...ke sure the snap couplings are clean before attaching as this protect the hydraulic system Daily cleaning and maintenance will extend the lifetime of both the machine and the attachment Operator s Manual City Ranger 2250 Lawn edger Contents General information 4 1 1 Safety 4 1 2 EC Declaration of Conformity 5 1 3 Technical data 6 Operator s manual 7 2 1 Assembly Disassembly 7 2 2 Before start up 8...

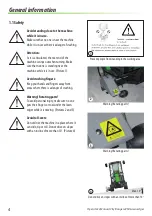
Страница 4: ... fingers away from areas where there is a danger of crushing Warning Rotating parts To avoid personal injury make sure no one puts their fingers or toes under the lawn edger while it is moving Pictures 2 and 3 Avoid roll overs Do not drive the machine in a place where it can slide tip or roll Do not drive on slopes with an incline of more than 10 Picture 4 Operator s Manual City Ranger 2250 Lawn e...

Страница 5: ...gholm A S Address Transportvej27 DK 7620Lemvig Telephone 45 97 81 12 05 hereby declares that Machine Lawn edger 2250 Type 22VKS1 has been manufactured in conformity with the provisions of the Machinery Directive 2006 42 EU Place Lemvig Date Signature Knud Olsen Senior Engineer Generalinformation ...

Страница 6: ...h L Width W Height with cab H Offset Assembled 2 640 mm 1 220 1 370 mm 1 960 mm 150 mm Storage dimensions 540 mm 930 1 080 mm 520 mm Technical data Type Weight of lawn edger Ground clearance below blade lifted Max cutting depth 22VKS1 50 kg 140 mm 95 mm Attention Specifications may change without notice ...

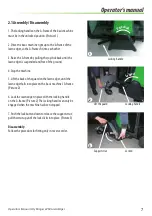
Страница 7: ...ard on the lawn edger until the lawn edger falls into place on the basic machine s A frame Picture 2 6 Lock the lawn edger in place with the locking handle on the A frame Picture 2 The locking handle can only be engaged when the machine has been stopped 7 Push the lock button down to release the support strut pull the strut up until the lock clicks into place Picture 3 Disassembly Follow the proce...

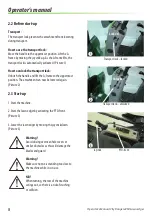
Страница 8: ...tion The attachment can now be lowered again Picture 2 2 3 Start up 1 Start the machine 2 Start the lawn edger by activating the PTO front Picture 3 3 Lower the lawn edger by moving the joystick down Picture 3 Warning Avoid driving over manhole covers or similar obstacles as this will damage the blades and guard Warning Make sure no one is standing too close to the machine while it is in use N B W...

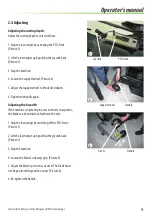
Страница 9: ...Adjusting the breadth If the machine is operating in areas with very sharp turns the blade can be turned out further to the side 1 Stop the lawn edger by switching off the PTO front Picture 1 2 Lift the lawn edger up by pulling the joystick back Picture 1 3 Stop the machine 4 Loosen the blade s sideways grip Picture 3 5 Adjust the blade s position as desired The blade must not be positioned beyond...

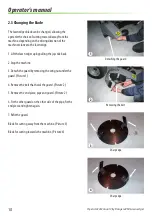
Страница 10: ...2 Stop the machine 3 Detach the guard by removing the wing nut under the guard Picture 1 4 Remove the bolt that holds the guard Picture 2 5 Remove the end piece pipe and guard Picture 2 6 Fit the other guard on the other side of the pipe fit the end piece and tighten again 7 Refit the guard Blade for cutting away from the machine Picture 3 Blade for cutting towards the machine Picture 4 Detaching ...

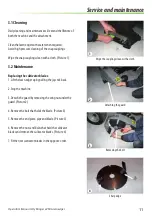
Страница 11: ...edger up by pulling the joystick back 2 Stop the machine 3 Detach the guard by removing the wing nut under the guard Picture 2 4 Remove the bolt that holds the blade Picture 3 5 Remove the end piece pipe and blade Picture 3 6 Remove the nuts and bolts that hold the cultivator blades and remove the cultivator blades Picture 4 7 Fit the new cultivator blades in the opposite order Operator s Manual C...

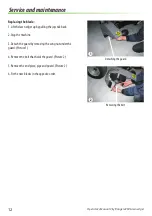
Страница 12: ...r up by pulling the joystick back 2 Stop the machine 3 Detach the guard by removing the wing nut under the guard Picture 1 4 Remove the bolt that holds the guard Picture 2 5 Remove the end piece pipe and guard Picture 2 6 Fit the new blades in the opposite order Operator s Manual City Ranger 2250 Lawn edger ...

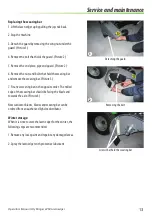
Страница 13: ...and remove the wearing bar Picture 3 7 Fit a new wearing bar in the opposite order The milled edge of the wearing bar should be facing the blade and towards the axle Picture 3 New cultivator blades blades and wearing bar can be ordered from an authorised Egholm distributor Winter storage When it is time to store the lawn edger for the winter the following steps are recommended 1 Remove any loose p...

Страница 14: ...ver faults and defects which cannot be traced back to defects in material or production errors 5 This warranty is valid for persons who have legally acquired the machine within the warranty period 6 In the event of failure to perform and substantiate service in accordance with the applicable instructions Egholm reserves the right to reject any claim made within the warranty period 7 Egholm reserve...

Страница 15: ... of safe and satisfied use of your machine Best regards Egholm A S 4 3 Disposal When many years from now your lawn edger has reached the end of its working life it should be disposed of in a responsible manner that conforms with relevant disposal regulations 1 Used hydraulic oil is to be disposed of at an approved waste disposal facility or site 2 Remove and dispose of all plastic and rubber parts...

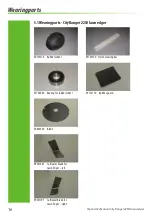
Страница 16: ...er 09701270 Rubber wheel 01700040 Bearing for rubber wheel 09806930 Blade 90501481 Cultivator blade for Lawn Edger left 5 1 Wearing parts City Ranger 2250 lawn edger 09722710 Rubber guard 09701070 Nylon wearing bar 90501701 Cultivator blade for Lawn Edger right ...

Страница 17: ...17 Operator s Manual City Ranger 2250 Lawn edger Notes ...

Страница 18: ...18 Operator s Manual City Ranger 2250 Lawn edger Notes ...

Страница 19: ...19 Operator s Manual City Ranger 2250 Lawn edger Notes ...

Страница 20: ...70101071 01 EN Egholm A S Transportvej 27 DK 7620 Lemvig T 45 97 81 12 05 F 45 97 81 12 10 www egholm eu info egholm dk ...

Отзывы: