


toward the star (with the help of the flexible shafts), or you can adjust
the focus with the focus knob. Additionally, you can now switch to a
higher magnification by changing the eyepiece (to a smaller focal length).
Please be aware that the magnification of the stars is barely perceptible.
TIP: Eyepieces are lens systems designed for your eye. In an eyepiece,
the clear image that is generated in the focal point of a lens is
captured (in other words, made visible) and magnified still more.
Eyepieces with various focal lengths are necessary in order to achieve
various degrees of magnification. Begin each observation with an
eyepiece with a low magnification (large focal length, e.g. 26mm).
Finding stars
In the beginning, you will certainly find it difficult to orient yourself in the
sky, since stars and constellations are always moving, and their position
in the sky varies according to the season, date, and time. The North Star
is an exception to this. If you were to imagine the polar axis of the Earth
extending out into space, it would approximately hit the North Star. The
so-called north ce-lestial pole is the starting point for all star charts. On
the drawing you see a number of the more familiar constellations and
star clusters, which are visible throughout the year. The position of the
stars is, of course, dependent on date and time. If you have fixed your
telescope on one of these stars, you will notice that within a short time it
disappears from the eyepiece field of vision. In order to compensate for
this effect, operate the flexible shaft of the counterweight axis, and your
telescope will follow the ap-parent path of this star.
Storing the Telescope Hopefully your observation session will have been
interesting and successful; afterwards, it is recommended to store the
telescope in a dry and well-ventilated room. Please do not forget to
place the lens caps back onto the front tube opening and the eyepiece
holder. All eyepieces and optical accessories should also be stored in
their respective containers.
NOTE: Make sure the focuser is closest to the object which you are
trying to view. If the focuser is not closest to the object the telescope
is facing backwards and the view will not be of the ground and dark
or black.
Your telescope also include a Wi-Fi eyepiece, once you have your object
in view, you may exchange the 26 eyepiece for the Wi-Fi eyepiece.
After exchanging the eyepiece, please follow the below instructions for
operation of the Wi-Fi eyepiece on applicable Wi-Fi devices.
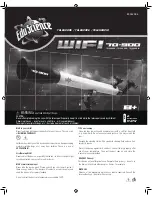
Wi-Fi___33 Camera Manual Instruction
1 Wi-Fi Camera Mode:
1.1 Place 4pcs AA battery (not included) or insert USB cable to computer
to get power;
1.2 Hold to press power key until power LED becomes red color, and then
press Wi-Fi switch to turn on Wi-Fi function (Wi-Fi LED becomes blue).
1.3 Run “Wi-Fi camera” app on your smartphone or tablet
and open following program (you must choose Wi-Fi device name
“Besser_ WIFI_Cam-bresser Wi-Fi camera” as Wi-Fi host) and you can
snap or record video or operate the file;
2 PC Camera mode:
You can use this device as traditional digital eyepiece by USB cable to
computer, insert USB cable to computer r; hold to press power key till
power led becomes red color, and then you can get picture or video in
computer like traditional digital eyepiece,
Remark:
a. If you want to use Wi-Fi camera function whenever,
only need to turn on Wi-Fi function and run “Wi-Fi camera” app
seen as 1.2 and 1.3,and the device will turn off computer interface
automatically;
b. About power supply, you can choose battery mode or usb cable
mode, if you insert usb cable to connect to computer,
the device will get power from computer firstly.
Using the Telescope
Observation
After you have located the North Star in the finder, you will be able to
recognize the North Star when you look through the eyepiece of the
telescope. If needed, you can angle the tele-scope even more exactly
Need Help? Toll Free 855-863-4426
WIFI
Wi-Fi
Wi-Fi
Battery
USB Port
Power
Power
Содержание WIFI 70-900
Страница 2: ...Need Help Toll Free 855 863 4426 13 10 1 4 9 8 5 7 2 3 6...
Страница 8: ...1 4 9 8 5 7 2 3 6 Vous avez besoin d aide Composez sans frais le 855 863 4426 13 10...
Страница 14: ...1 4 9 8 5 7 2 3 6 Necesita ayuda Llame al n mero gratuito 855 863 4426 13 10...
Страница 19: ...MISE EN GARDE Ne pas regarder directement le soleil...