background image


250714103200 


Before use 


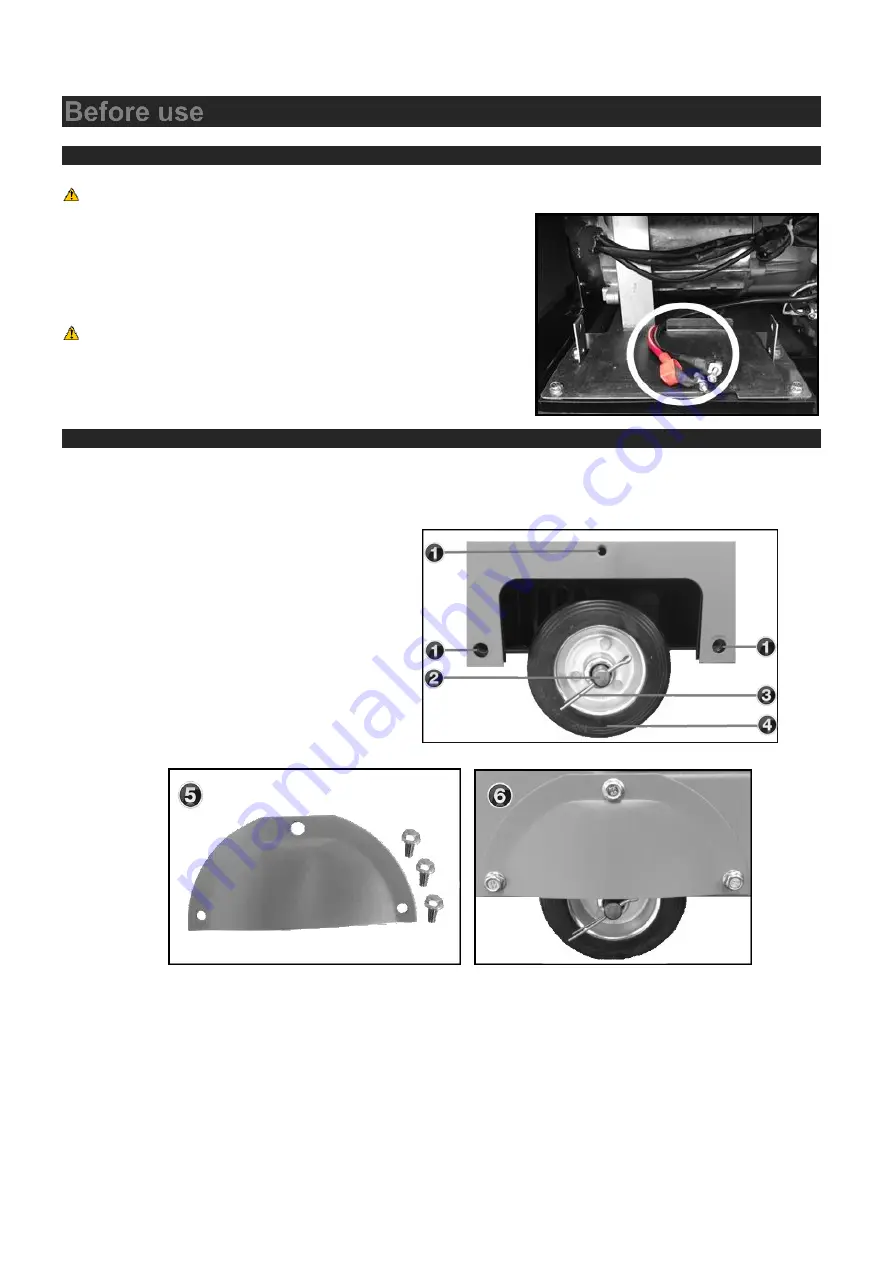
 Connecting the Battery (if equipped) 


For safety the connection plugs may have been disconnected from the battery before shipping. Please follow 
the below steps to connect your battery

 
1. 

Open the “front access panel”. 

2.  Bolt the RED wire to the POSITIVE terminal and the BLACK wire 

to the NEGATIVE terminal on the battery. 


NOTE! 

The battery is self-charging through general use however 

there may be need on occasion to remove the battery and 
charge it with an appropriate charger or jump start.


Fitting the Wheels (applicable models) 


1.  Installing one wheel at a time; slide one wheel onto the axle. 
2.  Pass the 

“split pin” through the “axle” and bend the legs out and around the “axle”. 

3.  Using the 3 short bolts provided; bolt the 

“wheel cover guards” over each wheel as shown. 


1.  Wheel guard bolt whole 
2.  Axel 
3.  Split Pin 
4.  Wheel 
5.  Wheel guard and bolts 
6.  Fully Assembled wheel and wheel 

guard. 


Содержание DSLGEN-6500S

Страница 1: ...re and or serious injury Save this manual for future reference ATTENTION Products covered by this manual will vary in appearance assembly inclusions description and packaging NOTE This manual covers m...

Страница 2: ...Parts Diagram 4 Before use 6 Starting the engine 7 Stopping the Engine 8 Re Priming the fuel system 8 Using your Generator 9 Maintenance 12 Service Schedule 14 Transporting Storage 15 Troubleshooting...

Страница 3: ...uring a power outage Improper connections may cause the generator to explode burn or cause fires in the building s electrical system Transporting the Generator The engine should be turned off when the...

Страница 4: ...familiar with safe operation handling of this machine or are in any way unsure of any object of this products suitability or correct use for your application you should complete training conducted by...

Страница 5: ...haust Outlet 3 Handle a 4 Fuel Guage 5 Fuel filler cap 6 Black control panel 7 Front access panel 8 Wheels 9 Wheel covers 10 Handle b 11 Rear Access Panel 12 Air filter service panel Control Panel s 1...

Страница 6: ...250714103200 5 5 Engine 1 Oil Filter location 2 Oil Filter locking bolt 3 Oil Filter strainer 4 Run Lever 5 Emergency OFF lever 6 Oil filler cap 7 Oil drain bolt...

Страница 7: ...The battery is self charging through general use however there may be need on occasion to remove the battery and charge it with an appropriate charger or jump start Fitting the Wheels applicable model...

Страница 8: ...e emitted from a new engine for the first 5 hours of use while running in 1 Clean surface around fuel cap to prevent contamination 2 Loosen fuel cap slowly Rest the cap on a clean surface 3 Carefully...

Страница 9: ...move the red shut down lever to the stop position In normal use 1 Switch OFF all connected equipment and pull the inserted plug s out 2 Switch OFF any protective switches circuit breakers 3 Turn the...

Страница 10: ...ch 10 hours of use NOTE Never run the engine without the air cleaner Rapid engine wear will result from contaminants such as dust and dirt being drawn through the carburettor into the engine See secti...

Страница 11: ...acle may be used while the AC power is in use An overloaded DC circuit will trip the DC circuit protector If this happens unload the DC load before pushing in the circuit protector to resume operation...

Страница 12: ...rator can cause damage and void warranty IMPORTANT Only one third of the total generator capacity is available from any single phase 240v outlet WARNING 3 Phase generators are not suitable for running...

Страница 13: ...warm but not hot to assure rapid and complete draining IMPORTANT Make sure to turn the engine switch OFF before draining NOTE When the oil is drained it is an optimal time to clean the oil filter stra...

Страница 14: ...remove debris and any degreaser left behind 4 Replace the Oil filter strainer followed by the oil filter locking bolt IMPORTANT Please dispose of used motor oil in a manner that is compatible with the...

Страница 15: ...250714103200 14 14 Service Schedule...

Страница 16: ...overfill the tank there should be no fuel in the filler neck WARNING Avoid a place exposed to direct sunlight when putting the generator on a vehicle If the generator is left in an enclosed vehicle f...

Страница 17: ...breakers to ON Take the generator to an authorised service center Turn all circuit breakers ON Replace the electrical appliance or equipment Take the electrical appliance or equipment to an electrical...

Страница 18: ...ox 1 3 of the total generator output e g 7amps OSE Max output 10kVA cos 08 Other Seller Equivalent DC Output 12V 8 3A Starting Method Electric Key Start Engine Oil Type Acceptable Oil Grades 10W30 10W...

Страница 19: ...250714103200 18 18 Appendix Copyright 2012 Mills International Trading Pty Ltd...

Страница 20: ...n access to the product The product has been supplied by a general merchandise retailer that may not be familiar with your specific applic ation or your description of the application Be sure to attai...

Отзывы: