background image

Video Conference Camera User Manual

4

Item

Name

1

LINE IN Interface

2

CVBS Interface

3

System Select Switch

4

RS485 Interface

5

RS232 IN Interface

6

RS232 OUT Interface

7

Network Interface

8

HDMI Interface

9

3G-SDI Interface

10

USB 2.0 Interface

11

DC 12V Interface

12

Power Switch

4.4 Dimension

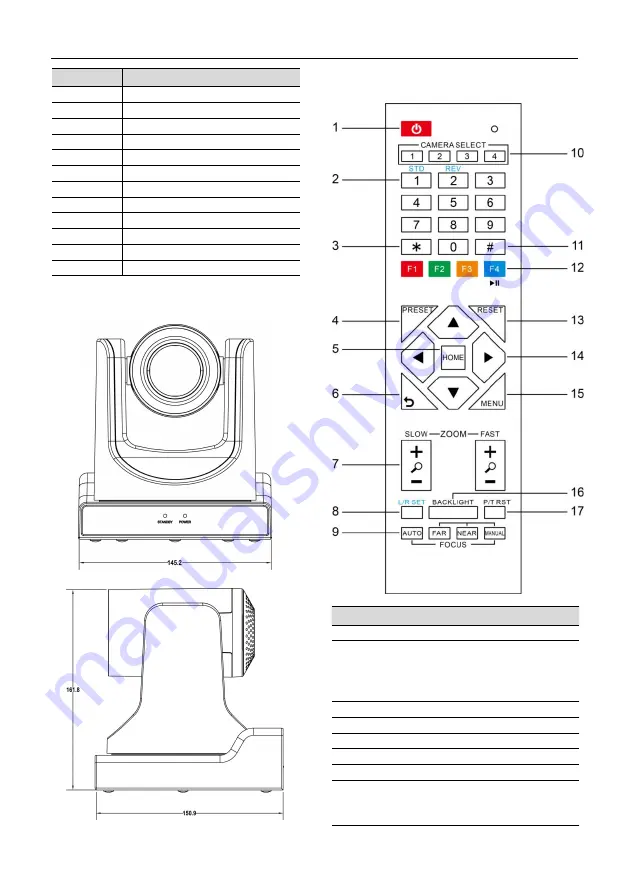
4.5 Remote Control

Key Description

1. Standby Key

Press this button to enter standby mode.

Press it again to enter normal mode.

Note: Power consumption in standby mode is

approximately half of the normal mode

2. Number Key

To set preset or call preset.

3. *Key

Used with other buttons.

4. Preset Key

Set preset: Store a preset position.

[SET PRESET] + Numeric button (0-9): Setting

a corresponding numeric key preset position.

Содержание V63CL-N

Страница 1: ...ot be cloned copied or translated without the permission of the company Product specifications and information which were referred to in this document are for reference only We may change delete or up...

Страница 2: ...7 VISCA Network 6 4 8 Serial Communication Control 6 5 GUI Settings 7 5 1 MENU 7 5 2 EXPOSURE 7 5 3 COLOR 7 5 4 IMAGE 8 5 5 P T Z 8 5 6 NOISE REDUCTION 9 5 7 SETUP 9 5 8 COMMUNICATION SETUP 9 5 9 REST...

Страница 3: ...er Monitor 12 6 6 Camera Parameter Setup 12 6 6 1 Homepage Introduction 12 6 6 2 Video Settings 15 6 6 3 Image Settings 16 6 6 4 Audio Settings 16 6 6 5 System Settings 17 6 6 6 Network Settings 17 6...

Страница 4: ...Mechanical damage may be caused by doing so Do not use in corrosive liquid gas or solid environment to avoid any cover plastic material damage Make sure there is no obstacle within rotation range Plea...

Страница 5: ...ort AAC audio encoding better sound quality and smaller bandwidth Local Storage Support U disk local storage local recording directly without NVR Low Light High SNR of CMOS sensor combined with 2D and...

Страница 6: ...RTMP Onvif DHCP Multicast etc Input Output Interface Audio Interface 1 x LINE IN 3 5mm Audio Interface CVBS Interface 1 x CVBS 3 5mm RCA jack 1Vp p 75 Communication Interface 1 x RS 485 2pin phoenix p...

Страница 7: ...12V Interface 12 Power Switch 4 4 Dimension 4 5 Remote Control Key Description 1 Standby Key Press this button to enter standby mode Press it again to enter normal mode Note Power consumption in stan...

Страница 8: ...nd tilting Press HOME button to face the camera back to front 15 Menu Key MENU enter or exit OSD MENU 16 Backlight Key BLC ON OFF Press this button to enable the backlight compensation Press it again...

Страница 9: ...bits Stop bits 1 bit Parity None RS485 Communication Control Control camera via RS485 half duplex mode Baud rate 2400 4800 9600 38400 Starting Position 1 bit Data bits 8 bits Stop bits 1 bit Parity N...

Страница 10: ...ExpCompMode item to On Backlight Set the backlight compensation optional items On Off Effective only in Auto mode Bright Intensity control optional items 0 17 Effective only in Bright mode Gain Limit...

Страница 11: ...ptional items 0 14 Contrast Contrast adjustment optional items 0 14 Sharpness Sharpness adjustment optional items Auto 0 15 Flip H Image flipped horizontally optional items On Off Flip V Image Flip Ve...

Страница 12: ...tion setup page as shown in the following figure COMMUNICATION SETUP Protocol VISCA V_Address 1 V_AddrFix Off Net Mode Serial Baudrate 9600 Select Item Change Value Menu Back Protocol Control protocol...

Страница 13: ...s and the data indicator orange will flash indicating that the physical connection of the camera has been completed 6 3 Internet Connection There are two main ways to connect video conference camera C...

Страница 14: ...gin window pop up input login name admin password admin shown as below After login shown as below If user first time use this camera by internet only for new user must install a player software VLC Pl...

Страница 15: ...22 org 89 If the camera port default is 80 then unnecessary to input port number use host name can access camera directly 6 5 3 VLC Stream Media Player Monitor Visit VLC Media Server Procedure Step 1...

Страница 16: ...gger the resolution is the bigger the playing area is Double click viewing window will show full screen double click again will return to initialized size Status bar in viewing window shown as below 1...

Страница 17: ...recall of these positions Type a number between 0 and 254 into the Preset box Click the Set button to save the current location with that preset number Click the Call button to cause the camera to ret...

Страница 18: ...e clearer of the image However the configuration of the bit rate needs to be combined with the network bandwidth When the network bandwidth is narrow and the bit rate is configured larger the video st...

Страница 19: ...alue is8 4 Sharpness Sharpness0 15 slider control on the right shows the corresponding numerical Default value is3 5 Hue Hue 0 14 slider control on the right shows the corresponding numerical Default...

Страница 20: ...h port to transmit When port mapping need to be consistent with the port number default port 80 B RTSP Port The video conference camera support RTSP protocol use the VLC tools broadcast default port 5...

Страница 21: ...ptional items Fixed IP Address Dynamic IP Address 7 IP Address Display the IP Address you can also input the IP Address when you select IP Configuration Type be Fixed IP Address 8 Subnet Mask Display...

Страница 22: ...ery or object near the camera There is no video image in IE Browser Please visit VLC website http www videolan org vlc download and install VLC media player after it been installed visit the camera wi...

Страница 23: ...can modify the group name to a private group Modify the NDI HX camera name If you want to modify the NDI HX camera name please enter the information interface modify the Device ID and then click the A...

Отзывы: