background image


24


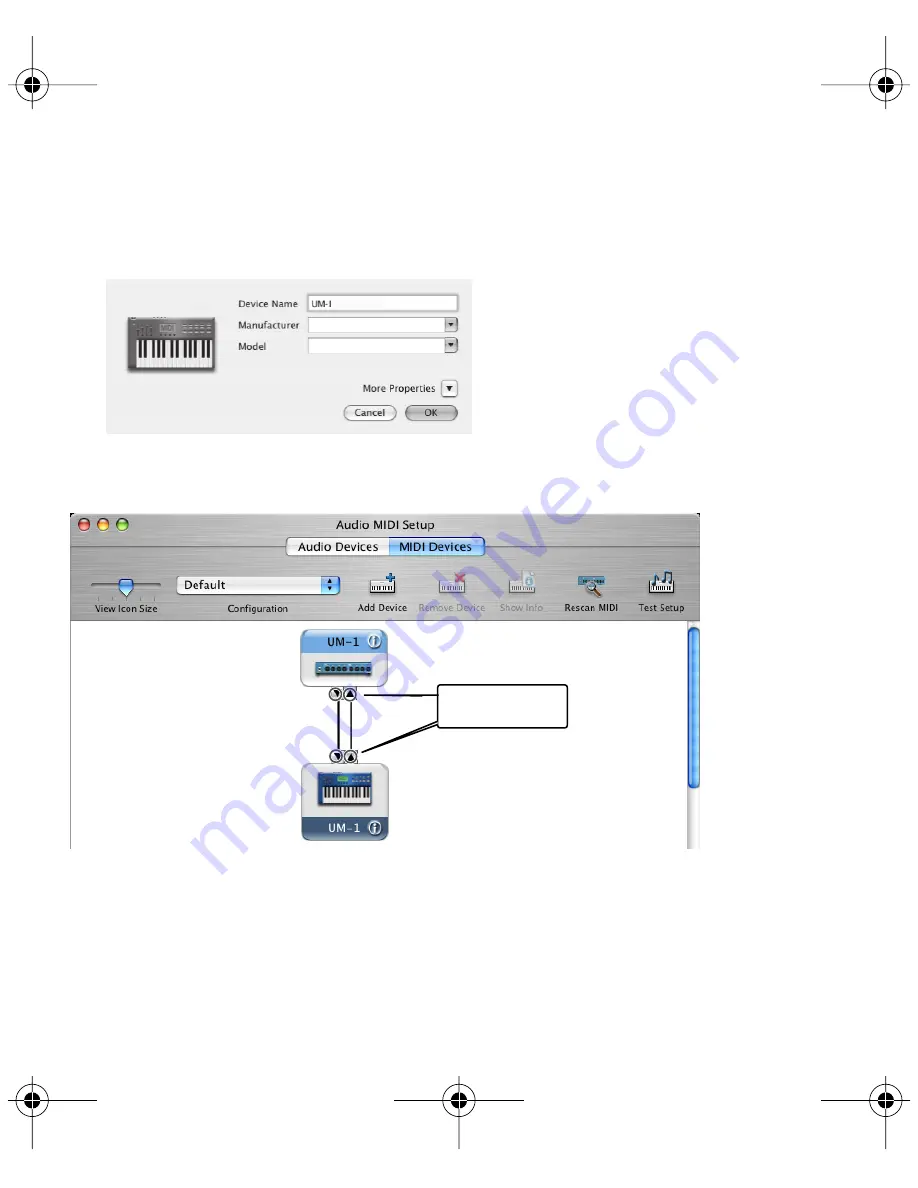
7.


Set the 


device name


.


1.


With the


 new external device 


selected, click 


Show Info.

2.


Enter the name in the 


Device Name


 field. 


8.


Connect the 


 and 


 symbols (which signify the outputs and inputs) of the 


UM-1


 icon to those of 

the 


new external device


 icon by using the mouse to drag between them.


s


9.


If running 


Mac OS X v10.3 or earlier:


 Close the 


Audio MIDI Setup


 dialog box. The settings are 

completed. 
If running 


Mac OS X v10.3 or later:


 Confirm that MIDI is being transmitted and received 

correctly. Perform Steps 10–13 (p. 25).

Use the mouse to 

drag a connection

UM-1EX_multi1.book 24 ページ 2005年11月1日 火曜日 午後3時19分

Содержание UM-1EX

Страница 1: ...n of ROLAND CORPORATION 201a Before using this unit carefully read the sections entitled USING THE UNIT SAFELY and IMPORTANT NOTES p 2 p 4 These sections provide important information concerning the proper operation of the unit Additionally in order to feel assured that you have gained a good grasp of every feature provided by your new unit Owner s manual should be read in its entirety The manual ...

Страница 2: ...y Material damage refers to damage or other adverse effects caused with respect to the home and all its furnishings as well to domestic animals or pets Used for instructions intended to alert the user to the risk of death or severe injury should the unit be used improperly The symbol alerts the user to things that must be carried out The specific thing that must be done is indicated by the design ...

Страница 3: ...or The unit does not appear to operate normally or exhibits a marked change in performance 013 In households with small children an adult should provide supervision until the child is capable of following all the rules essential for the safe operation of the unit 014 Protect the unit from strong impact Do not drop it 023 DO NOT play a CD ROM disc on a conven tional audio CD player The resulting so...

Страница 4: ...ition Therefore before using the unit you must allow it to stand for several hours until the condensation has completely evaporated Maintenance 401a For everyday cleaning wipe the unit with a soft dry cloth or one that has been slightly dampened with water To remove stubborn dirt use a cloth impregnated with a mild non abrasive detergent Afterwards be sure to wipe the unit thoroughly with a soft d...

Страница 5: ...re used in compliance with the guidelines of the Microsoft Corporation 206j Windows is known officially as Microsoft Windowsw operating system 207 Apple and Macintosh are registered trademarks of Apple Computer Inc 209 Mac OS is a trademark of Apple Computer Inc 220 All product names mentioned in this document are trademarks or registered trademarks of their respective owners 231 OMS is a register...

Страница 6: ...that all items are included If any are missing contact the dealer where you purchased the UM 1EX USB MIDI Interface UM 1EX CD ROM This contains drivers for use with the UM 1EX Owner s Manual This is the manual you are reading Please keep it on hand for reference UM 1EX_multi1 book 6 ページ 2005年11月1日 火曜日 午後3時19分 ...

Страница 7: ...n and Settings 21 Mac OS X users 22 Mac OS 9 users 26 Basic Use 33 Basic Connections and MIDI Flow 33 Transmitting MIDI messages from a MIDI keyboard or digital piano to the sequencer software 33 Transmitting MIDI Messages from the sequencer software to a MIDI sound module or digital piano 34 Transmitting MIDI messages from a MIDI Keyboard or other device to a MIDI sound module 35 Appendices 37 Ab...

Страница 8: ...ilotes Macintosh 58 Installation et configuration du pilote 58 Mac OS X 58 Italiano Collegamento e installazione dei driver Windows 62 Installazione del driver 62 Utenti Windows XP 2000 62 Collegamento e installazione dei driver Macintosh 65 Installazione e configurazione dei driver 65 Utenti Mac OS X 65 Español Conexión e instalación de los controladores Windows 69 Instalación del controlador 69 ...

Страница 9: ...rts only Windows XP SP2 or later and Mac OS X If you are using Windows 98 Me 2000 XP or XP SP1 or if you are using Mac OS 9 you must turn the ADVANCED mode select Switch ON before you connect the UM 1EX to your computer FPT Fast Processing Technology of MIDI Transmission ON Advanced mode This mode utilizes the UM 1EX s special advanced MIDI driver This advanced driver uses FPT technology for rapid...

Страница 10: ...er 4 THRU switch ON OFF setting You can use the THRU switch to switch the destination device for MIDI messages from the MIDI keyboard or digital piano connected to the MIDI IN cable There is no need to change any cable connections fig connect change_e Don t change the setting of the THRU switch while playback is in progress Doing so will cause MIDI errors Switch Setting MIDI Message Destination De...

Страница 11: ...only Windows XP SP2 or later If you are using Windows 98 Me 2000 XP or XP SP1 you must turn the ADVANCED mode select Switch ON before you connect the UM 1EX to your computer FPT Fast Processing Technology for MIDI Transmission About the Driver Modes ON Advanced mode This mode utilizes the UM 1EX s special advanced MIDI driver This advanced driver uses FPT technology for rapid high performance MIDI...

Страница 12: ...n the Control Panel Classic view If so double click the System icon Windows 2000 1 Click the Windows Start menu and from the menu that appears select Settings Control Panel 2 In Control Panel double click the System icon 3 Click the Hardware tab then click Driver Signing The Driver Signing Options dialog box will open 4 In the Driver Signing Options dialog box select Ignore then click OK If the cu...

Страница 13: ...h an or x symbol will appear If a Continue Anyway button is displayed click Continue Anyway to proceed with the installation If you are unable to continue click OK and repeat the driver installation from step 1 Windows 2000 If Driver Signing Options in step 4 is set to anything other than Ignore a dialog box indicating Digital Signature Not Found will appear If a Yes button is displayed click Yes ...

Страница 14: ...e Anyway to proceed with the installation Windows 2000 If Driver Signing Options in step 4 is set to anything other than Ignore a dialog box indicating Digital Signature Not Found will appear Click Yes to proceed with the installation 14 The Completing the Found New Hardware Wizard dialog box will appear Click Finish 15 In the Driver Setup dialog box click Close This completes driver installation ...

Страница 15: ... on your setup the System icon may appear directly in the Control Panel Classic view If so double click the System icon 2 Click the Advanced tab 3 In the right side of the Performance area click Settings The Performance Options dialog box will open 4 Click the Advanced tab 5 In the Processor scheduling area choose Background services and click OK I 6 In the System Properties dialog box click OK Th...

Страница 16: ...ht of the Performance field click Performance Options The Performance Options dialog box will appear fig back2000 5 In the Application response field choose Background services and click OK 6 Click OK to close the System Properties dialog box The System Properties dialog box will close Next you ll make the driver settings Setting the Driver p 18 UM 1EX_multi1 book 16 ページ 2005年11月1日 火曜日 午後3時19分 ...

Страница 17: ...nstallation click Next once again Installation will begin The Setup is now ready to install the drivers dialog box will appear Now you are ready to install the driver 8 Set the UM 1EX s ADVANCED mode select Switch to the ON position The driver cannot be installed by means of the following procedure if the switch is set to OFF If you are using Windows 98 Me 2000 XP or XP SP1 you must turn the ADVAN...

Страница 18: ...o Devices icon Depending on your setup the Sounds and Audio Devices icon may appear directly in the Control Panel Classic view If so double click the Sounds and Audio Devices icon 2 Click the Audio tab fig XP E 3 For MIDI music playback click the located at the right of Default device and select the MIDI device from the list that appears Selecting EDIROL UM 1 MIDI enables sounds to be played from ...

Страница 19: ...he left 2 Click the Audio tab fig 2K E 3 Click in the MIDI Music Playback Preferred device menu and select the MIDI device from the list that appears Selecting EDIROL UM 1 MIDI enables sounds to be played from the sound module connected to the UM 1EX s MIDI OUT cable with Media Player or other sequencer software utilizing Windows standard device settings 4 Close the Sounds and Multimedia Propertie...

Страница 20: ...dia icon 2 Click the MIDI tab fig 2K E 3 Select Single instrument and select the MIDI device from the list that appears If you want to use Media Player to play a sound module connected to the UM 1EX s MIDI OUT cable select EDIROL UM 1 MIDI 4 Close the Multimedia Properties dialog box Click OK to complete the settings Windows 98 users UM 1EX_multi1 book 20 ページ 2005年11月1日 火曜日 午後3時19分 ...

Страница 21: ...ast Processing Technology for MIDI Transmission Steps to be performed on the UM 1EX itself are marked by a symbol About the Driver Modes ON Advanced mode This mode utilizes the UM 1EX s special advanced MIDI driver This advanced driver uses FPT technology for rapid high performance MIDI transmissions We recommend use of this mode Driver Installation and Settings p 21 OFF Standard mode This mode us...

Страница 22: ...age such as This Installer package needs to may appear Click Continue 5 The display will indicate Welcome to the EDIROL UM 1Driver Installer Click Continue 6 The display will indicate Select a Destination Click the drive in which the operating system is installed to select it and then click Continue Select your startup disk as the drive 7 The display will indicate Easy Install Click Install or Upg...

Страница 23: ...nds after connecting the UM 1EX is required before the unit will operate normally 3 Open the Applications folder of your Macintosh hard disk In the Utilities folder double click Audio MIDI Setup to open the Audio MIDI Setup dialog box 4 Click the MIDI Devices tab 5 Confirm that UM 1 appears in the Audio MIDI Setup dialog box If UM 1 does not appear or if it is grayed out it means that the UM 1EX i...

Страница 24: ... icon to those of the new external device icon by using the mouse to drag between them s 9 If running Mac OS X v10 3 or earlier Close the Audio MIDI Setup dialog box The settings are completed If running Mac OS X v10 3 or later Confirm that MIDI is being transmitted and received correctly Perform Steps 10 13 p 25 Use the mouse to drag a connection UM 1EX_multi1 book 24 ページ 2005年11月1日 火曜日 午後3時19分 ...

Страница 25: ...sequencer software Before using the UM 1EX with your sequencer software please note the following points Connect the UM 1EX to your Macintosh before you start up your sequencer software Do not disconnect the UM 1EX from your Macintosh while your sequencer software is running Quit your sequencer software before you disconnect the UM 1EX from your Macintosh Turn off the Sleep function of your Macint...

Страница 26: ...acintosh Disconnect all USB cables other than those for your keyboard and mouse and restart your Macintosh 2 Exit all currently running software applications 3 Prepare the CD ROM Insert the CD ROM into the CD ROM drive of your Macintosh 4 Double click the UM 1 Driver E Installer icon found in the Driver E Mac OS 9 folder of the CD ROM to start up the installer Mac OS 9 users If a UM 1EX is already...

Страница 27: ...stem you are currently using fig 05 20 6 If a message like the following is displayed click Continue The other currently running software will exit and installation will continue 7 A dialog box will indicate Installation was successful Click Restart to restart your Macintosh Next make the driver settings OMS users p 28 FreeMIDI users p 31 UM 1EX_multi1 book 27 ページ 2005年11月1日 火曜日 午後3時19分 ...

Страница 28: ...e unit will operate normally fig 3 3 3 From the CD ROM drag the Driver E Mac OS 9 OMS Setting folder into the Opcode OMS Applications folder on the hard disk of your Macintosh to copy it there fig 3 4 4 In the Opcode OMS Applications folder where you installed OMS double click OMS Setup to start it up fig 3 5_35 5 If a dialog box like the one shown here appears click Turn It Off A confirmation dia...

Страница 29: ...7 Choose Open from the File menu From the OMS Setting folder that you copied in step 3 select the UM 1 file and click Open A screen like the one shown here will appear fig 3 9_35 8 From the Edit menu select OMS MIDI Setup In the OMS MIDI Setup dialog box that appears check Run MIDI in background and click OK UM 1EX_multi1 book 29 ページ 2005年11月1日 火曜日 午後3時19分 ...

Страница 30: ...tudio fig OMS3 11 When you move the mouse cursor near the MIDI connector icon the cursor will change to a shape Click the MIDI connector icon shown in the illustration If the UM 1EX s MIDI OUT indicator starts blinking the settings are correct 12 Exit OMS Setup From the File menu choose Exit If the AppleTalk confirmation dialog box appears click OK to close the dialog box A diamond mark indicates ...

Страница 31: ...click the FreeMIDI Setup icon to start it up When OMS is installed on this computer appears click FreeMIDI 5 The first time you start up use the following procedure 1 A dialog box saying Welcome to FreeMIDI will appear Click Continue 2 The FreeMIDI Preferences dialog box will appear Click Cancel 3 The About Quick Setup dialog box will appear Click Cancel 6 From the File menu choose Open If you are...

Страница 32: ...on shown in the illustration If the UM 1EX s MIDI OUT indicator starts blinking the settings are correct 10 Once again choose the MIDI menu command Check Connections to end the test 11 From the File menu choose Quit to exit FreeMIDI Setup UM 1EX_multi1 book 32 ページ 2005年11月1日 火曜日 午後3時19分 ...

Страница 33: ...ing of the THRU switch while you re using the UM 1EX Doing so will cause MIDI errors Basic Connections and MIDI Flow Transmitting MIDI messages from a MIDI keyboard or digital piano to the sequencer software MIDI IN UM 1 MIDI THRU Switch OFF MIDI Keyboard Digital Piano MIDI messages are transmitted to the sequencer software Connect to the MIDI OUT connector of the MIDI keyboard or digital piano MI...

Страница 34: ...make the device settings within the sequencer software THRU switch setting MIDI messages from the computer are transmitted to the MIDI device e g MIDI sound module digital piano connected to the UM 1EX s MIDI OUT cable Don t change the setting of the THRU switch while you re using the UM 1EX Doing so will cause MIDI errors Transmitting MIDI Messages from the sequencer software to a MIDI sound modu...

Страница 35: ... sent to the MIDI sound module connected to the UM 1EX s MIDI OUT cable Even if the UM 1EX is connected to a computer no MIDI messages will be sent to the computer Don t change the setting of the THRU switch while you re using the UM 1EX Doing so will cause MIDI errors Transmitting MIDI messages from a MIDI Keyboard or other device to a MIDI sound module THRU Switch ON MIDI Sound Module MIDI Keybo...

Страница 36: ...t change_e Don t change the setting of the THRU switch while you re using the UM 1EX Doing so will cause MIDI errors Switch Setting MIDI Message Destination Device OFF MIDI messages are transmitted to the computer sequencer software ON MIDI messages are transmitted to the MIDI device e g MIDI sound mod ule connected to the MIDI OUT cable MIDI Message Flow THRU OFF MIDI Message Flow THRU ON UM 1EX_...

Страница 37: ...operate normally These settings enable use of the UM 1EX with sequencer software that uses Windows or Macintosh standard device settings If using sequencer software that does not utilize Windows standard device settings make the device settings within the sequencer software For instructions on the device settings for your particular sequencer software refer to the owner s manual that was supplied ...

Страница 38: ...r resident software such as antivirus programs be running Installation may not be successful if other programs are running Be sure to close all other programs before installation Is the CD ROM correctly inserted into your CD ROM drive Installation is not possible unless the CD ROM included with the UM 1EX is inserted in your CD ROM drive Make sure that the CD ROM is correctly inserted into your CD...

Страница 39: ... power conservation mode of your computer may limit the power that is supplied to USB Check the settings of your computer In some cases the UM 1EX cannot be used with a bus powered hub a hub that does not contain a power supply Please use a self powered hub a hub that contains a power supply Is USB enabled on your computer Refer to the operation manual for your computer and make sure that USB is e...

Страница 40: ...ver in these locations and click Next If a dialog box with an or x symbol will appear click Continue Anyway to proceed with the installation If you are unable to continue click OK and repeat the driver installation Installing the Driver p 12 Windows 2000 If a dialog box indicating Digital Signature Not Found will appear click Yes to proceed with the installation If you are unable to continue click...

Страница 41: ...annot be used with a bus powered hub a hub that does not contain a power supply Please use a self powered hub a hub that contains a power supply Is USB enabled on your computer Refer to the operation manual for your computer and make sure that USB is enabled Does your computer meet the USB specifications If you are using a computer that does not fulfill the electrical requirements of the USB speci...

Страница 42: ... and restart your Macintosh If it is still not detected shut down your Macintosh and then restart it In some cases the UM 1EX will not be detected if you have connected it to the USB connector located on the keyboard of the Macintosh Please connect it to a USB connector on the Macintosh itself UM 1EX is not detected when making OMS or FreeMIDI settings Mac OS 9 users UM 1EX_multi1 book 42 ページ 2005...

Страница 43: ... you are using Windows XP Professional 2000 log on as a user that has administrative privileges e g Administrator 2 Insert the CD ROM into the CD ROM drive of your computer 3 From the Windows Start menu choose Run In the Run dialog box input the following into the Open field and click OK Windows XP 2000 users D Driver XP2k Uninstal exe Windows Me 98 users D Driver Me98 Uninstal exe The drive name ...

Страница 44: ...e Are you sure to uninstall the driver click OK 6 The Authenticate dialog box will appear enter the password and click OK 7 The display will indicate Uninstllation is completed click Restart Your Macintosh will then restart Macintosh Mac OS 9 users 1 Start up Macintosh with the UM 1EX disconnected Disconnect all USB cables other than a USB keyboard or USB mouse 2 From the system extensions folder ...

Страница 45: ...or message may appear If this occurs click OK and exit the other software Even if an software window is closed it is still running if it appears in the taskbar Be sure to exit unneeded software displayed Was a heavy processing load experienced while using the UM 1EX such as accessing the CD ROM drive or a network If an operation involving a heavy processing load is performed while the UM 1EX is in...

Страница 46: ...onnected and then connect the UM 1EX On a computer that uses a USB keyboard starting up the computer with the UM 1EX already connected may cause operation to become unstable In this case start up the computer with the UM 1EX disconnected and then connect the UM 1EX Operating system becomes unstable UM 1EX_multi1 book 46 ページ 2005年11月1日 火曜日 午後3時19分 ...

Страница 47: ... Cable Power Supply Supplied from the computer Current Draw 70 mA Dimensions 75 W x 41 D x 20 H mm 3 W x 1 5 8 D x 13 16 H inches Weight 120 g 5 oz Accessories Owner s Manual CD ROM 962a In the interest of product improvement the specifications appearance and or contents of this unit are subject to change without prior notice UM 1EX_multi1 book 47 ページ 2005年11月1日 火曜日 午後3時19分 ...

Страница 48: ...tellung wird das Symbol System manchmal direkt in der klassischen Ansicht der Systemsteuerung angezeigt Doppelklicken Sie in diesem Fall auf das System Symbol Windows 2000 1 Klicken Sie auf das Windows Start Menü und wählen Sie im Folgemenü Einstellungen Systemsteuerungen 2 Doppelklicken Sie auf das System Symbol in Systemsteuerung 3 Klicken Sie auf den Reiter Hardware und dann auf Treibersignatur...

Страница 49: ... mit oder x Wenn die Schaltfläche Continue Anyway In jedem Fall Weiter erscheint klicken Sie auf Continue Anyway In jedem Fall Weiter um die Installation fortzusetzen Wenn Sie nicht fortfahren können klicken Sie auf OK und wiederholen Sie Treiberinstallation von Schritt 1 an Windows 2000 Wenn Treibersignaturoptionen in Schritt 4 anders lauten als Ignorieren erscheint ein Dialogfeld mit Digital Sig...

Страница 50: ...m mit der Installation fortzufahren Windows 2000 Wenn Treibersignaturoptionen in Schritt 4 anders lauten als Ignorieren erscheint ein Dialogfeld mit Digital Signature Not Found Digitalsignatur nicht gefunden Klicken Sie auf Ja um mit der Installation fortzufahren 14 Es erscheint die Dialogbox Abschließen der Installation neuer Hardware Klicken Sie auf Fertig stellen 15 Klicken Sie in der Dialogbox...

Страница 51: ...er 5 In der Anzeige erscheint Welcome to the EDIROL UM 1Driver Installer Willkommen beim EDIROL UM 1Treiber Installationsprogramm Klicken Sie auf Continue Weiter 6 In der Anzeige erscheint Select a Destination Installationsziel auswählen Wählen Sie mit einem Mausklick das Laufwerk aus auf dem das System installiert ist und klicken Sie dann auf Continue Weiter Wählen Sie Ihre Bootplatte als Laufwer...

Страница 52: ...Öffnen Sie den Ordner Anwendungen auf Ihrer Macintosh Festplatte Klicken Sie im Ordner Dienstprogramme auf Audio MIDI Setup um das Dialogfeld Audio MIDI Setup zu öffnen 4 Klicken Sie auf die Registerkarte MIDI Devices MIDI Geräte 5 Bestätigen Sie dass UM 1 im Dialogfeld Audio MIDI Setup erscheint Wenn UM 1 nicht erscheint oder grau angezeigt wird bedeutet dies dass der UM 1EX nicht richtig erkannt...

Страница 53: ... und Eingaben des UM 1 Symbols mit denen des Symbols für das neue externe Gerät und verwenden Sie die Maus um die Symbole zu ziehen s 9 Bei Mac OS X v10 3 oder früher Schließen Sie das Dialogfeld Audio MIDI Setup Die Einstellungen wurden abgeschlossen Bei Mac OS X v10 3 oder später Bestätigen Sie das MIDI fehlerfrei übertragen und empfangen wird Führen Sie die Schritte 10 13 aus S 54 Verwenden Sie...

Страница 54: ...rwendung des UM 1EX mit Ihrer Sequenzsoftware Beachten Sie vor Verwendung des UM 1EX mit Ihrer Sequenzsoftware bitte folgende Punkte Schließen Sie den UM 1EX an Ihren Macintosh an bevor Sie Ihre Sequenzsoftware starten Trennen Sie nicht den UM 1EX vom Macintosh während die Sequenzsoftware läuft Beenden Sie die Ausführung der Sequenzsoftware bevor Sie den UM 1EX von Ihrem Macintosh trennen Deaktivi...

Страница 55: ...stème Selon la configuration de l ordinateur il se peut que l icône Système apparaisse dans le Panneau de configuration vue classique Si c est le cas double cliquez sur l icône Système Windows 2000 1 Cliquez sur le bouton Démarrer de Windows et sélectionnez Paramètres Panneau de configuration 2 Dans le Panneau de configuration double cliquez sur l icône Système 3 Cliquez sur l onglet Matériel puis...

Страница 56: ...e affichant un symbole ou x apparaît Si un bouton Continuer apparaît cliquez dessus pour poursuivre l installation S il vous est impossible de continuer cliquez sur OK et recommencez l installation du pilote depuis le début Windows 2000 Si les Options de signature du pilote étape 4 ont été définies sur un paramètre autre que Ignorer une boîte de dialogue indiquant Signature numérique non trouvée a...

Страница 57: ...n symbole apparaît Cliquez sur Continuer pour poursuivre l installation Windows 2000 Si les Options de signature du pilote étape 4 ont été définies sur un paramètre autre que Ignorer une boîte de dialogue indiquant Signature numérique non trouvée apparaît Cliquez sur Oui pour poursuivre l installation 14 La boîte de dialogue Fin de l Assistant Ajout de nouveau matériel détecté s affiche Cliquez su...

Страница 58: ...kage d installation a besoin de Cliquez sur Continuer 5 Un message de bienvenue dans l Assistant d installation du pilote de l EDIROL UM 1 s affiche Cliquez sur Continuer 6 L écran indique Sélectionnez une destination Cliquez sur le lecteur sur lequel est installé le système d exploitation puis cliquez sur Continuer Sélectionner le disque de démarrage comme lecteur 7 Le message Installation standa...

Страница 59: ...pareil ne fonctionne normalement 3 Ouvrez le dossier Applications du disque dur de votre Macintosh Dans le dossier Utilitaires double cliquez sur Audio MIDI Setup pour ouvrir la boîte de dialogue correspondante 4 Cliquez sur l onglet Périphériques MIDI 5 Vérifiez que l UM 1 apparaît bien dans la boîte de dialogue Audio MIDI Setup Si l UM 1 n apparaît pas ou apparaît en grisé c est qu il n est pas ...

Страница 60: ... UM 1 à ceux de l icône du nouveau périphérique externe en utilisant la souris pour tracer les connexions s 9 Si vous utilisez Mac OS X v10 3 ou antérieure Fermez la boîte de dialogue Audio MIDI Setup La configuration est terminée Si vous utilisez Mac OS X v10 3 ou ultérieure Vérifiez que les signaux MIDI sont transmis et reçus correctement Suivez les étapes 10 à 13 p 61 Utilisez la souris pour tr...

Страница 61: ...Setup Utilisation de l UM 1EX avec un logiciel séquenceur Avant d utiliser l UM 1EX avec un logiciel séquenceur respectez les points suivants Connectez l UM 1EX à votre Macintosh avant de démarrer votre logiciel séquenceur Ne débranchez pas l UM 1EX de votre ordinateur tant que votre logiciel séquenceur est ouvert Quittez le logiciel avant de débrancher l UM 1EX de votre ordinateur Désactivez la f...

Страница 62: ... controllo visualizzazione classica In questo caso fare doppio clic sull icona Sistema Windows 2000 1 Dal menu di avvio di Windows scegliere Impostazioni Pannello di controllo 2 In Pannello di controllo fare doppio clic sull icona Sistema 3 Fare clic sulla scheda Hardware e quindi su Firma driver Verrà visualizzata la finestra di dialogo Opzioni firma driver 4 Nella finestra di dialogo Opzioni fir...

Страница 63: ...inua fare clic su Continua per procedere con l installazione Se non è possibile continuare fare clic su OK e ripetere l installazione del driver dal passo 1 Windows 2000 Se Opzioni firma driver al passo 4 è impostato su Ignora verrà visualizzata la finestra di dialogo Firma digitale non trovata Se viene visualizzato un pulsante Sì fare clic su Sì per procedere con l installazione Se non è possibil...

Страница 64: ... su Continua per procedere con l installazione Windows 2000 Se Opzioni firma driver al passo 4 è impostato su Ignora verrà visualizzata la finestra di dialogo Firma digitale non trovata Fare clic su Sì per procedere con l installazione 14 Verrà visualizzata la finestra di dialogo Completamento dell Installazione guidata nuovo hardware in corso Fare clic su Fine 15 Nella finestra di dialogo Install...

Страница 65: ...needs to Fare clic su Continua 5 Sullo schermo comparirà il seguente messaggio Welcome to the EDIROL UM 1Driver Installer Fare clic su Continua 6 Sullo schermo verrà visualizzato il messaggio Select a Destination Selezionare l unità in cui è installato il sistema operativo e fare clic su Continua Selezionare il disco di avvio come unità 7 Verrà visualizzato il messaggio Installazione Standard Fare...

Страница 66: ...te 3 Aprire la cartella Applications del disco fisso del Macintosh Nella cartella Utilities fare doppio clic su Audio MIDI Setup per aprire la finestra di dialogo Audio MIDI Setup 4 Fare clic sulla scheda MIDI Devices 5 Verificare che UM 1 viene visualizzato nella finestra di dialogo Audio MIDI Setup Se UM 1 non viene visualizzato o se non è attivo significa che l UM 1EX non è stato riconosciuto i...

Страница 67: ...a nuovo dispositivo esterno utilizzando il mouse per trascinarli s 9 Se si sta utilizzando Mac OS X v10 3 o anteriori Chiudere la finestra di dialogo Audio MIDI Setup La procedura di installazione è giunta al termine Se si sta utilizzando Mac OS X v10 3 o posteriori Verificare che la trasmissione e la ricezione MIDI siano corrette Eseguire le operazioni descritte ai punti da 10 a 13 p 68 Utilizzar...

Страница 68: ... 12 Test Setup Quando si utilizza l UM 1EX con il software sequencer Prima di utilizzare l UM 1EX con il software sequencer leggere le seguenti indicazioni Collegare l UM 1EX al Macintosh prima di avviare il software sequencer Non scollegare l UM 1EX dal Macintosh mentre il software sequencer è in esecuzione Chiudere il software sequencer prima di scollegare l UM 1EX dal Macintosh Disattivare l op...

Страница 69: ... que el icono Sistema aparezca directamente en el Panel de control en la Vista clásica En este caso haga doble clic en el icono Sistema Windows 2000 1 Haga clic en el menú Inicio de Windows y seleccione Configuración Panel de control 2 En el Panel de control haga doble clic en el icono Sistema 3 Haga clic en la ficha Hardware y a continuación en Firma de controladores Aparecerá el cuadro de diálog...

Страница 70: ...iálogo con el símbolo o x Si aparece un botón de Continuar haga clic en Continuar para proseguir con la instalación Si no puede continuar haga clic en Aceptar y repita la instalación del controlador desde el paso 1 Windows 2000 Si Opciones de firma del controlador en el paso 4 es cualquier valor que no sea Ninguna aparece un cuadro de diálogo que indica Firma digital no encontrada Si aparece un bo...

Страница 71: ...r para proseguir con la instalación Windows 2000 Si Opciones de firma del controlador en el paso 4 es cualquier valor que no sea Ninguna aparece un cuadro de diálogo que indica Firma digital no encontrada Haga clic en Sí para proseguir con la instalación 14 Aparecerá el cuadro de diálogo finalización del Asistente para hardware nuevo encontrado Haga clic en Finalizar 15 En el cuadro de diálogo Con...

Страница 72: ...arecido a El paquete del programa de instalación necesita Haga clic en Continuar 5 Aparecerá el mensaje Welcome to the EDIROL UM 1Driver Installer Haga clic en Continue 6 La pantalla indicará Select a Destination Haga clic en la unidad en la que está instalado el sistema operativo y a continuación haga clic en Continue Seleccione el disco de inicio como la unidad 7 La pantalla indicará Easy Instal...

Страница 73: ...eño intervalo de unos segundos después de conectar el UM 1EX para que la unidad funcione correctamente 3 Abra la carpeta Applications de su disco duro En la carpeta Utilities haga doble clic en Audio MIDI Setup para abrir el cuadro de diálogo Audio MIDI Setup 4 Haga clic en la ficha MIDI Devices 5 Confirme que UM 1 aparece en el cuadro de diálogo Audio MIDI Setup Si UM 1 no aparece o aparece en gr...

Страница 74: ...ternal device utilizando el ratón para arrastrarlos entre ellos s 9 Si está utilizando Mac OS X v10 3 o una versión anterior Cierre el cuadro de diálogo Audio MIDI Setup De este modo se completan los ajustes Si está utilizando Mac OS X v10 3 o una versión posterior Confirme que MIDI se está transmitiendo y recibiendo correctamente Realice los pasos 10 13 pág 75 Utilice el ratón para arrastrar una ...

Страница 75: ...ando utilice el UM 1EX con su software de secuenciador Antes de utilizar el UM 1EX con su software de secuenciador tenga en cuenta los siguientes puntos Conecte el UM 1EX al Macintosh antes de iniciar el software de secuenciador No desconecte el UM 1EX del Macintosh mientras se esté ejecutando el software del secuenciador Salga del software del secuenciador antes de desconectar el UM 1EX del Macin...

Страница 76: ...ND TAIWAN ENTERPRISE CO LTD Room 5 9fl No 112 Chung Shan N Road Sec 2 Taipei TAIWAN R O C TEL 02 2561 3339 THAILAND Theera Music Co Ltd 330 Verng NakornKasem Soi 2 Bangkok 10100 THAILAND TEL 02 2248821 VIETNAM SAIGON MUSIC DISTRIBUTOR TAN DINH MUSIC 138 Tran Quang Khai Street Dist 1 Ho Chi Minh City VIETNAM TEL 08 848 4068 AUSTRALIA NEW ZEALAND Roland Corporation Australia Pty Ltd 38 Campbell Aven...

Страница 77: ...p 6 117 545 Moscow RUSSIA TEL 095 981 4967 SPAIN Roland Iberia S L Paseo García Faria 33 35 08005 Barcelona SPAIN TEL 93 493 91 00 SWEDEN Roland Scandinavia A S SWEDISH SALES OFFICE Danvik Center 28 2 tr S 131 30 Nacka SWEDEN TEL 0 8 702 00 20 SWITZERLAND Roland Switzerland AG Landstrasse 5 Postfach CH 4452 Itingen SWITZERLAND TEL 061 927 8383 UKRAINE TIC TAC Mira Str 19 108 P O Box 180 295400 Mun...

Страница 78: ...78 Memo UM 1EX_multi1 book 78 ページ 2005年11月1日 火曜日 午後3時19分 ...

Страница 79: ... to radio or television reception which can be determined by turning the equipment off and on the user is encouraged to try to correct the interference by one or more of the following measures Reorient or relocate the receiving antenna Increase the separation between the equipment and receiver Connect the equipment into an outlet on a circuit different from that to which the receiver is connected ...

Страница 80: ...UM 1EX_multi1 book 80 ページ 2005年11月1日 火曜日 午後3時19分 ...

Отзывы: