background image


78


Application guide


You can take advantage of the R-4’s ability to record four channels simultaneously. You might use channels 
1 and 2 to record the stage performance via line inputs, and channels 3 and 4 to record the sounds of the 
room or audience via mics.


Panel settings


Recording Setup


These settings are useful when you cannot afford mistakes, such as when recording an event or other non-
repeatable occasion. Even if you’ve set the input levels appropriately, there may be cases in which an 
unexpectedly loud sound causes clipping to occur; or conversely, in which the sound stays at an 
unexpectedly low level.
In such cases, you can use two pairs of mics and channels, each set to differing input levels, and record them 
simultaneously. Afterward, you can choose the best pair.


Panel settings


Recording Setup


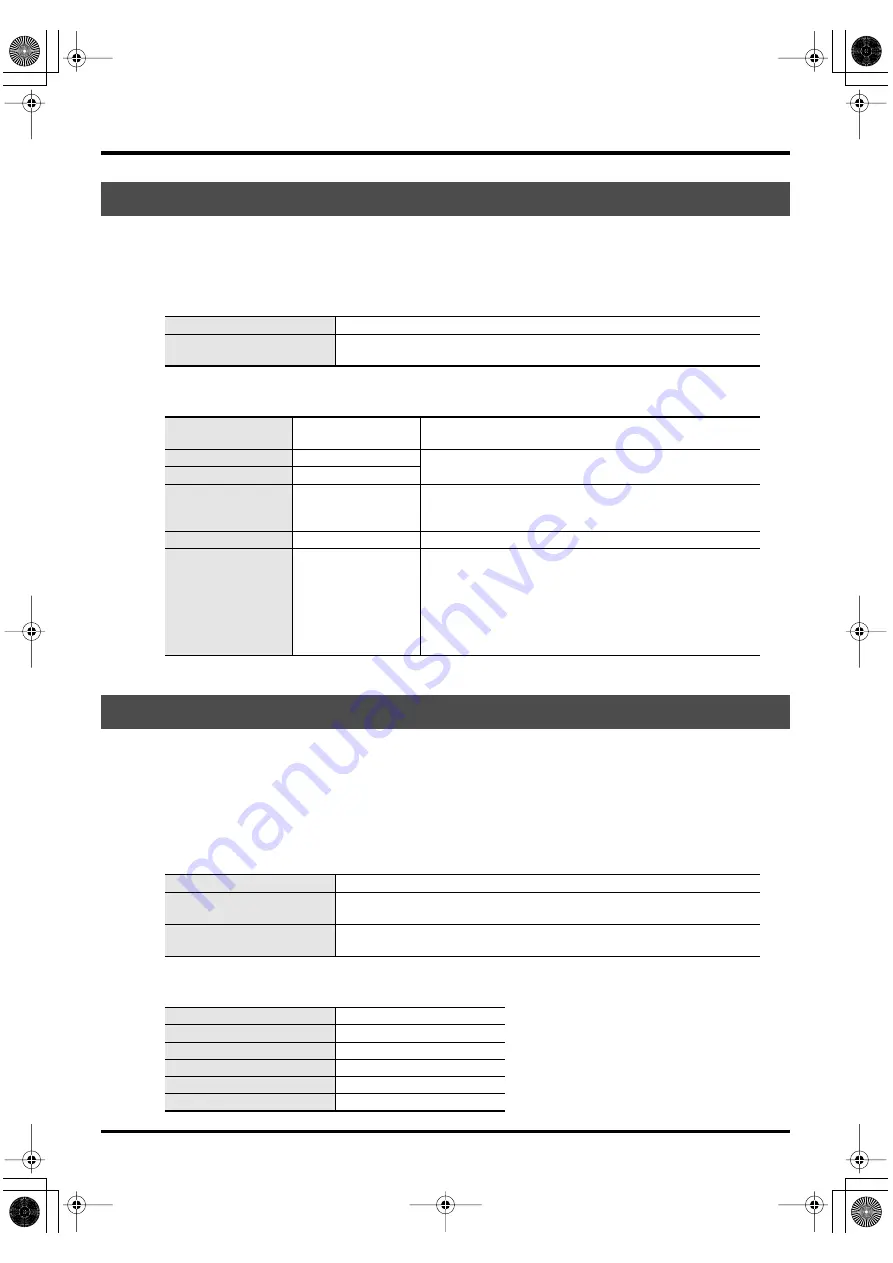
Simultaneously recording environmental sounds (ambience)


Input level select switch


LINE (CH1 and 2), MIC (CH3 and 4)


Phantom power switch


ON if you’re using a condenser mic that requires phantom power; otherwise 
OFF


Input Select


Analog

Set this to Analog since you’re recording from the combo in-
put jacks.


Rec Freq.


44.1 kHz

If you’ll be using a computer to edit the waveforms after re-
cording, you may wish to use a higher sampling frequency.


Rec Bit


16 bit


Rec Mode


STEREOx2

Choose the STEREO x2 setting so that you can record two ste-
reo pairs; one pair is the line feed from the stage and the other 
pair is the ambience mics.


Pre Recording


OFF, 1–29 sec

Specify the pre-recording time as desired.


Project Name


Date, Name

Specify a name that will help you manage the projects when 
you’ve finished recording. 
Date... Using the Date setting will make it easy to tell the date 
and time that the recording was made. 
Name... Assigning a unique project name, so that the projects 
have names such as SCENE001, SCENE002, and so forth, will 
make it easy to see which projects belong together.


Simultaneously recording at different input levels


Input level select switch


MIC


Phantom power switch


ON if you’re using a condenser mic that requires phantom power; otherwise 
OFF


Input level knobs


Set channels 1 and 2 to appropriate levels. Set channels 3 and 4 to slightly low-
er input levels; for example, about -12 dB lower than channels 1 and 2.


Input Select


Analog


Rec Freq.


44.1 kHz


Rec Bit


16 bit


Rec Mode


STEREOx2


Pre Recording


OFF


Project Name


Date

R-4_e.book 78 ページ 2005年2月10日 木曜日 午後3時36分

Содержание R-4

Страница 1: ...AY Roland Scandinavia Avd Kontor Norge Lilleakerveien 2 Postboks 95 Lilleaker N 0216 Oslo NORWAY TEL 2273 0074 POLAND MX MUSIC SP Z O O UL Gibraltarska 4 PL 03664 Warszawa POLAND TEL 022 679 44 19 PORTUGAL Roland Iberia S L Portugal Office Cais das Pedras 8 9 1 Dto 4050 465 Porto PORTUGAL TEL 22 608 00 60 ROMANIA FBS LINES Piata Libertatii 1 535500 Gheorgheni ROMANIA TEL 266 364 609 RUSSIA MuTek 3...

Страница 2: ...ommunications However there is no guarantee that interference will not occur in a particular installation If this equipment does cause harmful interference to radio or television reception which can be determined by turning the equipment off and on the user is encouraged to try to correct the interference by one or more of the following measures Reorient or relocate the receiving antenna Increase ...

Страница 3: ...t is uncom fortable If you experience any hearing loss or ringing in the ears you should immediately stop using the unit and consult an audiologist 011 Do not allow any objects e g flammable material coins pins or liquids of any kind water soft drinks etc to penetrate the unit 012b Immediately turn the power off remove the AC adaptor from the outlet and request servicing by your retailer the neare...

Страница 4: ...aptor and all cords coming from external devices 109b Before cleaning the unit turn off the power and unplug the AC adaptor from the outlet 110b Whenever you suspect the possibility of lightning in your area disconnect the AC adaptor from the outlet 111 Selection If used improperly batteries may explode or leak and cause damage or injury In the interest of safety please read and observe the follow...

Страница 5: ...inside the unit Damage or malfunction may result if you attempt to use the unit in this condition Therefore before using the unit you must allow it to stand for several hours until the condensation has completely evaporated Maintenance 401a For everyday cleaning wipe the unit with a soft dry cloth or one that has been slightly dampened with water To remove stubborn dirt use a cloth impregnated wit...

Страница 6: ... in any location where it may be affected by vibration from external sources or on any surface that is not stable and level If the device includes a cooling fan ensure that the fan and the side panel air vents remain unobstructed Do not leave the unit in any environment subject to temperature extremes for example in a closed automobile in summer or outdoors during winter Do not use the unit in con...

Страница 7: ...Editing 48 Editing procedure 48 Effects setting 55 Effects 56 Using effects 58 System settings 60 System Menu 60 Example operations 65 Appendix 70 Handling memory cards 70 Connection to a computer 72 Connecting a video device that has a LANC connector 74 Application guide 75 Connecting an external mic for CD quality stereo recording 75 Recording birdsongs outdoors 76 Recording audio while shooting...

Страница 8: ...er on p 24 USB cable 1 meter You can use this cable to connect the R 4 to the USB connector of your computer Connection to a computer p 72 If the AC adaptor or USB cable becomes damaged or if you need a replacement for any reason please contact one of the Service Centers listed in the Information section at the end of this manual Don t remove the ferrite core that s attached to the USB cable Carry...

Страница 9: ...k from occurring Power switch POWER This turns the power on off To turn the power on or off press and hold the power switch for about two seconds The power switch is lit green when the power is on Don t turn the power off during recording or playback Before you turn off the power you must make sure that recording or playback is stopped If you accidentally turn off the power during recording the da...

Страница 10: ...r microphones that require phantom power You risk causing damage if you mistakenly supply phantom power to dynamic microphones audio playback devices or other devices that don t require such power Be sure to check the specifications of any microphone you intend to use by referring to the manual that came with it This instrument s phantom power 48 V DC 8 mA Max total of all channels must be 25 mA o...

Страница 11: ... is immediately before the current location the previous marker button This button moves you to the marker that is immediately after the current location the next marker Mark button MARK By pressing this button you can assign a marker to a desired location in the project file Markers are numbered sequentially starting at the beginning of the project A B Repeat button A B REPEAT This button lets yo...

Страница 12: ...value You can also press this when you want to use the Finder function For more about the Finder function refer to The Finder screen p 41 Scrub dial SCRUB VALUE Use this dial to select among items for which settings are made or to modify a value While stopped or when playback is paused you can turn the scrub dial to move the current location forward or backward Shuttle dial SHUTTLE While the proje...

Страница 13: ... lit blue during playback During playback you can press the PLAY button once again to play at double speed During double speed playback press the PLAY button once again to return to normal playback During double speed playback the lower part of the display will indicate PLAY X2 Double speed playback will change the pitch If you want to turn off the double speed playback feature go to the System Se...

Страница 14: ...When you stop recording on your video device the R 4 will also stop recording For details refer to Connecting a video device that has a LANC connector p 74 USB connector USB Use the included USB cable to connect this to your computer Projects recorded on the R 4 can be moved or copied to your computer Files from your computer can also be moved or copied to the R 4 s hard disk AC adaptor jack DC IN...

Страница 15: ... hum may occur depending on the particulars of your installation If you are unsure of the connection method contact the nearest Roland Service Center or an authorized Roland distributor as listed on the Information page Unsuitable places for connection Water pipes may result in shock or electrocution Gas pipes may result in fire or explosion Telephone line ground or lightning rod may be dangerous ...

Страница 16: ...u to connect phantom powered condenser mics In this case turn on the phantom power switch fig XLR TRS This instrument is equipped with balanced XLR TRS type jacks Wiring diagrams for these jacks are shown below Make connections after first checking the wiring diagrams of other equipment you intend to connect Line output jacks LINE OUT These jacks output an analog audio signal You can use RCA phono...

Страница 17: ...ry compartment Be sure to observe the correct polarity when installing the batteries If you re using the AC adaptor there s no need to install batteries Make sure to switch off the R 4 s power before you change from AC adaptor operation to battery operation or vice versa For details refer to Installing batteries and turning the power on p 25 Bottom panel 41 41 R 4_e book 17 ページ 2005年2月10日 木曜日 午後3時...

Страница 18: ...his will indicate 1L and 1R If you re using two stereo channels this will in dicate 1L 1R 2L 2R For a monaural project this area will show 1 2 3 and 4 according to the num ber of channels Output assignments These show how the audio of each channel is assigned to the L R output channels L means that the audio is assigned to the left channel R to the right channel and LR to both left and right chann...

Страница 19: ...wer is being supplied to the R 4 The plug icon is shown if power is being supplied by the AC adaptor and the battery icon is shown if power is being supplied by batteries Remaining time During playback this indicates the remaining time from the current location to the end of the project Channel level sliders Use these to adjust the playback level of each channel Use the left right CURSOR FINDER bu...

Страница 20: ...g time that recording to the hard disk can take place The remaining time will depend on the sampling frequency Sample Freq sample size Rec Bit and recording mode Rec Mode settings The indication shows how much longer you can record with the current settings Total recording time Indicates the total time from the beginning of recording to the current location Even if you record continuously another ...

Страница 21: ...ct you want to record Monaural projects fig project M1 eps What is a project Type Structure MONOx1 If there is only one channel a monaural WAV file will be created with a name consist ing of the project name plus an extension of wav MONOx2 MONOx3 MONOx4 If there are 2 4 channels a folder will be created with a name consisting of the project name plus an extension of pjt and within that folder will...

Страница 22: ...en a new file will be created and recording will continue When you finish recording these files will appear as separate projects About BWF Each WAV file within a project is in BWF format In addition to the conventional WAV data the file contains information about the recording time recorder EDIROL R 4 and marker data Of course these files can be loaded into players or waveform editing software in ...

Страница 23: ...ixers Headphones AC adaptor USB PHONES USB DIGITAL OUT L CONNECTOR DIGITAL OUT LINE IN DIGITAL IN LINE OUT AC outlet DC IN LANC LANC connection Video camera with a LANC connector USB connection Personal computer with a USB connector Digital connection Equipment that has a digital output jack Analog connection Equipment that has a line input jack Equipment that has a digital input jack Digital conn...

Страница 24: ... Plug the AC adaptor into an AC power outlet To prevent the inadvertent disruption of power to your unit should the plug be pulled out accidentally and to avoid applying undue stress to the AC adaptor jack anchor the power cord using the cord hook as shown in the illustration 3 To turn the power on press and hold the R 4 s POWER switch for about two seconds Wait until the main screen appears Turni...

Страница 25: ...LUE dial set the Battery Type to Alkaline if you ve installed alkaline batteries or to Ni MH if you ve installed nickel metal hydride batteries The setting is activated as soon as you select it 10 When you ve finished making settings press the EXIT button You re returned to the previous screen 11 When you re back in the System Menu screen press the EXIT button once again Although the indication EN...

Страница 26: ...ing alkaline batteries 44 1 kHz 16 bit stereo phantom power off The values for battery life shown above are only approximate they will vary depending on your system and conditions of use The life of the battery will be shortened if you leave the display backlighting turned on or if you make heavy use of effects There is a System setting that allows you to specify the length of time that the backli...

Страница 27: ...osition Phantom power switch If you ve connected a phantom powered condenser mic turn this ON fig input analog eps System settings Press the R 4 s SYSTEM button In 1 Recording Setup set Input Select to Analog Set the other items in 1 Recording Setup as appropriate for the recording you want to make For more about system settings refer to System settings p 60 Limiter Turn this ON if you want to pre...

Страница 28: ...xpect to record 3 Gradually turn the input level knob toward the right 4 Adjust the level so that the level meter shown in the display reaches a point slightly before C clip level If the recording level is too low quiet sounds will not be recorded If the recording level is too high soft sounds will be distorted producing a crackling noise in the recording The level meter indicates the clip level C...

Страница 29: ... precision device If you subject the hard disk to impacts such as the following the data may not be read or written successfully causing recording or playback to be unsuccessful In the worst case irreparable damage may occur Please be careful not to subject the R 4 to strong impact or continued vibration while using it The following actions will cause malfunctions Subjecting the unit to impact suc...

Страница 30: ...Adjusting the input level p 28 Input levels of the internal mics are adjusted by knob 1 MIC L and knob 2 MIC R Record button REC Press the REC record button to begin recording For details on recording standby refer to Recording standby p 28 Other settings If you want to monitor the sound that s being recorded connect headphones to the PHONES jack and use the monitor level knob to adjust the volume...

Страница 31: ...pling frequency that is being input the incoming digital audio data will be converted to the sampling frequency Rec Freq and sample size Rec Bit that are specified in Recording Setup Record button REC Press the REC record button to begin recording For details on recording standby refer to Recording standby p 28 Other settings If you want to monitor the sound that s being recorded connect headphone...

Страница 32: ...e from the Roland PCS series Input level select switch Set to LINE Phantom power switch Turn this OFF fig input analog eps System settings Press the R 4 s SYSTEM button In 1 Recording Setup set Input Select to Analog Set the Rec Mode to STEREOx1 Set the other items in 1 Recording Setup as appropriate for the recording you want to make For more about system settings refer to System settings p 60 Re...

Страница 33: ...egularized in contrast to a live audio source whose levels might change unpredictably or if you have already checked the maximum volume levels that are going to occur Turn this ON if you need to prevent clipping distortion that might be caused by unexpectedly loud volumes or strong attacks Other settings If you want to monitor the sound that s being recorded connect headphones to the PHONES jack a...

Страница 34: ...connect the R 4 s LINE OUT line input jacks or DIGITAL OUT digital output jack to your amplified speakers 4 Switch on the R 4 s power 5 Next switch on your speakers and gradually increase the volume to the desired level The R 4 does not provide a way to adjust the volume of the audio that is output from its line output jacks Here s how to connect a mixer or other audio device that has line input j...

Страница 35: ...on the R 4 2 Switch off your MD recorder 3 Connect the R 4 s DIGITAL OUT jack to the digital input jack of your MD recorder You ll need a separately available coaxial type cable not included for connecting the R 4 s digital output jack to your digital device 4 Switch on the R 4 s power 5 Next switch on your MD recorder The R 4 does not provide a way to adjust the volume of the digital audio signal...

Страница 36: ...k mode Only the selected project will play Sequential The projects in the folder containing the currently selected project will play consecutively Repeat OFF ON Selects whether playback will repeat If Play Mode is Single only that project will play repeatedly If it is Sequential the projects in the folder containing the currently select ed project will play consecutively and then the projects in t...

Страница 37: ...Speaker screen appears You can t monitor via the internal speakers while recording You ll need to monitor through headphones Note that sound will not be output from the speakers if headphones are connected If you want to use the internal speakers you must disconnect the headphones For more about system settings refer to System settings p 60 Speaker Speaker Switch setting Output destination ON Inte...

Страница 38: ...NEXT button to select the project you want to play The projects are in alphabetical order 2 Press the PLAY button The selected project will play 3 Slowly raise the MONITOR level knob to the desired volume for listening Projects with names beginning with are ignored and will not be shown The project name will not be displayed correctly if the project name contains double byte characters e g Japanes...

Страница 39: ...indicates the number of markers as shown at right Marks are numbered sequentially starting at the beginning of the project You can assign up to 99 markers Repeat steps 1 and 2 to assign markers as desired 3 When you ve assigned one or more markers proceed as follows You can use these operations either while playing or while stopped button Moves to the marker immediately before the current location...

Страница 40: ...lit and that location will be remembered as the end point B for repeat playback fig repeat ab Playback will automatically repeat between the points you specified in steps 1 and 2 To cancel repeat playback press the A B REPEAT button when points A and B have already been assigned The A B REPEAT button will go out and repeat playback will be cancelled Repeat playback A B REPEAT A A B A B Please note...

Страница 41: ...ht button to move into the selected folder i e move to a lower level folder If you want to move back to the upper level folder press the CURSOR left button fig finder select2 eps 3 When the screen at right appears use the CURSOR buttons to choose 1 Select The project will be selected and you will return to the main screen Alternatively with a project selected step 2 you can press the PLAY button i...

Страница 42: ...k to the upper level folder press the CURSOR left button fig finder cf eps If you want to select the CompactFlash card select the hard disk HD and then press the CURSOR right button the contents of the CompactFlash card will appear However this will not be displayed if no CompactFlash card is inserted fig finder delete1 eps 3 When the screen shown in the illustration appears use the CURSOR buttons...

Страница 43: ...the contents of the CompactFlash card will appear However this will not be displayed if no CompactFlash card is inserted fig finder rename1 eps 3 When the screen shown in the illustration appears use the CURSOR buttons to choose 3 Rename fig finder rename2 eps 4 Use the CURSOR left right buttons to move the cursor through the characters of the project name or folder name shown in the display Place...

Страница 44: ...elect the hard disk HD and then press the CURSOR right button the contents of the CompactFlash card will appear However this will not be displayed if no CompactFlash card is inserted fig finder copy1 eps 3 When the screen shown in the illustration appears use the CURSOR buttons to choose 4 Copy fig finder copy2 eps 4 Use the CURSOR up down buttons or the SCRUB VALUE dial to select the copy destina...

Страница 45: ...r level folder If you want to move back to the upper level folder press the CURSOR left button fig finder cf eps If you want to select the CompactFlash card select the hard disk HD and then press the CURSOR right button the contents of the CompactFlash card will appear However this will not be displayed if no CompactFlash card is inserted fig finder move1 eps 3 When the screen shown in the illustr...

Страница 46: ...move to a lower level folder If you want to move back to the upper level folder press the CURSOR left button fig finder cf eps If you want to select the CompactFlash card select the hard disk HD and then press the CURSOR right button the contents of the CompactFlash card will appear However this will not be displayed if no CompactFlash card is inserted fig finder make2 eps 3 When the screen shown ...

Страница 47: ...ers are shown in alphabetical order after the projects Use the CURSOR up down or the SCRUB dial to verify that the new folder was created If an identically named folder already exists a number will be added to the name of the newly created folder e g NewFolder 1 NewFolder 11 NewFolder 111 etc R 4_e book 47 ページ 2005年2月10日 木曜日 午後3時36分 ...

Страница 48: ...up down buttons to adjust this If you decide not to adjust the settings press the EXIT button fig wave 3 eps 3 While playing or fast forwarding press the ENTER button when you reach the beginning point of the region you want to extract Alternatively you can use the scrub dial or shuttle dial to specify the point instead of doing so during playback fig wave trim1 eps The value of point is shown in ...

Страница 49: ...d re specify the beginning of the region point Even when the screen shown at the right is displayed you can halt execution by pressing the EXIT button Don t turn off the power while a project is being saved or while processing is being performed fig wave trim2 eps 6 The extracted region will be saved as a new project with the same name as the original project but with 1 appended to it The original...

Страница 50: ... the EXIT button fig wave2 3 eps 3 While playing or fast forwarding press the ENTER button when you reach the point at which you want to divide the project Alternatively you can use the scrub dial or shuttle dial to specify the point instead of doing so during playback fig wave2 4 eps 4 A screen asking you to confirm the specified point will appear fig wave2 5 eps To execute the Divide operation a...

Страница 51: ...e names The original project will remain unchanged For example if the original project is named Project the new projects will be named Project 1 and Project 2 Project Project Project 1 Project 2 fig media full eps If the internal hard disk does not have enough space to save the project a message of Media Full will appear R 4_e book 51 ページ 2005年2月10日 木曜日 午後3時36分 ...

Страница 52: ...display shows an editing screen like the one at right If you decide to cancel the operation press the EXIT button fig wave3 3 eps 4 Use the CURSOR buttons to select the project that you want to append and press the ENTER button fig wave3 4 eps If you decide to cancel the operation press the EXIT button Even when the screen shown at right is displayed you can halt execution by pressing the EXIT but...

Страница 53: ...pended to it The original project will remain unchanged For example if the original project is named Project the new project will be named Project 1 Project Project 1 Project 2 fig media full eps If the internal hard disk does not have enough space to save the project a message of Media Full will appear R 4_e book 53 ページ 2005年2月10日 木曜日 午後3時36分 ...

Страница 54: ... to specify the value For example in a stereo two channel project STEREO x2 you might set the Mix Level to 6 0 dB so that the level of each channel will be lowered by 6 dB when they are merged If you decide to cancel press the EXIT button fig merge 3 eps 3 To execute press the ENTER button If you decide not to use the Merge command press the EXIT button Even when the screen shown at the right is d...

Страница 55: ...er 2 Graphic EQ You can adjust the gain of six fixed frequency bands 3 Noise Gate This effect minimizes the noise that might be heard in silent regions as well as low frequency noise 4 Enhancer By adding a phase shifted sound to the direct sound this effect sharpens the definition of the sound and pushes it toward the foreground 5 Comp DeEsser This cuts the sibilance that can be obtrusive in a voc...

Страница 56: ...n of the high range equalizer 6 LEVEL 0 120 100 Adjusts the overall volume No Parameter name Range of values Default values Explanation 1 125Hz 12dB 0dB 12dB 0dB Adjusts the gain at 125 Hz 2 250Hz 12dB 0dB 12dB 0dB Adjusts the gain at 250 Hz 3 500Hz 12dB 0dB 12dB 0dB Adjusts the gain at 500 Hz 4 1kHz 12dB 0dB 12dB 0dB Adjusts the gain at 1 kHz 5 2kHz 12dB 0dB 12dB 0dB Adjusts the gain at 2 kHz 6 4...

Страница 57: ...0 1 1 2 1 1 5 1 2 0 1 2 8 1 4 0 1 8 0 1 16 0 1 Inf 1 4 0 1 Adjusts the ratio at which the sound will be compressed when the input exceeds the threshold level Higher ratios mean that the sound will be compressed more strongly 4 ATTACK 0 25 100ms 10ms Adjusts the time over which the amount of compression specified by Ratio will be reached once compres sion is triggered by the input exceed ing the th...

Страница 58: ... the desired effect type For details on each effect type refer to Effects p 56 fig effect link eps 3 Press the CURSOR down button The cursor will move to the Link setting Using effects CH1 CH2 CH3 CH4 The effect on off setting and effect parameter settings will be independent for each channel CH1 2 CH3 4 The effect on off setting and effect parameter settings will be linked for chan nels 1 and 2 a...

Страница 59: ...ile setting effect parameters you can return to the previous screen by pressing the EXIT button The effect settings you make are remembered until you change them However if you change the Type of effect the settings you made will revert to the default values 9 When you ve finished making the desired effect settings press the EXIT button to return to the main screen Each effect has various settings...

Страница 60: ...tting if you want to record via the internal mics Digital Choose this setting if you want to record via the digital input The signal from a digital device connected to the digital input jack will be recorded With this set ting any input from the internal mics or the line input jacks will be ignored The sampling frequency is specified by the Rec Freq setting and the bit depth by the Rec Bit setting...

Страница 61: ... recording to two stereo files If Input Select is Analog a stereo file with chan nel 1 as L and channel 2 as R will be created and another stereo file with channel 3 as L and chan nel 4 as R will also be created You can t select STEREO x2 if Input Select is Int Mic or Digital 4CHx1 Four channel recording to one four channel file Channels 1 4 will be recorded as a single WAVE file Be aware that not...

Страница 62: ...ject will play sequentially and then the projects in that same folder will play sequentially again X2 Play OFF ON This enables disables the double speed playback function that is activated by pressing the PLAY button twice An indication of PLAY x2 will appear at the bottom of the display Press the PLAY button once again to return to normal playback 3 Speaker Menu item Value Function Speaker Switch...

Страница 63: ...eries you re using Choose the Alkaline setting if you re using alkaline batteries or Ni MH if you re using nickel metal hydride batteries If you choose a setting that does not match the type of batteries that are actu ally installed the remaining battery power indication will not be correct L Connector Disable Enable This setting Enables or Disables the function that lets the R 4 be controlled by ...

Страница 64: ...tion Format Formats the CompactFlash card All projects and folders on the CompactFlash card will be erased afterwards the card will be empty Be sure to back up your projects before you execute this command Check Checks the CompactFlash card and after reorganization frees up any space on the card not used by R 4 projects There is no guarantee that this command will restore the CompactFlash card to ...

Страница 65: ...ut Select value The setting is applied as soon as you select it You don t need to press the ENTER button fig recording 3 eps 4 Use the CURSOR buttons to choose Rec Freq 5 Use the SCRUB VALUE dial to select the Rec Freq value 6 In the same way use the CURSOR buttons and the SCRUB VALUE dial to choose and set the remaining items 7 When you ve finished making settings press the EXIT button You re ret...

Страница 66: ... Use the CURSOR buttons and the SCRUB VALUE dial to specify the date and time When you ve finished making settings press the EXIT button You re returned to the System Menu screen If you decide to cancel press the EXIT button 4 Press the EXIT button once again to return to the main screen If you want to make other system related settings use the CURSOR buttons to select the desired menu item Date T...

Страница 67: ...e project name appears 4 Use the CURSOR buttons SCRUB VALUE dial CLEAR button and MARK button to edit the name When you re finished press the ENTER button You re returned to the Project Name screen If you decide to cancel press the EXIT button 5 Press the EXIT button once again to return to the main screen If you want to make other system related settings use the CURSOR buttons to select the desir...

Страница 68: ...the CURSOR buttons to choose either Format or Check and press the ENTER button fig hd uti3 eps 4 The display will ask Are you sure Use the CURSOR buttons to select Yes if you are sure you want to execute or No if you decide to cancel without executing Then press the ENTER button fig hd uti4 eps The message shown at right will appear while processing is being performed Don t turn off the power whil...

Страница 69: ...g fact reset2 eps 4 The display will ask Are you sure Use the CURSOR buttons to select Yes if you are sure you want to execute or No if you decide to cancel without executing Then press the ENTER button When processing has been completed you will automatically return to the System Menu screen 5 Press the EXIT button once again to return to the main screen If you want to make other system related s...

Страница 70: ...y back files from a CompactFlash card You can use CompactFlash cards of up to 2 GB gigabytes in capacity Some models or makes of CompactFlash card may not work correctly with the R 4 Microdrives cannot be used Don t insert or remove a CompactFlash card while it is being accessed Doing so may damage the data in the R 4 or in the CompactFlash card and may damage the card itself Carefully insert the ...

Страница 71: ...ARD slot cover press the eject button and remove the CompactFlash card Before you use a CompactFlash card with the R 4 you ll need to format the card For the formatting procedure refer to page 68 of Executing HDD Utility or CF Utility commands p 68 CompactFlash cards formatted on a device other than the R 4 may not work correctly on the R 4 The CompactFlash card must be formatted in FAT16 format A...

Страница 72: ... The computer will detect the R 4 and the screen shown at right will appear It may take several seconds for detection to occur If you see a dialog box asking you to Windows can perform the same action each time you insert a disk or connect a device with this kind of file click Cancel The computer will detect the R 4 as follows 3 You can copy WAV files from the R 4 to your computer or from your com...

Страница 73: ...hat indicates the R 4 and click OK 6 When your computer indicates Safe To Remove Hardware you can disconnect the USB cable between the R 4 and your computer Alternatively you can switch off power to the R 4 When you disconnect the cable the screen shown at right will appear Never switch off the R 4 s power or disconnect the USB cable before you have closed the connection Doing so may damage the in...

Страница 74: ...g is applied when you select it You don t need to press the ENTER button 5 Press the EXIT button You re returned to the System Menu screen Press the EXIT button once again to return to the main screen In this state the R 4 will operate in synchronization with your video device For details on settings and operation for your video device refer to the manual of your video device 1 Use the special cab...

Страница 75: ...ecording p 27 Here we will explain the settings you ll need to make on the R 4 This is a basic form of recording Panel settings Recording Setup Connecting an external mic for CD quality stereo recording Input level select switch MIC Phantom power switch ON if you re using a condenser mic that requires phantom power otherwise OFF Input Select Analog Rec Freq 44 1 kHz Rec Bit 16 bit Rec Mode STEREOx...

Страница 76: ...ng power Rec Freq 44 1 kHz Rec Bit 16 bit Rec Mode STEREOx1 MONOx1 Set to match the mics that are connected Pre Recording 4 sec The pre recording setting lets you press the record button when you hear birdsong sounds that oc curred several seconds earlier will be captured retro actively If you re trying to capture birdsong a setting of four seconds will be sufficient In compari son to allowing rec...

Страница 77: ...e mic for each actor or instrument You can record up to four mics simul taneously Rec Freq 48 kHz If you re going to shoot video with a video camera and later use a video editing system to bring in the audio tracks recorded by the R 4 it s a good idea to record at 48 kHz Rec Bit 16 bit If you re capturing audio for use in a production in which the video is the main element 16 bit recording provide...

Страница 78: ...m the combo in put jacks Rec Freq 44 1 kHz If you ll be using a computer to edit the waveforms after re cording you may wish to use a higher sampling frequency Rec Bit 16 bit Rec Mode STEREOx2 Choose the STEREO x2 setting so that you can record two ste reo pairs one pair is the line feed from the stage and the other pair is the ambience mics Pre Recording OFF 1 29 sec Specify the pre recording tim...

Страница 79: ...eeds 2 GB The R 4 can handle files up to 2 GB in size Project exists An identically named project already exists Create the project using a different name File Sys Error A problem has occurred with the file system Name too long The project name is too long This message will appear if the project name newly created when you use Trim Combine or copy a project is too long You ll need to shorten the n...

Страница 80: ...ncorrectly Please set the input level switch correctly Refer to Input level select switches p 16 If you re recording from a connected mic make sure that the mic is correctly connected to the combo input jack Also check the setting of the input level select switch and the phantom power switch Refer to Phantom power switches PHANTOM POWER p 10 Input level select switches p 16 You also won t be able ...

Страница 81: ...ings differ significantly between L and R so that the levels are not balanced correctly Even though you ve set the recording levels the sound is distorted when you turn on an effect Since some effects work by emphasizing a portion of the sound this may increase the volume of the overall song thereby causing clipping distortion You may take either of the following two actions Lower the level LEV va...

Страница 82: ...rd disk may not occur in time meaning that that portion of sound will not be recorded When you listen to the recorded project the time count during playback will not skip but there will be a skip of several seconds in the sound of the project During recording please be careful that the R 4 is not subjected to impact The sound skips when you play back through the internal speakers Vibration produce...

Страница 83: ...perate the R 4 Backlight turns off The Backlight setting in LCD Setup may be set to turn off the backlight when the unit has not been operated for a while Refer to 4 LCD Setup p 62 Settings you made have disappeared If effect settings or system settings you made have reverted to their original state it s possible that you inadvertently reset the R 4 to its factory set condition Refer to Executing ...

Страница 84: ...hone type Digital Input Output Coaxial type conforms to IEC60958 Input Impedance 4 k ohms Nominal Input Level Variable Line Level 33 4 dBu MIC Level 60 23 dBu Output Impedance LINE Out 950 ohms Headphones 10 ohms Output Level LINE Out 10 dBV Headphones 40 mW 40 mW Limiter threshold level 10 dB relative to digital full scale maximum compression ratio 1 3 Residual Noise Level LINE Out 85 dBu Digital...

Страница 85: ...imiter Switch Scrub Value Shuttle Dial Transport Buttons PREV NEXT STOP PLAY PAUSE REC Marker Buttons CLEAR PREV NEXT MARK Function Buttons WAVE EDIT EFFECTS SYSTEM A B Repeat Button Display Button Display 128 x 64 dots Graphic LCD backlit LCD Power Supply AC Adaptor Alkaline dry battery LR6 AA type x 8 or Nickel Hydrogen battery HR15 51 x 8 Power Consumption 2000 mA Dimensions 240 W x 217 4 D x 7...

Страница 86: ...4 R INPUT3 L DIGITAL IN Coaxial GAIN LIMITER MIC LINE LEVEL SW GAIN LIMITER A D A D L R LINE OUT L R PHONES USB 2 0 1 1 USB MASS STORAGE DEVICE L R Built in SPEAKER DIGITAL OUT Coaxial L R 44 1 48 96 SAMPLE RATES COMPACTFLASH CF Built in MIC MONITOR LEVEL DSP EFFECTS R 4_e book 86 ページ 2005年2月10日 木曜日 午後3時36分 ...

Страница 87: ...87 Deutsch Beschreibung des R 4 p 88 Français PrésentatioFrancaisn du R 4 p 94 Italiano Presentazione dell R 4 p 100 Español Presentación del R 4 p 106 R 4_e book 87 ページ 2005年2月10日 木曜日 午後3時36分 ...

Страница 88: ...chalter POWER Schaltet das Gerät an und aus Hierzu drücken Sie die Taste und halten Sie etwa zwei Sekunden lang ge drückt Wenn das Gerät eingeschaltet ist leuchtet die Taste grün Bei Aufnahme oder Wiedergabe darf das Gerät nicht ausgeschaltet werden Vergewissern Sie sich vor dem Ausschalten dass Wiedergabe oder Aufnahme gestoppt sind Falls Sie das Gerät während einer Aufnahme versehentlich ausscha...

Страница 89: ...tplatte des R 4 keine Dateien gespei chert sind die das R 4 verarbeiten kann WAV Dateien sind die einzigen Dateitypen die das R 4 verarbei ten kann Effekt Taste EFFECTS Details finden Sie unter Effects setting S 55 Systemtaste SYSTEM Details finden Sie unter System settings S 60 Marker MARKER Löschtaste CLEAR Mit dieser Taste löschen Sie einen Marker den Sie mit der Mark Taste gesetzt haben Die Ma...

Страница 90: ...igen Sie eine Einstellung oder schließen Sie eine Eingabe ab Die Taste dient auch zur Nutzung der Finder Funktion Informationen zur Finder Funktion finden Sie unter The Finder screen S 41 Drehregler SCRUB VALUE Mit diesem Drehregler wählen Sie Teile aus für die Einstellungen vorgenommen werden sollen Er dient auch zum Verändern eines Wertes Wenn die Wiedergabe gestoppt oder unterbrochen ist können...

Страница 91: ...im unteren Teil des Displays PLAY X2 angezeigt Die Widergabe mit doppelter Ge schwindigkeit verändert die Tonhöhe Wenn Sie die Option des Abspielens mit doppelter Geschwindigkeit ausschalten möchten stellen Sie in den System einstellungen unter Player Setup X2 Play OFF ein Weitere Details finden Sie unter 2 Player Setup S 62 Aufnahmetaste REC Die Aufnahme erfolgt unmittelbar nachdem Sie die REC Ta...

Страница 92: ...eichnen nimmt das R 4 parallel ebenfalls auf Wenn Sie die Aufzeichnung am Videogerät anhalten stoppt das R 4 ebenfalls die Aufnahme Detaillierte Informationen finden Sie unter Connecting a video device that has a LANC connector S 74 USB Anschluss USB AC Netzgerätbuchse DC IN Kabelklemme Auswurftaste Speicherkartenaufnahme MEMORY CARD Das R 4 kann nur CompactFlash Speicherkarten TYPE 1 verwenden Mi...

Страница 93: ...ise hierzu finden Sie unter 1 Recording Setup S 60 Line Ausgangsbuchsen LINE OUT Diese Buchsen geben dasselbe Signal aus wie der digitale Ausgang und die Kopfhörerbuchse Der nominale Ausgangspegel ist fest auf 10 dBV eingestellt die Lautstärke dieser Ausgangsbuchsen ist nicht veränderbar Batteriefach Legen Sie hier bitte Batterien ein wenn Sie das R 4 netzunabhängig nutzen möchten Wenn Sie das Net...

Страница 94: ...interrupteur met l appareil sous tension et hors tension Pour allumer ou éteindre l appareil appuyer pendant environ deux secondes sur l interrupteur Celui ci est éclairé en vert lorsque l appareil est sous ten sion Ne pas mettre l appareil hors tension pendant l enregistrement ou la lecture Interrompre impérativement la lecture et l enregistrement avant toute mise hors tension En cas de mise hors...

Страница 95: ...er en mode Wave Edit lorsque le disque dur ne contient pas de fichiers susceptibles d être pris en charge par le R 4 Seuls les fichiers au format WAV sont pris en charge par le R 4 Touche d effets EFFECTS Pour plus de détails voir le Effects setting p 55 Touche système SYSTEM Pour plus de détails voir le System settings p 60 Marqueur MARKER Touche Effacer CLEAR Cette touche supprime un marqueur in...

Страница 96: ... touche permet de confirmer un paramètre ou de finaliser une valeur Vous pouvez également ap puyer sur cette touche pour utiliser la fonction Recherche Pour en savoir plus sur la fonction Recherche voir The Finder screen p 41 Touche Scrub SCRUB VALUE Cette touche permet de modifier une valeur ou de naviguer parmi les éléments paramétrés Lorsque l ap pareil est arrêté ou que la lecture est sur paus...

Страница 97: ...revenir au mode de lecture normale Pendant la lecture à double vitesse la partie inférieure de l écran affiche PLAY X2 Pen dant la lecture à double vitesse la tonalité est modifiée Pour désactiver la fonction de lecture à double vitesse ouvrir le menu Paramétrage Système et sélectionner X2 Play OFF dans le menu Paramètres de lecture Pour plus de détails voir 2 Player Setup p 62 Bouton d enregistre...

Страница 98: ... moment où l équipement vidéo dé bute l enregistrement De même le R 4 arrête l enregistrement en même temps que l équipement vidéo Pour plus d informations voir Connecting a video device that has a LANC connector p 74 Connecteur USB Prise adaptateur AC DC IN Réducteur de tension Touche EJECT Fente carte mémoire MEMORY CARD Le R 4 n est compatible qu avec les cartes mémoire CompactFlash TYPE 1 Les ...

Страница 99: ...Setup p 60 Prises de sortie de ligne LINE OUT Ces prises produisent le même signal que le connecteur de sortie numérique et la prise casque Le niveau de sortie nominale est fixé à 10 dBV Le volume de ces prises n est pas réglable Logement des piles Si le R 4 doit fonctionner sans être branché sur le secteur insérer les piles dans le compartiment prévu à cet effet Il n est pas utile d installer des...

Страница 100: ...torno acustico Interruttore di alimentazione POWER Accende spegne l apparecchio Per accendere o spegnere l apparecchio premere e tenere premuto l interruttore di alimentazione per due secondi circa L interruzione di alimentazione si illumina di verde quando l apparecchio è acceso Non spegnere l apparecchio durante la registrazione o la riproduzione È necessario assicurarsi che la riproduzione o la...

Страница 101: ...nto alla sezione Editing p 48 Non è possibile attivare il Wave Edit mode se il disco fisso dell R 4 non contiene nessun file compatibile con l R 4 I file WAV sono l unico tipo di file compatibili con l R 4 Pulsante effects EFFECTS Per maggiori informazioni fare riferimento alla sezione Effects setting p 55 Pulsante system SYSTEM Per maggiori informazioni fare riferimento alla sezione System settin...

Страница 102: ... FINDER Utilizzare questo pulsante per confermare un impostazione o un valore È anche possibile premere questo pulsante per utilizzare la funzione finder Per maggiori informazioni sulla funzione finder fare riferimento alla sezione The Finder screen p 41 Potenziometro scrub SCRUB VALUE Utilizzare questo potenziometro per selezionare le voci da impostare o per modificare un valore In fase inattiva ...

Страница 103: ...ale Durante la riproduzione a doppia velocità nella parte inferiore del display verrà visualizzata la scritta PLAY X2 La riproduzione a doppia velocità modificherà il tono Per disattivare la funzione di riproduzione a doppia velocità passare alle Impostazioni del riproduttore nel menu Impostazioni del sistema e impostare X2 PLAY su OFF Per maggiori informazioni fare riferimento alla sezione 2 Play...

Страница 104: ... R 4 avvierà la registrazione in serie Quando si termina la registrazione sul dispositivo video anche l R 4 terminerà la registrazione Per maggiori informazioni fare riferimento alla sezione Connecting a video device that has a LANC connector p 74 Connettore USB USB Jack dell adattatore AC DC IN Fermo del cavo Pulsante Eject Alloggiamento per la scheda di memoria MEMORY CARD L R 4 supporta solamen...

Страница 105: ...to alla sezione 1 Recording Setup p 60 Jack di uscita di linea LINE OUT Questi jack trasmettono lo stesso segnale del connettore di uscita digitale e del jack delle cuffie Il livello nominale di uscita è fissato a 10 dBV e il volume di questi jack non può essere regolato Vano batterie Inserire le batterie in questo vano se si desidera alimentare l R 4 mediante batterie Se si utilizza l adattatore ...

Страница 106: ...acústico Interruptor de alimentación POWER Este interruptor se utiliza para encender y apagar la unidad Para encender o apagar la alimentación mantenga pulsado este interruptor durante dos segundos aproximadamente El interruptor de alimentación se encenderá en verde cuando la unidad esté encendida No apague la alimentación durante una grabación o una reproducción Antes de apagar la unidad debe ase...

Страница 107: ...onsulte Editing pág 48 No podrá acceder al modo Wave Edit modificación de onda si el disco duro del R 4 no contiene archivos que admita el R 4 Los archivos WAV son el único tipo de archivo que admite el R 4 Botón de efectos EFFECTS Para obtener más detalles consulte Effects setting pág 55 Botón de sistema SYSTEM Para obtener más detalles consulte System settings pág 60 Marcador MARKER Botón de bor...

Страница 108: ...te botón para confirmar un ajuste o aceptar un valor También puede pulsarlo cuando desee utilizar la función Finder búsqueda Para obtener más información sobre la función Finder búsqueda consulte The Finder screen pág 41 Mando de selección SCRUB VALUE Utilice este mando para realizar selecciones entre los elementos de una configuración o para modificar un valor Cuando la reproducción se ha detenid...

Страница 109: ...reproducción a doble velocidad en la parte inferior de la pantalla aparecerá PLAY X2 reproducción a doble velocidad La reproducción a doble velocidad cambiará el tono Si desea desactivar la función de reproducción a doble velocidad vaya al menú System Settings configuración del sistema y en Player Setup configuración del reproductor desactive X2 Play reproducción a doble velocidad Para obtener más...

Страница 110: ...rá a grabar también Cuando detenga la grabación en el dispositivo de vídeo el R 4 también detendrá la grabación Para obtener más detalles consulte Connecting a video device that has a LANC connector pág 74 Conector USB USB Jack del adaptador de CA DC IN Gancho de seguridad del cable Botón de expulsión Ranura de la tarjeta de memoria MEMORY CARD El R 4 sólo puede utilizar tarjetas de memoria Compac...

Страница 111: ...o 1 2 y 3 4 Para obtener más detalles consulte 1 Recording Setup pág 60 Jacks de salida de línea LINE OUT Estos jacks producen la misma señal que el conector de salida digital y el jack de auriculares El nivel de salida nominal se fija en 10 dBV y el volumen de estos jacks no se puede ajustar Compartimento de las pilas Coloque las pilas en este lugar si desea que el R 4 funcione con pilas Si está ...

Страница 112: ...Cursor Monitor Select buttons 12 D Date 62 Date Time 63 66 DC IN 14 Delete 42 Digital 60 digital device 31 DIGITAL IN 14 Digital input connector 14 DIGITAL OUT 14 Digital output connector 14 digital recording device 35 DISPLAY 11 Display 13 18 Display button 11 Divide 50 E Effect button 11 EFFECTS 11 effects 55 58 Eject button 14 Enhancer 57 ENTER FINDER 12 Enter Finder button 12 EXIT 12 Exit butt...

Страница 113: ... 13 Pause button 13 PHANTOM POWER 10 Phantom power switch 10 27 30 32 75 78 PHONES 15 pjt 22 PLAY 13 Play button 13 Play Mode 36 62 Player Setup 36 62 POWER 9 24 Power source 19 Power switch 9 Pre Recording 61 75 78 PREV 13 PREV button 13 Progress bar 18 Project exists 79 Project Name 18 62 63 67 75 78 R REC 13 Rec Bit 60 75 78 Rec Freq 60 75 78 Rec Mode 61 75 78 Record button 13 28 30 31 33 Recor...

Страница 114: ...ounter 18 20 Top panel 9 Total recording time 20 Total time 18 Trim 48 U USB 14 USB cable 8 USB connector 14 W wav 22 WAVE EDIT 11 Wave edit button 11 Windows 73 X X2 Play 36 62 R 4_e book 114 ページ 2005年2月10日 木曜日 午後3時36分 ...

Страница 115: ...ommunications However there is no guarantee that interference will not occur in a particular installation If this equipment does cause harmful interference to radio or television reception which can be determined by turning the equipment off and on the user is encouraged to try to correct the interference by one or more of the following measures Reorient or relocate the receiving antenna Increase ...

Страница 116: ...AY Roland Scandinavia Avd Kontor Norge Lilleakerveien 2 Postboks 95 Lilleaker N 0216 Oslo NORWAY TEL 2273 0074 POLAND MX MUSIC SP Z O O UL Gibraltarska 4 PL 03664 Warszawa POLAND TEL 022 679 44 19 PORTUGAL Roland Iberia S L Portugal Office Cais das Pedras 8 9 1 Dto 4050 465 Porto PORTUGAL TEL 22 608 00 60 ROMANIA FBS LINES Piata Libertatii 1 535500 Gheorgheni ROMANIA TEL 266 364 609 RUSSIA MuTek 3...

Отзывы: