background image

14 

Start / Stop talk 
Button 

  / 


Start or stop playing your voice through IP camera’s audio 
output. When talk is stopped, people at IP camera will not 
hear you. 
 
Please note: you need a microphone connected to your 
computer, and computer’s mixer setting must enable 
microphone recording, or nothing will be outputted by IP 
camera. 


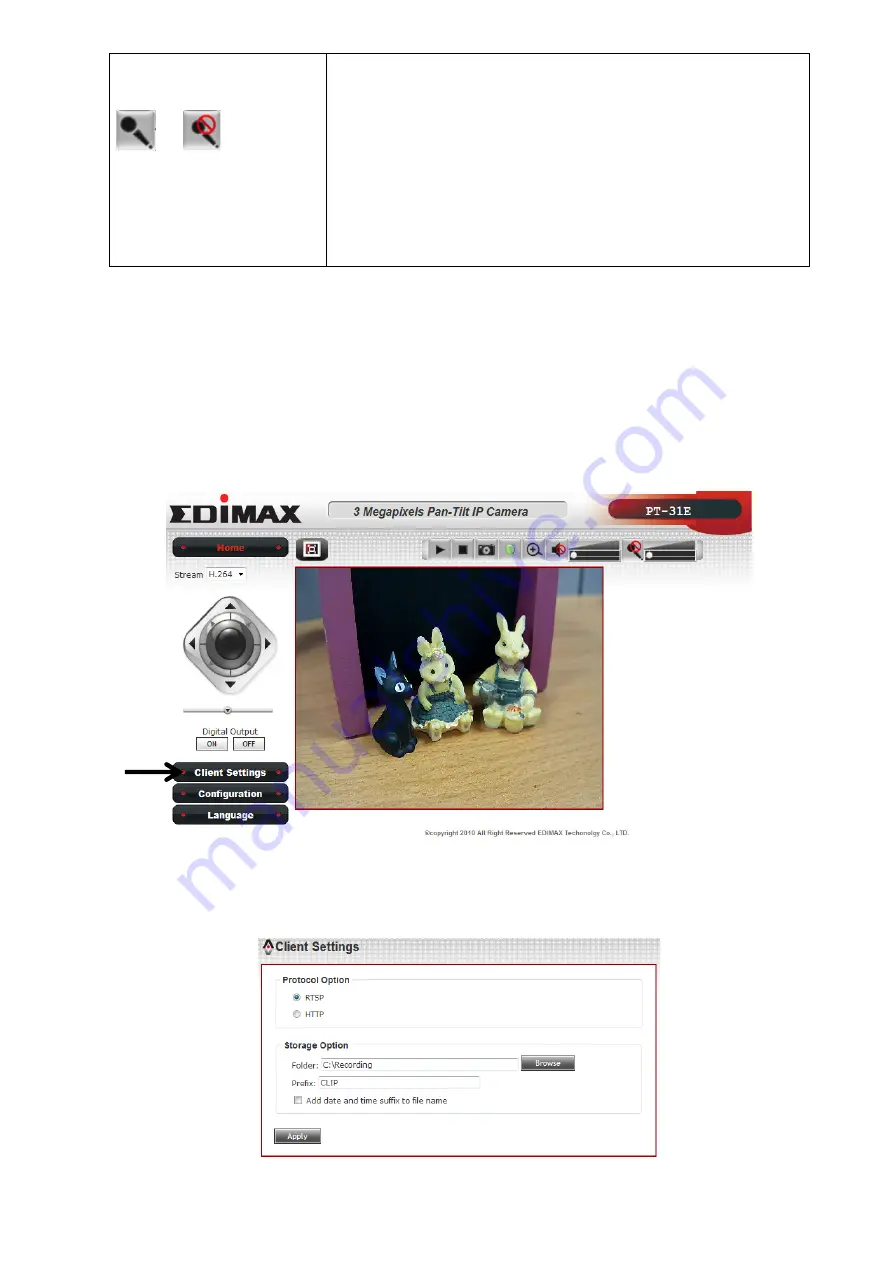
2-3 Client Settings


In ‘Client Settings’ menu, you configure basic IP camera settings like data transfer protocol 
and data storage folder. 
 
To access ‘Client Settings’ menu, click ‘Client Settings’ button on the left. 


The following screen will appear: 


All manuals and user guides at all-guides.com

Содержание PT-31

Страница 1: ...All manuals and user guides at all guides com a l l g u i d e s c o m...

Страница 2: ...ation and to make changes from time to time in the contents hereof without the obligation to notify any person of such revision or changes The product you have purchased and the setup screen may appea...

Страница 3: ...3 4 IP Filter 23 3 5 Video 24 3 5 1 Image Settings 25 3 5 2 Video Settings 26 3 5 3 Overlay Settings 28 3 6 Audio 29 3 7 Motion Detection 30 3 8 Pan Tilt Zoom Control 32 3 8 1 RS 485 Setup Page 32 3 9...

Страница 4: ...4 3 6 Security 77 4 4 Video Playback 80 4 4 1 Advanced Search 82 4 4 2 Event Search 85 4 4 3Video Playback 89 Federal Communication Commission Interference Statement 92 All manuals and user guides at...

Страница 5: ...tware and user manual 1 pcs Quick installation guide 1 pcs 1 2 Getting Familiar with Your New Network Camera Item Description 1 Light sensor Detects light level of the place where this IP camera insta...

Страница 6: ...s of IP camera in IP camera s configuration menu This will be helpful if you don t want other people to know the operation status of this IP camera Item Description 1 Audio out Connects to external au...

Страница 7: ...card supported DI DO PIN ASSIGNMENT Item Description GND Signal ground DO Digital Output 1 DI1 Digital Input 1 DI2 Digital Input 2 To insert or release a wire press the button of the PIN you wish to...

Страница 8: ...nto the slot at the bottom of the network camera Step 3 Screw mounting plate B to the network camera via the 2 holes indicated by the arrows Step 4 Mount the network camera on to the wall All manuals...

Страница 9: ...the hole indicated by the arrow Step 6 When mounted on the wall the cables can pass through mounting plate A as in the picture Step 7 Connect an Ethernet cable to the network camera via the Ethernet...

Страница 10: ...power adapter to the network camera then plug the power adapter into a wall socket The camera s LED lights should light up after a few seconds and the camera will test its pan and tilt motor within 1...

Страница 11: ...s are powered on and connected to network first Step 3 When you find a network camera select it and click Link to access it via web browser Note You can also access the network camera s web configurat...

Страница 12: ...prompted or you will not be able to see the videos in the network camera 2 2 Live Monitoring After ActiveX control is installed you can view IP camera s video by web browser Just connect to IP camera...

Страница 13: ...etting menu Configuration Open Configuration menu Language Open language menu you can switch web interface to other language Available languages English Simplified Chinese Traditional Chinese Original...

Страница 14: ...ompted to indicate the folder on your computer to save video file Enable Digital Zoom button This function will enlarge video view digitally so you can see objects in video in detail Please note that...

Страница 15: ...r computer and computer s mixer setting must enable microphone recording or nothing will be outputted by IP camera 2 3 Client Settings In Client Settings menu you configure basic IP camera settings li...

Страница 16: ...t a folder Prefix When saving video files the characters you typed in Prefix field will be used as leading characters of video file s name For example the default setting of Prefix is CLIP and video f...

Страница 17: ...ch provides various kinds of system setting To access configuration menu click Configuration button on the left The Configuration submenu will appear please pick a setup item you wish to configure 3 1...

Страница 18: ...Select this option and date time setting will not be changed when you click Apply in the page You can check Camera Date and Time item in this page to know IP camera s current date and time setting Sy...

Страница 19: ...change administrator s user name it will always be administrator Here are the descriptions of every setup item Item Description Password Retype Password Administrator Input administrator s new passwor...

Страница 20: ...ers Password Retype Password Input this user s password in both Password and Retype Password field Authority To define this user s access privilege select User or Guest in dropdown menu When you finis...

Страница 21: ...address Prefix Length Input IPv6 IP address prefix length 0 128 Subnet Mask Input subnet mask Gateway Input gateway address Primary DNS Input DNS server s IP address Secondary DNS Input backup DNS ser...

Страница 22: ...t number When this port number changes you must change corresponding settings in external network devices NVR or CMS software so they can receive this IP camera s video RTP Data Port Input RTP data po...

Страница 23: ...local area network must support QoS You can select Video Audio s QoS DSCP value 0 to 63 or both video and audio DDNS Enable DDNS support if your ISP assigns dynamic IP address to you You must register...

Страница 24: ...k this Box to disable this function Accepted IP list Here lists all IP address that can build connections to this IP camera If you want to remove a set of IP address from the list click on the IP addr...

Страница 25: ...on IP Address Accepted IP list Input the starting and ending IP address of IP address you wish to deny connections here IP camera will deny connections established from these IP address If you want to...

Страница 26: ...ers in this page Here are the descriptions of every setup item Item Description Brightness Contrast Saturation Shaprness Control the image parameters Click to decrease value or click to increase value...

Страница 27: ...cy of power line of the place you re using this IP camera This will help to reduce the flicker of certain lights in the image When you finish with above settings click Apply button to save changes 3 5...

Страница 28: ...o quality There are 5 levels of video quality select very high to improve video quality but consumes more network bandwidth and select very low will decrease video quality and consumes less network ba...

Страница 29: ...ground color You may find this will help the readability of time stamp text in some cases Enable Text Display Check this box to display certain text on video this will help when you need to identify c...

Страница 30: ...mp jpg jpeg image files only 2 Image s resolution should be less than 160 x 128 and can be divided by 4 3 Do not upload image files that size is greater than 64KB When you finish with above settings c...

Страница 31: ...s box to disable it Audio Type Speaker The format is fixed as G 711 When you finish with above settings click Apply button to save changes 3 7 Motion Detection This IP camera is capable to detect obje...

Страница 32: ...y want to adjust width or height drag the four sidebars top bottom left and right Title Window 1 to Window 3 Input characters in title field to change motion detection area s title text so you can ide...

Страница 33: ...ol via RS 485 connection you can use this function to control pan tilt camera cradle so you can control the orientation of IP camera from remote place 3 8 1 RS 485 Setup Page In this page you can setu...

Страница 34: ...ion will be located at the correct position without deviation after a period of usage Preset list This IP camera supports up to 8 preset points You can move camera to preset point and camera will stop...

Страница 35: ...button You can also adjust the order or preset points in patrol list select a preset point and click or button When you finish click Apply button 3 9 Event When there s an event you can use this setu...

Страница 36: ...ions of every setup item is listed below Item Description Enable Setting Check this box to enable this event If you just want to disable this event temporarily you can uncheck this box to keep this ev...

Страница 37: ...nable EMAIL Check this box and IP camera will send an Email to designated recipient address refer to SMTP Server setting in Event Server tab when this event is activated Enable Samba Net Storage Check...

Страница 38: ...s You may want to know what happened before event is triggered in many cases especially when object is outside of motion detection window Note If the Pre Event set to 0 second the Post Event cannot se...

Страница 39: ...Description Enable FTP Server Check this box to enable FTP server upload FTP Server Input FTP server s IP address or hostname Port Input FTP server s port number In most cases it should be default va...

Страница 40: ...you check this box while others don t Test FTP Click this button to test FTP server settings above immediately SMTP Server Check this box to enable Email send SMTP Server Input SMTP server s IP addre...

Страница 41: ...ng field Requires SSL Encryption If your Email server required SSL encryption check this box Please note that some Email server uses different port number than standard port 25 when SSL encryption is...

Страница 42: ...password check you can just input samba server address and path to access the file storage space When you finish with above settings click Apply button to save changes 3 10 SD Card Storage When a SD c...

Страница 43: ...ew video file when a recording video file reaches the size limit stated here Recording Schedule Define the recording schedule You can check Sun to Sat boxes to represent a weekday and specify time per...

Страница 44: ...ed for confirmation 3 12 Device Info You can check the information and network settings of this IP camera These information are very useful when you need to repair or fix the problem of this IP camera...

Страница 45: ...and save it on SD card A SD card must be inserted into SD card slot when you click this button or you ll receive an error message Restore Restore a previously saved configuration file saved on your c...

Страница 46: ...u can change the display language of web interface Click Language button and select one language More languages may available in latest firmware file All manuals and user guides at all guides com a l...

Страница 47: ...wing instructions to setup EdiView on Windows Vista 7 operating system Please note You must login as system administrator when you re installing EdiView 1 Locate EdiView setup file and double click on...

Страница 48: ...7 2 You ll see a User Account Control security warning message appear click Yes to continue 3 Click Next to continue 4 Click Install to begin installation All manuals and user guides at all guides com...

Страница 49: ...48 5 ase wait while installation is being performed This may take few minutes to done please be patient All manuals and user guides at all guides com...

Страница 50: ...A new setup window will appear please click Next button to continue 8 You can select a folder on your computer to install EdiView by clicking Change button or simply click Next button directly to acce...

Страница 51: ...50 9 Click Install to continue 10 Installation will take few minutes please be patient All manuals and user guides at all guides com a l l g u i d e s c o m...

Страница 52: ...when you see this message EdiView is ready to use now 12 MSDE Microsoft SQL Database Engine installation procedure will start at the same time Please wait until it completes All manuals and user guide...

Страница 53: ...52 13 You ll be prompted that this program has compatibility issues click Run program to continue All manuals and user guides at all guides com...

Страница 54: ...5 A new icon will appear on your computer s desktop you can double click on it to start EdiView 4 2 EdiView Interface To start EdiView double click EdiView icon on your computer s desktop Or click Sta...

Страница 55: ...54 All manuals and user guides at all guides com...

Страница 56: ...ol security warning message appear click Yes to continue EdiView login window will appear Default user ID is admin and default password is 1234 click OK when ready All manuals and user guides at all g...

Страница 57: ...6 The main window of EdiView will appear Split screen mode selector Function Keys Date Time Remaining disk space Snapshot camera selection Exit Camera View All manuals and user guides at all guides co...

Страница 58: ...will be hidden only IP camera s video will be displayed To leave full screen mode press Esc key on your keyboard Camera Scan When you click this button EdiView will display the video from one camera...

Страница 59: ...background picture To add a camera right click on the background picture and select Add Camera A new window will appear Select the camera you wish to add from Camera dropdown list and check the box I...

Страница 60: ...e Configuration Enter EdiView configuration page See next chapter for detailed instructions Playback Playback recorded video A new video playback window will appear See chapter III for detailed instru...

Страница 61: ...isplayed in Camera View area This example picture shows a 4 split camera view with only 2 IP cameras configured To select an IP camera click its video and it will be highlighted some IP cameras suppor...

Страница 62: ...control arrow Zoom Optical zoom control Click or to control zoom level Exposure Exposure control Click or to control exposure level Cruise control Click Go button to start camera cruise and click Stop...

Страница 63: ...le Configure schedule recording Event Configure event recording Security Configure EdiView user list Detailed descriptions of every sub menu will be given in following chapters 4 3 1 Device You should...

Страница 64: ...63 All manuals and user guides at all guides com...

Страница 65: ...es until the search is complete and all IP cameras found on your local area network will be listed In this example an IP camera has been found at IP address 192 168 2 3 If this is the IP camera you wi...

Страница 66: ...u have to input the details of IP camera manually 1 Input the network settings of IP camera including IP address HTTP port number user name password 2 Click button located at the right of Model item a...

Страница 67: ...Remove Remove selected IP camera When you selected an IP camera in the list you can also click Update to list button to update its information like IP address and user name password 4 3 2 Recording Y...

Страница 68: ...this IP camera Monitor only not record EdiView will not record video of this IP camera Round The Clock EdiView will record video of this IP camera all the time Motion Detection EdiView will only reco...

Страница 69: ...to reset motion detection blocks to default setting You can also change the color of block if its color is similar to the IP camera s video and makes you hard to identify the blocks by click the color...

Страница 70: ...Cancel button to discard all settings you made 4 3 3 System You can configure system wide configurations in this sub menu The descriptions of every setup items are listed as follow Item Description Ho...

Страница 71: ...low Browse Select a drive or folder on your computer for recording data storage You can also create a new folder when you re prompted to select a drive or folder on your computer Safe Space Specify th...

Страница 72: ...automatically This function is useful when you want to start recording automatically when computer starts User ID Input user ID used to login EdiView must have adequate privileges to perform the acti...

Страница 73: ...specified here even a new event is detected User Input the user name for SMTP authentication Input only when it s required by your SMTP server you can leave it blank if it s not required Password Inp...

Страница 74: ...Schedule You can configure recording schedule in this sub menu When you enter this sub menu for first time click Add Job button to add a new schedule recording job All manuals and user guides at all g...

Страница 75: ...iod in a week of this schedule There are total 48 x 7 blocks in a week schedule where every block represents half an hour You can use mouse to click on the block to add or delete time period If record...

Страница 76: ...can use this function to specify a time period Select Start and End date time and click Add Modify button to add the time period to the list You can also select an existing time period and make chang...

Страница 77: ...ting event select an event in the list and click Remove button The descriptions of every setup items are listed as follow Item Description Select Camera Select the IP camera to define its event detail...

Страница 78: ...where EdiView is installed To add a new sound file copy the wav file to the following directory C Program Files EdiView media You can click Play button to play the sound file you selected Alarm Remark...

Страница 79: ...n EdiView Administrator and user Administrator can configure EdiView while user can only view video of camera and perform limited system configuration schedule record and video playback All manuals an...

Страница 80: ...ou can only change admin s password in Administrator s Password and Confirm Password field Please input the same password in both fields for confirmation To add a user click Add button a new window wi...

Страница 81: ...era view Camera Map Operation Allows to show E MAP Scheduling User can start or stop schedule recording Recording User can start or stop video recording Playback User can playback saved video Camera L...

Страница 82: ...r To play a recorded video you can use one of following two functions Please refer to following chapters for detailed instructions of every search mode Advanced Search Event Search All manuals and use...

Страница 83: ...of all IP cameras When you enter this menu please specify start time and stop time You can input 0 23 in Hour in a day field by keyboard directly When you finish click SEARCH button to search for reco...

Страница 84: ...ndicates it s a Round Clock manual recording Other record type include Blue Manual Recording Green Recording is triggered by motion Red Recording is triggered by Digital Input To view the video check...

Страница 85: ...84 And the video will be prepared for playback All manuals and user guides at all guides com...

Страница 86: ...85 4 4 2 Event Search You can search for video for playback by triggering event round the clock motion detection or digital input All manuals and user guides at all guides com a l l g u i d e s c o m...

Страница 87: ...ction and I O Mode Digital Input You can check all boxes you wish to search for 3 Camera You can check all cameras you wish to search for video To select camera ID more than 16 click right or left but...

Страница 88: ...finish click Search button to search for recorded video and a list similar to this will appear You can select the video clip you wish to play and click Play button All manuals and user guides at all...

Страница 89: ...88 All manuals and user guides at all guides com...

Страница 90: ...dow Click X mark to close video playback window Video Playback Control You can use following buttons to control video playback Skip to the beginning position of video Skip to previous video frame Stop...

Страница 91: ...ed You cannot adjust video playback speed when video is playing Search Capture Click or button to search for video see chapter 3 2 3 3 for detailed instruction Click button to take a snapshot picture...

Страница 92: ...ation or click Print to print current image to printer To back to previous menu click Cancel click Reset to reset image parameters back to default value Time Current time will be displayed here You ca...

Страница 93: ...ximity to the antenna shall not be less than 2 5cm 1 inch during normal operation Federal Communications Commission FCC RF Exposure Requirements SAR compliance has been established in the laptop compu...

Страница 94: ...chtlinien 2004 108 EC 2006 95 EC 2009 125 EC Spanish El presente equipo cumple los requisitos esenciales de la Directiva 2004 108 EC 2006 95 EC 2009 125 EC Italian Questo apparecchio conforme ai requi...

Страница 95: ...d European Standard 2004 108 EC European Standard 2006 95 EC EN 55022 2006 A1 2007 IEC 60950 1 2005 2nd Edition Am 1 2009 EN 61000 3 2 2006 EN 60950 1 2006 A11 2009 A1 2010 EN 61000 3 3 2008 EN 55024...

Страница 96: ...e the recipients all the rights that you have You must make sure that they too receive or can get the source code And you must show them these terms so they know their rights We protect your rights wi...

Страница 97: ...stomarily used for software interchange or b Accompany it with a written offer valid for at least three years to give any third party for a charge no more than your cost of physically performing sourc...

Страница 98: ...ree Software Foundation may publish revised and or new versions of the General Public License from time to time Such new versions will be similar in spirit to the present version but may differ in det...

Страница 99: ...98 All manuals and user guides at all guides com...

Отзывы: