background image


English


Copyright

©

 by Edimax Technology Co, LTD. all rights  reserved.    No  part  of  this 

publication may be reproduced, transmitted, transcribed, stored in a retrieval system, 
or translated into any language or computer language, in any form or by any means, 
electronic, mechanical, magnetic, optical, chemical, manual or otherwise, without the   
prior written permission of this Company . 
 
This company makes no representations or warranties, either expressed or implied, 
with respect to the contents hereof and specifically disclaims any warranties, 
merchantability or fitness for any particular purpose.    Any software described in this 
manual is sold or licensed "as is". Should the programs prove defective following 
their purchase, the buyer (and not this company, its distributor, or its dealer) assumes 
the entire cost of all necessary servicing, repair, and any incidental or consequential 
damages resulting from any defect in the software. Further, this company reserves 
the right to revise this publication and to make changes from time to time in the 
contents hereof without obligation to notify any person of such revision or changes. 
 
The product you have purchased and the setup screen may appear slightly different 
from those shown in this QIG. For more detailed information about this product, 
please refer to the User's Manual on the CD-ROM. The software and specifications 
subject to change without notice. Please visit our web site 

www.edimax.com

 for the 

update. All right reserved including all brand and product names mentioned in this  
manual are trademarks and/or registered trademarks of their respective holders . 


Linux Open Source Code


Certain Edimax products include software code developed by third parties, 
including software code subject to the GNU General Public License ("GPL") or 
GNU Lesser General Public License ("LGPL"). Please see the

 GNU


(www.gnu.org) and 

LPGL

(www.gnu.org) Websites to view the terms of 

eachlicense.


The GPL Code and LGPL Code used in Edimax products are distributed 
without any warranty and are subject to the copyrights of their authors.    For 
details, see the GPL Code and LGPL Code licenses.   You can download the 
firmware-files at 

http://www.edimax.com

 under "Download" page. 


Содержание BR-6214K

Страница 1: ...BR XXXXXX Wired Wireless Broadband Router Quick Installation Guide Version 1 0 October 2007 ...

Страница 2: ...o o Incluso nel CD il Q I G in Italiano M Ma ag gy ya ar r A magyar telepítési útmutató megtalálható a mellékelt CD n N Ne ed de er rl la an nd ds s De nederlandse Q I G treft u aan op de bijgesloten CD P Po ol ls sk ki i Skrócona instrukcja instalacji w języku polskim znajduje się na załączonej płycie CD P Po or rt tu ug gu uê ês s Incluído no CD o G I R em Portugues Р Ру ус сс ск ки ий й Найдите...

Страница 3: ... gu ur ra at ti io on n 5 2 1 R Ro ou ut te er r C Co on nf fi ig gu ur ra at ti io on n P PP PP Po oE E 8 2 2 R Ro ou ut te er r C Co on nf fi ig gu ur ra at ti io on n C Ca ab bl le e M Mo od de em m 11 3 Advanced Setup 13 3 1 Change management password 13 3 2 Firmware Upgrade 14 3 3 System Reset 15 3 4 Wireless Security For Wireless Router Only 16 3 5 Print Server BR 6315SRg only 17 3 6 Web FTP...

Страница 4: ... to make changes from time to time in the contents hereof without obligation to notify any person of such revision or changes The product you have purchased and the setup screen may appear slightly different from those shown in this QIG For more detailed information about this product please refer to the User s Manual on the CD ROM The software and specifications subject to change without notice P...

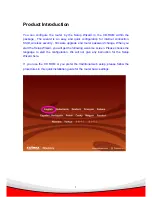
Страница 5: ...curity firmware upgrade and router password change When you start the Setup Wizard you will get the following welcome screen Please choose the language to start the configuration We will not give any instruction for the Setup Wizard here If you lose the CD ROM or you prefer the traditional web setup please follow the procedures in this quick installation guide for the router basic settings ...

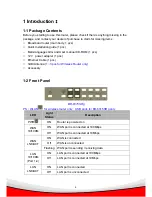
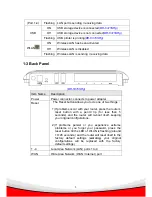
Страница 6: ...1 pcs 3dBi Antenna 1 3 pcs for Wireless Router only Accessary 1 2 Front Panel BR 6315SRg PS WLAN for wireless router only USB ports for BR 6315SRg only LED Light Status Description PWR ON Router is powered on ON WAN port is connected at 100Mbps WAN 10 100M Off WAN port is connected at 10Mbps ON WAN is connected Off WAN is unconnected WAN LNK ACT Flashing WAN port is sending receiving data ON LAN p...

Страница 7: ...Reset button allows you to do one of two things 1 If problems occur with your router press the router s reset button with a pencil tip for less than 5 seconds and the router will re boot itself keeping your original configurations 2 If problems persist or you experience extreme problems or you forgot your password press the reset button till the LED of WLAN is flashing around 10 26 seconds and the...

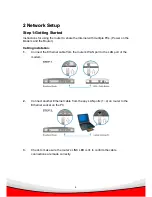
Страница 8: ...ower on the Modem and the Router C Ca ab bl li in ng g i in ns st ta al ll la at ti io on n 1 Connect the Ethernet cable from the router s WAN port to the LAN port of the modem 2 Connect another Ethernet cable from the any LAN ports 1 4 on router to the Ethernet socket on the PC 3 Check to make sure the router s LINK LED is lit to confirm the cable connections are made correctly ...

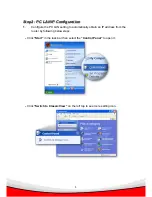
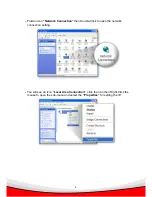
Страница 9: ...a at ti io on n 1 Configure the PC LAN setting to automatically obtain an IP address from the router by following below steps z Click Start in the task bar then select the Control Panel to open it z Click Switch to Classic View on the left top to see more setting icon ...

Страница 10: ...rk Connection then Double Click to open the network connection setting z You will see an icon Local Area Connection click the icon then Right Click the mouse to open the sub menu and select the Properties for setting the IP ...

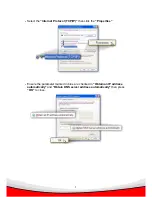
Страница 11: ...t the Internet Protocol TCP IP then click the Properties z Ensure the parameter marked in blue are checked in Obtain an IP address automatically and Obtain DNS server address automatically then press OK to close ...

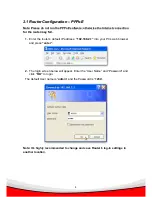
Страница 12: ...er rn ne et t c co on nn ne ec ct ti io on n f fo or r t th he e r ro ou ut te er r m ma ay y f fa ai il l 1 Enter the router s default IP address 192 168 2 1 into your PC s web browser and press enter 2 The login screen below will appear Enter the User Name and Password and click OK to login The default User name is admin and the Password is 1234 Note It s highly recommended to change and save Ro...

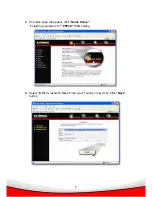
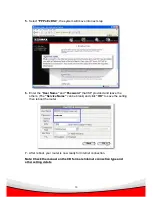
Страница 13: ...9 3 The main page will appear click Quick Setup Following example is for PPPoE WAN setting 4 Select GMT Greenwich Mean Time your country or city then Click Next button ...

Страница 14: ... and click OK to save the setting then reboot the router 7 After reboot your router is now ready for Internet connection N No ot te e C Ch he ec ck k t th he e m ma an nu ua al l o on n t th he e C CD D f fo or r m mo or re e I In nt te er rn ne et t c co on nn ne ec ct ti io on n t ty yp pe e a an nd d o ot th he er r s se et tt ti in ng g d de et ta ai il ls s ...

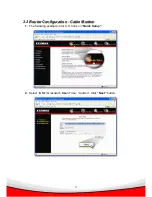
Страница 15: ...2 R Ro ou ut te er r C Co on nf fi ig gu ur ra at ti io on n C Ca ab bl le e M Mo od de em m 1 The following example is for U K Click on Quick Setup 2 Select GMT Greenwich Mean Time London Click Next button ...

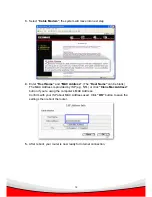
Страница 16: ...ame can be blank The MAC Address is provided by ISP e g NTL or click Clone Mac Address button if you re using the computer s MAC Address Confirm with your ISP about MAC Address used Click OK button to save the settings then reboot the router 5 After reboot your router is now ready for Internet connection ...

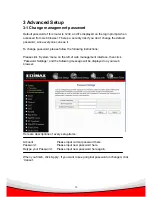
Страница 17: ... please follow the following instructions Please click System menu on the left of web management interface then click Password Settings and the following message will be displayed on your web browser Here are descriptions of every setup items Account Please input current password here Password Please input new password here Retype your Password Please input new password here again When you finish ...

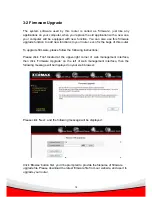
Страница 18: ...f this router To upgrade firmware please follow the following instructions Please click Tool located at the upper right corner of web management interface then click Firmware Upgrade on the left of web management interface then the following message will be displayed on your web browser Please click Next and the following message will be displayed Click Browse button first you ll be prompted to pr...

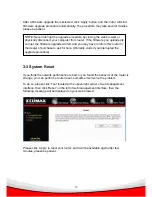
Страница 19: ...he upper right corner of web management interface then click Reset on the left of web management interface then the following message will be displayed on your web browser Please click Apply to reset your router and it will be available again after few minutes please be patient NOTE Never interrupt the upgrade procedure by closing the web browser or physically disconnect your computer from router ...

Страница 20: ...e the wireless router will use WPA encryption and the following setup menu will be shown on your web browser Here are descriptions of every setup items WPA Unicast Please select a type of WPA cipher suite Cipher Suite Available options are WPA TKIP WPA2 AES and WPA2 Mixed You can select one of them but you have to make sure your wireless client support the cipher you selected Pre shared Select the...

Страница 21: ...conds while router is rebooting 3 5 Print Server BR 6315SRg The router provides Print Server function that let you share a printer to all PCs in your Intranet It supports LPD and IPP printing protocol NOTE Some wireless clients especially those manufactured before year 2003 only support WEP or WPA TKIA cipher A driver upgrade would be needed for those clients to use WPA and WPA2 encryption ...

Страница 22: ...heck Enable Internet printing to share the printer on internet you can uncheck this option to use printer on intranet only Click Apply at the bottom of the screen to save the configurations You can now configure other advance sections or start using the router About the detail setting please read the user manual in the CD ROM 3 6 Web FTP Server BR 6315SRg The router provides File FTP Server functi...

Страница 23: ...low you to manage the partitions of the USB storage device You can add remove or format the partition of the USB storage device Storage Status The storage status shows the status of both USB ports When you plug a USB storage device into the USB ports it will show the status of the current valid disk and partition of this device Click on one of the File FTP server selections and proceed to the rele...

Страница 24: ...ible media players Parameters Description iTunes Server You can enable or disable iTunes server function here Click Save to keep changes or Cancel to discard the change you made Server name Please specify the server name if iTunes server you wish to create here All iTunes clients will need this name to locate this iTunes server Valid server name length is 4 to 20 characters and is case sensitive M...

Страница 25: ...nd users listed above You can now click Advanced Setting to configure other advance sections or start using the router After you click Advanced Setting you ll be prompted to specify the advanced settings of this iTunes server N No ot te e C Ch he ec ck k t th he e m ma an nu ua al l o on n t th he e C CD D f fo or r m mo or re e I In nt te er rn ne et t c co on nn ne ec ct ti io on n t ty yp pe e ...

Страница 26: ... uncontrolled environment In order to avoid the possibility of exceeding the FCC radio frequency exposure limits human proximity to the antenna shall not be less than 2 5cm 1 inch during normal operation Federal Communications Commission FCC RF Exposure Requirements SAR compliance has been established in the laptop computer s configurations with PCMCIA slot on the side near the center as tested in...

Отзывы: