background image


23 


V.


Cleaning the Unit 

Choose either of the two options below depending on the cleaning tool you 

have. 


If you have other pump-like cleaning tools available (e.g. for 

computers), you may also utilize them. Please be careful to not exert 

extremes of force or temperature / humidity onto the sensors to 

prevent damaging them. 


It is recommended to clean the sensors every 3-6 months for maximum 

sensor functionality. 


V-1.


Air Pump Cleaner 


A general air pump cleaner of maximum diameter 55mm and length 

150mm will be sufficient. 


1.


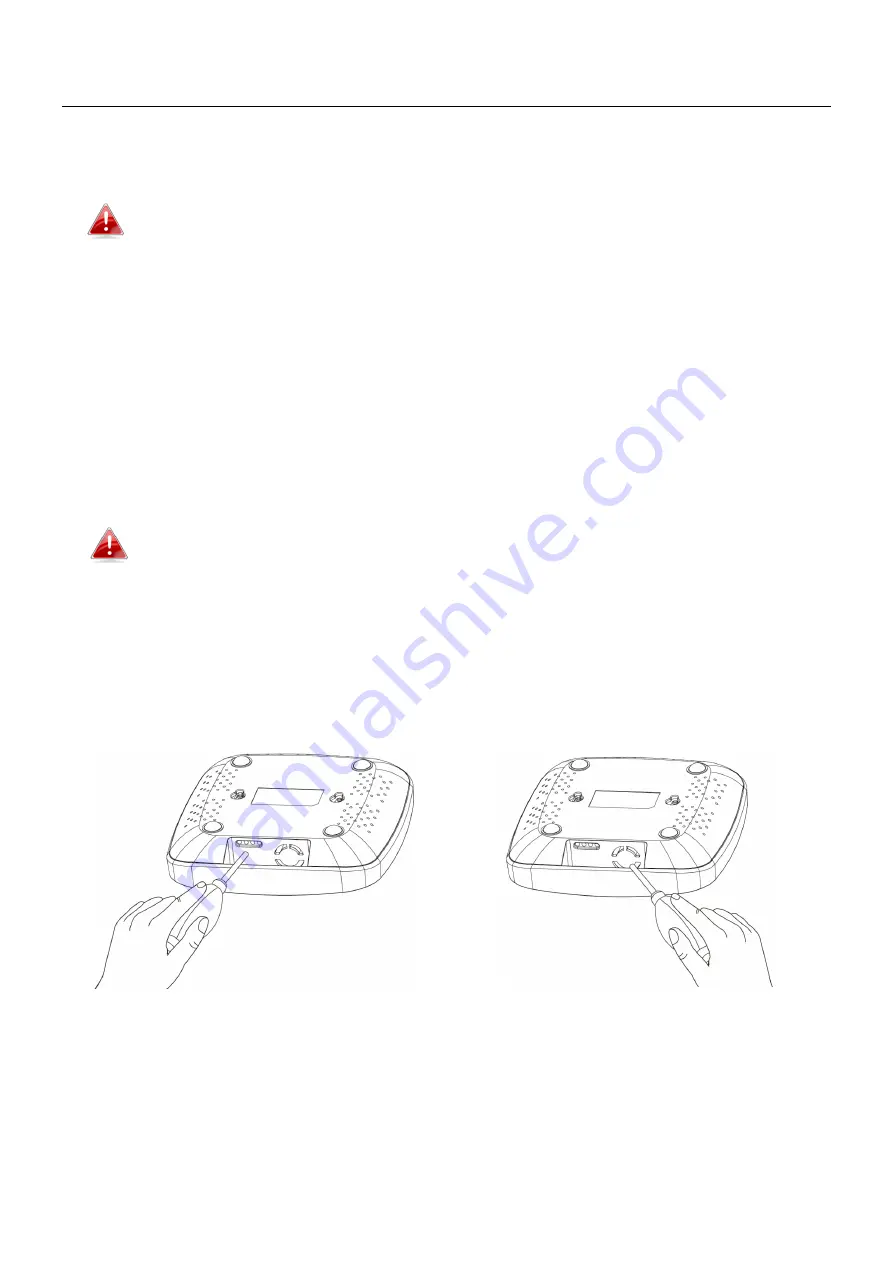
Direct the nozzle of the air pump cleaner at an opening (Figure 1 or Figure 

2) of a sensor. 

2.


Squeeze the bulb to blow air at the sensors. 

3.


Do this for 5-10 times and make sure all sensor openings are cleaned. 


Figure 1 


Figure 2 


Содержание AI-2003W

Страница 1: ...AI 2003W AI 2004W Quick Installation Guide 09 2019 v1 0...

Страница 2: ...4 System Requirement 8 II 5 Total Air Quality Solution Structure 9 III Installation 10 III 1 Hardware Installation 10 III 2 Smart App Installation 11 III 3 Android OS 12 III 4 iOS 15 III 5 Deploying t...

Страница 3: ...humidity or temperature such as near fire or other heat sources 6 Must not be installed in locations directly exposed to sunlight or reflected light source 7 Must not be installed in corrosive enviro...

Страница 4: ...solution with visible figures display that intuitively simplifies data reading to aid the improvement of indoor air quality for homes schools healthcare institutes smart buildings and smart city proj...

Страница 5: ...s LED Color LED Status Description System Status Red Flash Waiting to be wirelessly paired On Device is booting up Green Flash Wi Fi is operational but not connected On Wi Fi setup successful Blue On...

Страница 6: ...button for 5 seconds LED Color LED Status Description Consolidated Air Quality AirBox Status Green On Consolidated air quality Good Blue AirBox in default Red Consolidated air quality Unhealthy System...

Страница 7: ...7 II 3 Hardware Introduction 1 Hardware Interface Center Button OLED Display For Sensors Results Power Jack...

Страница 8: ...in Sensor Model Sensors PM2 5 PM10 CO2 NDIR CO TVOC HCHO Humidity Temperature AI 2003W v v v v v v v AI 2004W v v v v v v v v II 4 System Requirement Internet with Wi Fi Connection 802 11n Computer o...

Страница 9: ...9 II 5 Total Air Quality Solution Structure AI 2003W and AI 2004W only support Wi Fi connection 3rd party air circulator support is for specific project only...

Страница 10: ...ty detector to the Internet III 1 Hardware Installation 1 Please connect the power adapter to the unit demonstrated on the left and a power socket 2 Please wait a moment for the device to boot up Proc...

Страница 11: ...nstructions below according to your mobile device Please make sure Access to my location is turned on Android OS iOS Your mobile device is able to connect to your home s Wi Fi network or whichever net...

Страница 12: ...distributor or SI where you purchased the device to claim the EdiGreen Plus account Email and Password Go to your mobile device s Wi Fi settings and connect to the Wi Fi Please make sure this network...

Страница 13: ...13 iii The app will start searching for available device Tap the desired Wi Fi network iv Enter the Wi Fi password and tap to continue...

Страница 14: ...14 v Please wait a moment for the setup process vi Setup Complete Now you are able to monitor the air quality near your unit with your mobile device anywhere as long as you have access to the Internet...

Страница 15: ...15 iOS i Open the EdiGreen Plus and enter your Email and password to log in ii Tap Setup Device...

Страница 16: ...nter the last two digits of your AirBox Please find the unique SSID of your detector on the product label The final 2 digits of the SSID AirBox_Setup_ is the final two digits of the detector s Setup W...

Страница 17: ...17 iv Press Join v The app will start searching for available Wi Fi network for the detector Tap the desired Wi Fi network and enter the Wi Fi password and press OK to continue...

Страница 18: ...18 vi Please wait a moment for the setup process vii Congratulations Your AirBox and Edigreen Plus is up and running Note The system status LED of AirBox should be turned on in blue...

Страница 19: ...ice s EdiGreen Plus app you can choose how to place your air quality detector 1 Rubber Legs The rubber legs shown below act as shock prevention and anti slide support i Simply place the unit with the...

Страница 20: ...the device on a surface i Locate the anchors on the Device Stand and the anchor holes on the device Insert the anchors into the device ii Push the anchors towards the smaller ends of the anchor holes...

Страница 21: ...21 iii Place the unit at your desired location in the position shown below The bottom of the stand has rubber to act as anti slide support Anti slide rubber...

Страница 22: ...e picture below for at least 10 seconds until System Status LED shows up Red light After that you can release it 2 Please wait for at least 15 seconds for the device to reset System Status LED Red Lig...

Страница 23: ...ty onto the sensors to prevent damaging them It is recommended to clean the sensors every 3 6 months for maximum sensor functionality V 1 Air Pump Cleaner A general air pump cleaner of maximum diamete...

Страница 24: ...icient 1 Direct the nozzle of the compressed air at an opening Figure 3 or Figure 4 of a sensor 2 Keep the nozzle at 10cm from the sensor opening 3 Use short bursts 1 2 seconds of air spray a few time...

Страница 25: ...25...

Отзывы: