background image

20

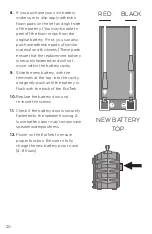
NEW BATTERY 

TOP

RED

BLACK

8.

  If you purchase your own battery, 


make sure to also apply adhesive 


foam pads on the left and right side 


of the battery. (You may be able to 


peel off the foam strips from the 


original battery. If not, you can also 


purchase adhesive pads of similar 


material and thickness.) These pads 


ensure that the replacement battery 


is securely fastened and will not 


move within the battery cavity.

9.

  Slide the new battery, with the 


terminals at the top, into the cavity 


and gently push until the battery is 


flush with the back of the EcoTrek.

10.

 Replace the battery door and 


re-insert the screws.

11.

  Check if the battery door is securely 


fastened to the speaker housing. A 


loose battery door may compromise 


speaker waterproofness.

12.

 Power on the EcoTrek to ensure 


proper function. Be sure to fully 


charge the new battery prior to use 


(4-8 hours).

Содержание Ecotrek GDI-EXTRK200

Страница 1: ...1 EcoTrek Models GDI EXTRK200 210 User Guide ...

Страница 2: ...es specified by the manufacturer 10 Use only with the cart stand tripod bracket or table specified by the manufacturer or sold with the apparatus When a cart or rack is used use caution when moving the cart apparatus combination to avoid injury from tip over 11 Do not install this equipment in a confined or building in space such as a book case or similar unit and remain a well ventilation conditi...

Страница 3: ...ke Do not remove battery incorporated with product for your safety If you need to replace the battery take it to the nearest authorized EcoTrek service point or dealer for assistance Safety way to remove the battery or the battery from the equipment Remove the old battery or battery pack follow the steps in reverse order than the assembly To prevent contamination of the environment and bring on po...

Страница 4: ...4 EcoTrek Layout BACK FRONT Rugged Carrying Handle Control Panel RIGHT SIDE LEFT SIDE Power Connections Battery Compartment Built In Speakerphone Mic Location Subwoofer ...

Страница 5: ... is NOT watertight Waterproof Caps To close properly turn the cap clockwise so the cap s arrow point lines up with the locked symbol To access the connections turn the cap counterclockwise so the cap s arrow point lines up with the unlocked symbol then pull the tab on the cap to open LOCK UNLOCK ...

Страница 6: ...o wall power outlet if power cable jack is wet If water has entered the unit do NOT attempt to charge the EcoTrek instead please contact Grace Digital at www gracesupport com Use Caution 120V AC Power Input Contact may cause electric shock and injury if wet Insert the included power cable to charge the EcoTrek Note The EcoTrek can be played while battery charges The icon will be on when plugged in...

Страница 7: ...t plugged in and charging continuously for more than 8 hours after the unit indicates a full charge Follow provided instruction when attempting to replace battery If needed contact Grace Digital at www gracesupport com Avoid completely draining the battery Avoid storing in high temperatures and moist places For long term storage periodically recharge the battery If you do not charge the battery fo...

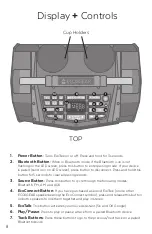
Страница 8: ...ough the following modes Bluetooth FM AM and AUX 4 EcoConnect Button If you have purchased a second EcoTrek or one other ECOXGEAR speaker bearing the EcoConnect symbol press and release this button on both speakers to link them together and play in stereo 5 EcoTalk This button activates your Voice Assistant Siri and OK Google 6 Play Pause Press to play or pause a track from a paired Bluetooth devi...

Страница 9: ... To seek jump to the next available station press and hold either button down for a few seconds until it starts to seek a station 14 LED Screen Icons When the battery level is less than 20 the first bar will blink Two speakers are paired via EcoConnect Indicates that the battery level is very low In pairing mode the icon will flash If the connection is successful the icon will be solid Indicates t...

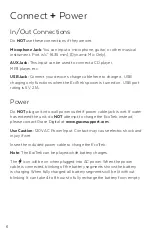
Страница 10: ...oTrek will not automatically power off after 30 minutes of inactivity if it is plugged into an AC outlet Pairing a Bluetooth Device 1 Turn on your Bluetooth device 2 Power on EcoTrek Speaker on ready to connect voice prompt will be heard If already powered on and not in Bluetooth mode press SOURCE until it is in Bluetooth mode If Bluetooth icon on LED screen is not flashing briefly press to start ...

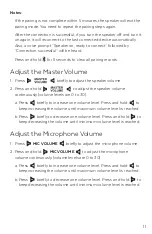
Страница 11: ...r volume continuously volume levels are 0 to 30 a Press briefly to increase one volume level Press and hold to keep increasing the volume until maximum volume level is reached b Press briefly to decrease one volume level Press and hold to keep decreasing the volume until minimum volume level is reached Adjust the Microphone Volume 1 Press MIC VOLUME briefly to adjust the microphone volume 2 Press ...

Страница 12: ...s BT Bluetooth FM AM AUX 1 Play Music Bluetooth Mode After the EcoTrek is connected to your Bluetooth device press briefly on the EcoTrek to play press again to pause Press briefly to play previous song Press briefly to get the next song Press to adjust the volume Notes Pair and connect your Bluetooth device with EcoTrek before using this feature If a call is received when you are listening to mus...

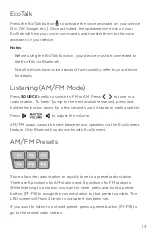
Страница 13: ...eek jump to the next available station press and hold either button down for a few seconds until it starts to seek a station Press to adjust the volume AM FM audio cannot be sent between two speakers via the EcoConnect feature Only Bluetooth audio works with EcoConnect AM FM Presets Store a favorite radio station to quickly tune to a preset radio station There are 6 positions for AM station and 6 ...

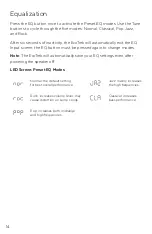
Страница 14: ...Q Input screen the EQ button must be pressed again to change modes Note The EcoTrek will automatically save your EQ settings even after powering the speaker off LED Screen Preset EQ Modes Normal the default setting for best overall performance Jazz mainly increases the high frequencies Rock increases volume level may cause distortion on some songs Classical increases bass performance Pop increases...

Страница 15: ...s Wait a few seconds for the speakers to wirelessly connect Both speakers will announce Connection Successful and the EcoConnect icon on the LED screen on both units will light up once the connection is completed Once the two EcoTrek speakers are connected via EcoConnect start playing music from your device Both connected EcoTrek units will play the music from you device The EcoConnect default has...

Страница 16: ...nnect between the speakers after power off please follow the above steps Notes You can also pair the EcoTrek with any other ECOXGEAR speaker bearing the EcoConnect symbol The EcoConnect functionality is only available while using Bluetooth as your audio source at a maximum range of 30 feet between both of the paired speakers While pairing the two EcoTrek speakers make sure that the speakers are wi...

Страница 17: ...peaker plugged in when it is not in use Battery Storage Fully charge the EcoTrek prior to extended storage 4 8 hours Do NOT leave your speaker plugged in while it is in storage Avoid storing in high temperatures and moist places For long term storage fully recharge the battery every 3 months If you do not charge the battery within six months it may not charge Battery Disposal Bring the battery to ...

Страница 18: ... screws This will require a Phillips screwdriver 3 With the battery door removed the battery will be visible It is fit snuggly into the unit and surrounded by foam strips 4 To remove the battery tilt the EcoTrek backward so that the open battery cavity is facing the ground 5 Lift the EcoTrek unit slightly and gently tap the unit on the ground on the bottom back edge of the unit and gravity should ...

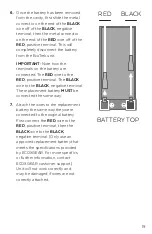
Страница 19: ...wire to the RED positive terminal The BLACK wire to the BLACK negative terminal The replacement battery MUST be connected the same way 7 Attach the wires to the replacement battery the same way they were connected to the original battery First connect the RED wire to the RED positive terminal then the BLACK wire to the BLACK negative terminal Only use an approved replacement battery that meets the...

Страница 20: ...replacement battery is securely fastened and will not move within the battery cavity 9 Slide the new battery with the terminals at the top into the cavity and gently push until the battery is flush with the back of the EcoTrek 10 Replace the battery door and re insert the screws 11 Check if the battery door is securely fastened to the speaker housing A loose battery door may compromise speaker wat...

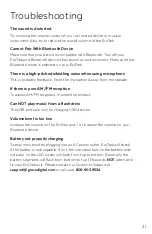
Страница 21: ...eaker If there is poor AM FM reception To adjust AM FM reception move entire product Can NOT play music from a flash drive The USB ports are only for charging USB devices Volume level is too low Increase the volume on the EcoTrek and or increase the volume on your Bluetooth device Battery not properly charging Twenty minutes after plugging into an AC power outlet EcoTrek will check if the battery ...

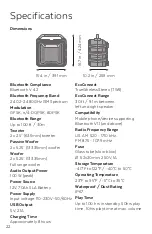
Страница 22: ... 60Hz USB Output 5V 2 1A Charging Time Approximately 8 hours EcoConnect TrueWireless Stereo TWS EcoConnect Range 30 ft 9 1 m between left and right speaker Compatibility Mobile phone device supporting Bluetooth V1 1 and above Radio Frequency Range US AM 520 1710 kHz FM 87 5 107 9 mHz Fuse Glass tube slow blow Ø 5 2x20mm 250V 1A Storage Temperature 40 F to 122 F 40 C to 50 C Operating Temperature 2...

Страница 23: ...tended The ECOXGEAR Bluetooth speaker is intended to be used indoors or outdoors and in land or water environments The speaker has been tested to IP67 waterproofing standards which means the speaker can be submerged in up to 3 feet of water for 30 minutes without any damage However the speaker is NOT intended for constant underwater use Always make sure the cap s cover s are clean free from sand o...

Страница 24: ...ithout the caps or door properly closed water may enter into the unit and void your warranty 3 Dry unit completely before opening the caps or door Do NOT open the caps or door if wet or in a wet environment 4 Do NOT apply excessive force to any surfaces of the unit when wet or in a wet environment 5 Do NOT use or store the unit in places with high temperature 6 AVOID prolonged exposure to ultravio...

Отзывы: