background image

p. 

12

Assigning Master/Slave Relationship (cont.)

Assign the Master 

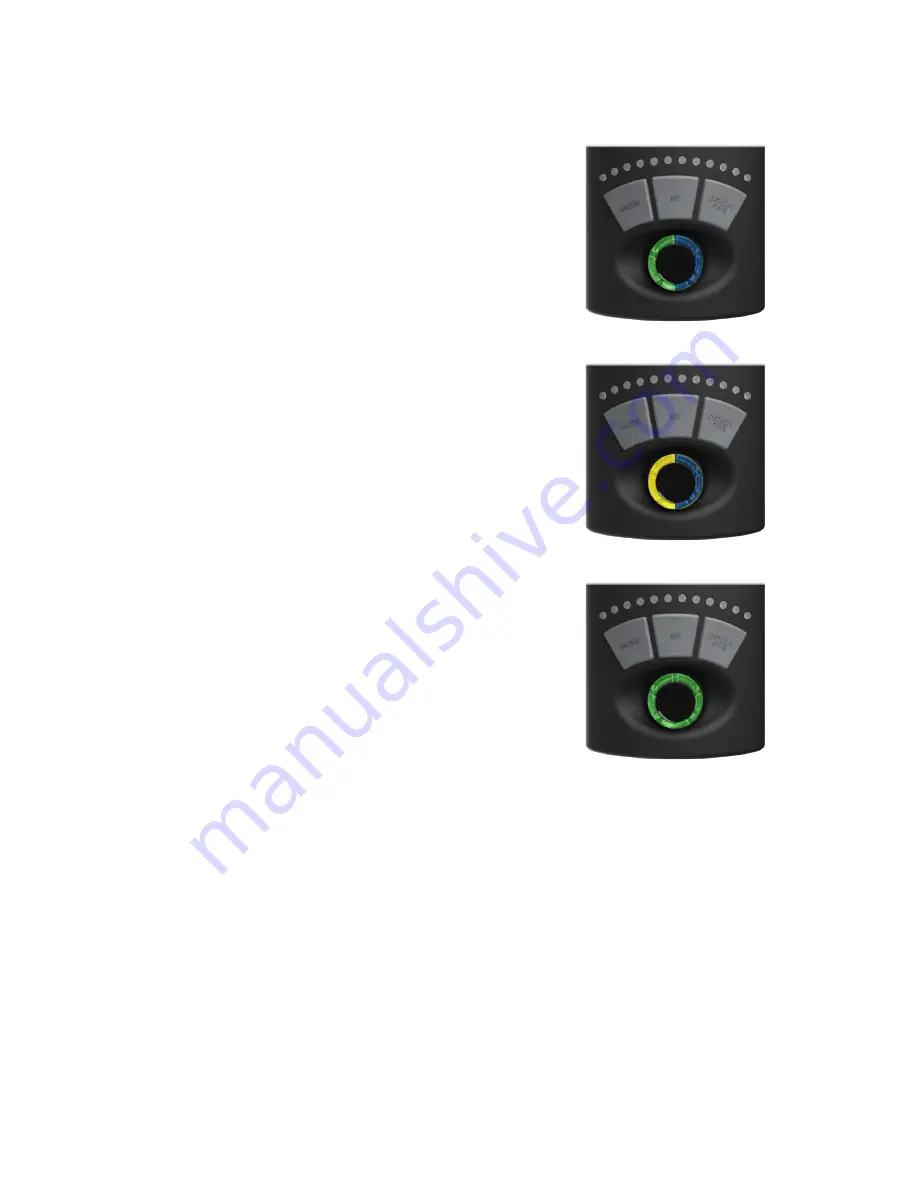
- Set the master pump by 

pressing the MODE button. The control dial will 
then blink blue and green. You are now ready to 
assign slave pumps.

Assign the Slaves

 - Set the slave pump by 

pressing the SET button on the driver. The 
control dial will then blink blue and yellow. NOTE: 
If the slave blinks blue and red, it was too far 
away from the master driver and could not 
communicate properly. Repeat this step for all 
slaves you want to assign the master.

Reset the Master

 - Hold the MODE button on the 

master pump after completing ALL the master/
slave assignments. The pump will reset and 
begin operation in the previous mode you had 
programmed. You can then change modes with 
the master pump like normal and the slave pumps 
will operate according to what the master pump 
defines. Slave pump speeds can be defined by 
the master or can be locally defined, See Section 
2.3: Assigning a Local Max Speed to a Slave.

Begin Normal Operation 

- Use the controls on the Master Pump to operate all pumps in the group. Slave 

pumps can only be set to sync or anti-sync modes, or the three options in EcoSmart modes. For more 
information on operating slave pumps and configuration, see Chapter 5: Pump Configuration for EcoSmart 
Modes.

Program Subsequent Groups 

- Now that the first group is programmed, repeat these steps on the next 

group of pumps, if so desired.

Unassign a Slave Pump

 - If you would like to unassign a pump as a slave and use it independently, follow 

instructions for clearing driver memory and perform those steps on the slave pump which you would like to 
unassign.

NOTE: The subsequent pump groups must be programmed near the original group. For example, 
if running two different groups in separate areas of your house, the second group must be 
programmed within 5 feet the first group to ensure proper communication.

PRESS MODE

PRESS SET

HOLD MODE

*Pump shown reset to consistent 

Speed Mode (Green Dial).

Содержание QuietDrive

Страница 1: ...QUIETDRIVE User Manual...

Страница 2: ...ding how to videos View them on the EcoTech Marine website at http ecotechmarine com support videos The EcoTech Marine Community is another tool for users to troubleshoot and learn about our products...

Страница 3: ...ncorporating the QuietDrive driver that comes standard with the MP10 MP40 and MP60 VorTech pump No matter where life takes you with EcoSmart Live your tank is right there with you Paring your VorTech...

Страница 4: ...ttings Option PWR Button Used to select different options in certain configuration modes and used to power device on off LED Strip LEDs will illuminate to indicate modes speed time etc Wireless Indica...

Страница 5: ...rent modes use the MODE SET and OPTION buttons along with the control dial Modes will be distinguished by the color of the dial and or the illumination of specific blue LED s on the LED strip The foll...

Страница 6: ...yellow Then press set to switch between the two The specific Random mode you are in will be indicated by a pair of two blue LED lights brightly illuminated The speed of these modes will be indicated...

Страница 7: ...of long pulses that the VorTech pump will make when set to Long Pulse Mode Short Pulse mode creates a flow pattern consisting of uniform high and low levels pulsing at a selected interval between 0 2...

Страница 8: ...d then resume its set mode The EcoTech Marine Battery Backup sold separately combined with your VorTech pump is a unique accessory which greatly improves your likelihood of emerging from a power outag...

Страница 9: ...d 3rd and 4th Blue LEDs Illuminated Illustration above shows the driver in the Night Mode Speed configuration setting It also is showing by the illuminated LEDs what setting it is currently set to The...

Страница 10: ...mp Setting 3 20 speed of pump Setting 3 10 hour night Setting 3 20 speed of pump Default Setting Default Setting Default Setting Driver shown here in Battery Backup Speed Configuration Mode Setting sh...

Страница 11: ...10 hour night Setting 3 10 hour night Setting 3 50 speed of pump Driver shown here in Feed Mode Speed Configuration Mode Setting showing that it is set to barely spinning and default being 50 lower th...

Страница 12: ...ng other pumps what mode it is operating and what speed it is running at VorTech pumps set to operate as slaves will listen for the master pump s wireless signal and do either the same as the master p...

Страница 13: ...master pump NOTE When using a single VorTech pump no master slave configuration is necessary Clear Driver Memory The internal memory of each unit must be cleared before setting up a group Hold MODE a...

Страница 14: ...master or can be locally defined See Section 2 3 Assigning a Local Max Speed to a Slave Begin Normal Operation Use the controls on the Master Pump to operate all pumps in the group Slave pumps can on...

Страница 15: ...rn the knob to adjust the maximum speed for that particular slave pump which will be indicated by the LED strip While normally you cannot change the speed of a slave pump because the speed is determin...

Страница 16: ...nt thing to remember is that when using EcoSmart modes you assign slave pump modes based specifically on where they are positioned If a pump is placed opposite the master pump it goes in the orange mo...

Страница 17: ...nge direction every cycle In this mode your master driver will be purple and your slave driver will flash white orange teal and indicate its speed by the LED strip Nutrient Transport mode NTM creates...

Страница 18: ...coTech makes it easy to upgrade your drivers firmware To complete this process you will need a driver with the latest firmware along with the driver that you want to upgrade Follow the instructions an...

Страница 19: ...ly disassemble and clean the wetside then check that there are no obstructions blocking the rotation of the wetside or dryside If the problem persists contact EcoTech Marine to speak with a service re...

Отзывы: