


Page 10 of 15
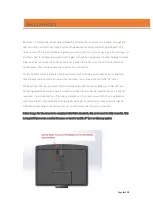
‘normalising’ to release stresses in the metal formed during the casting process. The paint finish also
requires an initial curing process to be followed and will release a smell when burning off: -
You will need to have at least two Controlled kindling wood fires with each fire lasting around 40
minutes – the second fire can be started when the stove is almost cooled down. After these fires you
can increase the fuel load but still control the fire for another few burns as the paint may still be curing
and in a fragile state. A thermometer will be a valuable tool in helping you to achieve this safely and
also to ensure an efficient burn rate in future. Starting a large fire too soon is likely to damage the
stove in which case it will not be covered by the warranty. Note: the paint on any new stove is
relatively soft. As such do not clean, wash or wipe the surface until the paint has fully cured. Never
wipe the stove whilst warm. If the above advice is ignored, then there is a high risk of the paint being
“shocked” by excessive heat and could peel. Furthermore, if the stove is over fired it will invalidate
your guarantee.
ENSURE THAT YOU HAVE READ AND UNDERSTOOD THESE INSTRUCTIONS BEFORE LIGHTING THE FIRE,
AND THAT YOU ARE CONFIDENT THE STOVE HAS BEEN INSTALLED CORRECTLY.
ALWAYS WEAR A PROTECTIVE GLOVE WHEN REFUELLING YOUR STOVE.
Ignition (FOLLOW INITITAL TEMPERING INSTRUCTIONS ABOVE FIRST TO AVOID DAMAGE)
Construct a pile of kindling in the middle of the bed using approx 500g of kindling wood
Light with a single chemical firelighter
Partially shut the door but leaving it cracked open slightly
After about 5 minutes or when the fire is well established, shut the door
After a further 3-5 minutes as the fire starts to die, add a further three larger pieces of wood
weighing approx. 0.75kg in total.
Once theses logs are alight, and after about 7 minutes or so, a normal load of 2 logs weighing up to
1.2kg in total can be added.
Once this load is burning well the stove can be controlled with the lever
First use troubleshooting.
Содержание Hampton 5 Large
Страница 1: ...Page 1 of 15 Hampton 5 Large...
Страница 15: ...Page 15 of 15...


