background image


© 2017 EcoAir                                                                                    3                                                                         All rights reserved


1.


To assemble Fan Assembly to Round Base, make sure to align the screw hole of the fan assem-

bly to the round base.


2.


Tighten the fan assembly to the round base using the butterfly screws


3.


Height adjustment is achieved by loosening the fastening knob, move the inner tube up or 

down then tighten up when desire high is achieved.


4.


Remove both grill assembly and retaining nuts.


5.


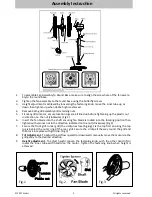
Fit rear grill to motor, ensure location lugs are all lined up before tightening up the plastic nut 

in direction on the nut (clockwise). (Fig 1)


6.


Insert the fan blade into the shaft ensuring fan blade is locked into the locating position then 

tighten with spinner nut in the direction indicated on the nut (clockwise). (Fig 2)


7.


Secure the front grill to rear grill (the circlip has locating lug). Fix the top first ensuring the top 

lug is behind the outer ring of the rear grill. Secure the circlip all the way round the grill and 

then lock into place with grill clip. (Fig 3)


8.


Tilt Adjustment. 

To adjust the air flow upward or downward, manually move the motor via the 

grill gently to the desired direction.


9.


Height  adjustment. 

To  adjust  height,  loosen  the  fastening  knob,  with  the  other  hand  lift  or 

lower  the  inner  tube  with  handle  on  the  motor.  Tighten  the  fastening  knob  when  height  is 

achieved.


Assembly Instruction


Fig.1


Fig.2


Fig.3


Содержание ZEPHYR

Страница 1: ...Zephyr 16 DC FAN ...

Страница 2: ...rs of the wires in the mains lead of this appliance does not correspond with the coloured markings identifying the terminals in your plug proceed as follows 1 The BLUE wire is NEUTRAL and must be connected to the terminal which is marked with the letter N or coloured BLACK 2 The BROWN wire is LIVE and must be connected to the terminal which is marked with the letter L or coloured RED 3 The GREEN Y...

Страница 3: ...fan blade into the shaft ensuring fan blade is locked into the locating position then tighten with spinner nut in the direction indicated on the nut clockwise Fig 2 7 Secure the front grill to rear grill the circlip has locating lug Fix the top first ensuring the top lug is behind the outer ring of the rear grill Secure the circlip all the way round the grill and then lock into place with grill cl...

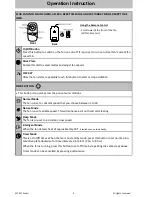
Страница 4: ...de press this button to set on time Ro tate drive plate clockwise for time intervals 0 5 to 8 1 2 hrs to 8 hrs When the fan is running press this button to set off time by repeating the same steps above Timer mode can be cancelled by pressing button twice PLUG FAN INTO MAIN POWER AFTER A BEEP THIS FAN IS UNDER STANDBY MODE READY TO BE USED On Off Button Press this button to switch on the fan on an...

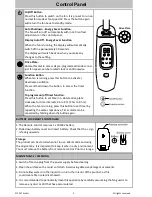
Страница 5: ...set timer on Rotate drive plate clockwise for time intervals 0 5 to 8 1 2 hrs to 8 hrs When the fan is running press this button to set timer by repeating the same steps above Timer mode can be cancelled by holding down the button again Control Panel BATTERY FOR REMOTE CONTROLLER 1 The Remote Control requires 1 x CR2032 battery 2 Slide down battery cover and insert battery Check that the sign is f...

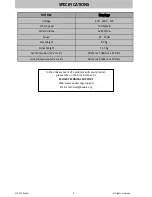
Страница 6: ... Min Noise 27 67 dB Net Weight 8 2 Kg Gross Weight 11 5 Kg Net Dimension W x H x D 400mm x 1380mm x 452mm Gross Dimension W x H x D 237mm x 470mm x 1072mm In the unlikely event of a problem with your product please refer in the first instance to ECOAIR TECHNICAL SUPPORT Web www ecoair org support Email technical ecoair org ...

Страница 7: ...y of its parts in water 10 Never unplug the power cord without switching OFF the fan first 11 Never remove the rotor blade guard after assembly 11 Always unplug the fan when not in use or when moving location To disconnect the fan from the power supply grip the plug and pull from the power socket Never pull by the cord 13 Close supervision is necessary when the fan is used in the presence of child...

Страница 8: ...rmed by persons not authorised by us b If our appliances are fitted with non original spare parts extras or accessories c If our appliance has been altered d In the event of abuse whether physical or verbal abuse towards any member of staff 8 Warranty provision will be free of charge and we will decide whether this will take the form of a repair or the replacement of the appliance Small appliances...

Страница 9: ... 2017 EcoAir All rights reserved ...

Отзывы: