Menu structure of CI 3000
78
Version 2.09 09. April 2014
S
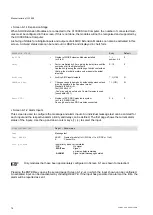
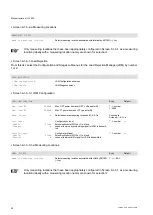
Screen 6-1-1 Expansion Stage
When SIOX Extension Modules are connected to the CI 3000 Store Computer, the number of connected mod
ules must be configured in this screen. If this is not done, the modules will not be recognised and supported by
the CI 3000 Store Computer.
Archiving of status for all digital inputs and outputs of all SIOX Extension Modules can also be activated in this
screen. Archived status data can be read out in LDSWin and displayed in chart form.
EX
P
ANSION
STAGE
Entry
Default
No
SIOX
n
Number of SIOX Extension Modules installed
(n=0 to 4)
↑
,
↓
number 0..4
0
Delay
X
Factor, multiplied by 20 ms, giving the delay time until the
next scan of all the digital outputs.
Application: Ignoring the chattering of switch contacts so
that e.g. the electricity meters only measure the actual
impulses.
0..10
0
Archiving
N
Archive SIOX inputs/outputs
↑
,
↓
(Y/N)
N
CAN-
B
us
f
ast
N
Changes can only be made by authorised personnel and
are only possible in the Superuser mode!
Standard (50 kBit) = N
Fast (250 kBit) = Y
„Yes“ may only be set when a Combi Gateway is used
(see chapter 5.2.1).
↑
↓
(Y/N)
N
Num.o
f
DDC
n
Number of BCS DDC modules in system
(n=1 to 4, READ ONLY)
Can only be set when DDC modules connected.
0..4
0
S
Screen 6-1-2 Alarm Inputs
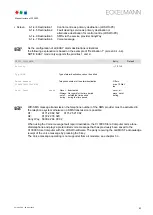
This screen is used to configure the message and alarm inputs. An individual message text can be entered for
each input and the respective alarm priority and delay can be defined. The first page shows the current alarm
status of the inputs. Use the up and down cursor keys (
↑
) (
↓
) to select the input.
SIGNAL/ALARM
IN
P
Page 1 – Show status
Text
Message text
Inp
:
XXXX/
k
XXXX:
Name of module (Int.I / SIOX n=1 to 4 / DDC n=1 to 4)
k:
Channel No.
P
rio
p
Status
Input priority p and current status:
-
OK
No signal
-
WAIT xm
Signal, ,
x minutes delay remaining
-
ALARM
Signal, alarm/message generated
Only modules that have been appropriately configured in Screen 6-1 are shown for selection!
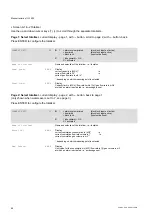
Pressing the ENTER key opens the second page (Screen 6-1-2-a), in which the input shown can be configured.
An activated input can be deactivated by choosing
DELETE
. If the input has generated an alarm at the time, the
alarm will be reported as sent.
Содержание CI 3000
Страница 20: ...Application of CI 3000 14 Version 2 09 09 April 2014 Notice...
Страница 62: ...Installation and Startup of CI 3000 SIOX 56 Version 2 09 09 April 2014 Notice...
Страница 118: ...Menu structure of CI 3000 112 Version 2 09 09 April 2014 Notice...
Страница 120: ...Decommissioning and disposal 114 Version 2 09 09 April 2014 Notice...
Страница 126: ...Alarms and Messages of CI 3000 120 Version 2 09 09 April 2014 Notice...


