Echoflex Installation Guide
Photo & CCT Sensors
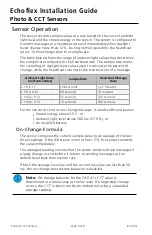
Sensor Operation
The sensor records sample values at a rate based on the current ambient
light level and the stored energy in the sensor. The sensor is configured to
transmit messages at a heartbeat rate and immediately when daylight
levels change more than 12%. During normal operation, the heartbeat
rate is 10 times longer than the sample rate.
The table below shows the range of ambient light values that determine
the sample rate compared to the heartbeat rate. The sample rate marks
the recording of daylight level values used to calculate the percent of
change, while the heartbeat rate marks the transmission of a message.
Ambient Light Value
Lux (Footcandles)
Sample Rate
Heartbeat Message
Rate
< 10 (< 1)
128 seconds
> 21 minutes
< 50 (< 4.6)
64 seconds
10 minutes
< 100 (< 9.3)
32 seconds
320 seconds
> 100 (> 9.3)
16 seconds
160 seconds
For the sensor to send an on-change message, it needs sufficient power:
•
Stored energy above 3.5 V, or
•
Ambient light level above 300 lux (27.9 fc), or
•
An installed battery
On-Change Formula
The sensor compares the current sample value to an average of the last
three readings. If the difference is more than 12%, the sensor transmits
the value immediately.
The averaged reading ensures that the sensor sends multiple messages if
a large change occurs before it returns to sending messages at the
default heartbeat transmission rate.
If both the average lux value and the current lux value are less than 50
lux, the on-change transmission behavior is disabled.
Note:
On-change behavior for the TAP-41's CCT value is
determined in a similar way as the lux level. If a large step change
occurs, the CCT in kelvin can be smoothed out using a calculated
average reading.
Photo & CCT Sensors
Page 4 of 8
Echoflex


