background image

Wiring Instructions:

Black Wire: Connect to (-) ground

Red Wire: Connect to a dedicated (+) power source with a customer 

supplied inline fuse.

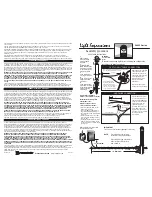
See wiring diagram in Figure 2 for  details.

MOUNTING POSITION

LENS

VEHICLE 

BODY

(+)

(-)

GROUND

GROUND

RED

BLACK

CUSTOMER SUPPLIED

IN-LINE FUSE

IMAGE SHOWN: EW2015R

WIRING APPLIES TO EW2015R,

EW2025R & EW2030R

FIGURE 2

Installation:

For best results, select a mounting location between approximately 

72” to 96”[1829 mm to 2438mm] from the ground. Once mounted, 

angle the lighthead so the boundary line appears in the desired 

location as shown in FIGURE 1.

1.  Select a mounting location for the unit on a flat surface, and drill 

     a 5/16“ hole.

2.  Secure the light head with the supplied hardware. 

3.  Adjust the unit to face downward as shown and tighten the 

     screws located on each side of the worklamp.

FIGURE 1

Page 2 of 3

Содержание EW2030

Страница 1: ...rator to ensure during use that all features of this product work correctly In use the vehicle operator should ensure the projection of the beam is not blocked by vehicle components i e open trunks or...

Страница 2: ...EW2025R EW2030R FIGURE 2 Installation For best results select a mounting location between approximately 72 to 96 1829 mm to 2438mm from the ground Once mounted angle the lighthead so the boundary line...

Страница 3: ...AINST ECCO REGARDING THE PRODUCT AND ITS USE SHALL BE AT ECCO S DIS CRETION THE REPLACEMENT OR REPAIR OF THE PRODUCT OR THE REFUND OF THE PURCHASE PRICE PAID BY BUYER FOR NON CONFORMING PRODUCT IN NO...

Страница 4: ...producto funcionen correctamente durante su uso Durante el uso el operador del veh culo debe garantizar que los componentes del veh culo no bloqueen la proyec ci n del haz de luz es decir maleteros o...

Страница 5: ...R EW2025R Y EW2030R FIGURE 2 Instalaci n Para obtener los mejores resultados seleccione un lugar de montaje entre aproximadamente 1829 mm a 2438 mm 72 a 96 Una vez montada incline el cabezal de luz pa...

Страница 6: ...SUPUESTO EN CONTRA DEL FABRICANTE RESPECTO AL PRODUCTO Y SU USO SER EL REEMPLAZO O LA REPARACI N DEL PRODUCTO O EL REEMBOLSO DEL PRECIO DE COMPRA PAGADO QUE HAYA PAGADO EL COMPRADOR POR EL PRODUCTO QU...

Страница 7: ...alit s de ce produit fonctionnent correctement pendant son utilisation En cours d utilisation l op rateur du v hicule doit s assurer que la visibilit du faisceau n est pas bloqu e par des com posantes...

Страница 8: ...ur de meilleurs r sultats choisissez un emplacement de montage entre environ 1 829 mm 2 438 mm 72 po et 96 po du sol Une fois la t te d clairage mont e inclinez la de mani re ce que la ligne de d limi...

Страница 9: ...TE AUTRE TH ORIE EN CE QUI CONCERNE LE PRODUIT ET SON UTILISATION SE LIMITERONT LA DISCR TION DU FABRICANT AU REMPLACEMENT OU LA R PARATION DU PRODUIT OU AU REMBOURSEMENT DU PRIX D ACHAT PAY PAR L ACH...

Страница 10: ...liegt in der Verantwortung des Fahrers sicherzustellen dass w hrend der Verwendung alle Funktionen dieses Produkts ordnungs gem funktionieren Der Fahrer muss w hrend der Verwendung sicherstellen dass...

Страница 11: ...Ergebnis eine Montageposition zwischen 1829 mm und 2438 mm zwischen 72 und 96 ber dem Boden Nach der Montage richten Sie den Lampenkopf so aus dass die Begrenzungslinie an der gew nschten Stelle ersc...

Страница 12: ...HT AUF DAS PRODUKT UND SEINE VERWENDUNG BESTEHEN NACH ERMESSEN VON DER HERSTELLER IM ERSATZ ODER IN DER REPARATUR DES PRODUKTES ODER IN DER R CKERSTATTUNG DES KAUFPREISES DEN DER K UFER F R DAS NICHT...

Отзывы: