


Do not spill fuel on the motorcycle while refueling.
Immediately wipe up fuel spills on your motorcycle.
Fuel can cause damage to cosmetic surfaces.
1. Verify fuel is present in tank and add fuel if re-
quired. See page 70.
2. Adjust mirrors to proper riding conditions
3. Check coolant level. See MAINTENANCE AND
LUBRICATION, Coolant Level. See page 1
23
.
4. Verify oil is present in engine. Check oil level only
after warming up motorcycle. See page 107.
5. Check controls to make sure they operate properly.
Operate the front and rear brakes, throttle, clutch
and shifter. All controls should operate freely with-
out binding.
6. Check steering for proper operating by turning the
handlebars through the full operating range. Handle-
bars should turn smoothly without binding.
Be sure tires are properly inflated, balanced and
have adequate tread. Inspect your tires regularly and
see an EBR dealer for replacements. Riding with ex-
cessively worn, unbalanced or under-inflated tires
can adversely affect stability and handling, which
could result in death or serious injury.
7. Check tire condition and pressure. Incorrect pressure
will result in poor riding characteristics and affect
handling and stability. See pages 43 and 130.
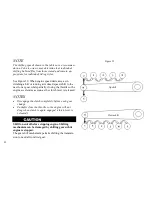
8. Check all electrical equipment and switches includ-
ing the headlamp, stop lamp, turn signals and horn,
for proper operation.
NOTE
Check horn operation with engine running.
77
Содержание EBR 1190RS 2013
Страница 1: ...2013 EBR OWNERS MANUAL EBR 1190RS MODEL Part Number C1000 2B6 1 ...
Страница 3: ...3 ...
Страница 23: ...TABLE OF CONTENTS Notes 23 ...
Страница 24: ...TABLE OF CONTENTS Notes 24 ...
Страница 36: ...VEHICLE IDENTIFICATION NUMBER EBR 1190RS MODELS 36 ...
Страница 39: ...NOTES 39 ...
Страница 42: ...Table 5 Drivetrain Table 6 Cooling System Table 7 Liquid Capacities Table 8 Sprocket teeth 42 ...
Страница 43: ...Table 9 Transmission Gear Ratios Table 11 Tires Table 10 Bulb Chart 43 ...
Страница 44: ...Table 12 Dimensions Table 13 Weights 44 ...
Страница 64: ...Table 15 64 ...
Страница 66: ...Figure 24 Upshift Pattern Figure 25 Downshift Pattern 66 ...
Страница 71: ...Maximum Fill Level is at Bottom of Baffle Figure 29 71 ...
Страница 84: ...Figure 34 Seat Fasteners Seat removal 4 T 30 screws 84 ...
Страница 92: ...92 Notes ...
Страница 93: ...93 Notes ...
Страница 111: ...Figure 47 Engine oil drain plug left side Figure 48 Engine oil drain plug Right side Drain Plug Drain Plug 111 ...
Страница 116: ...Figure 52 Adjustment Measurement 35 mm Adjustment Distance 116 ...
Страница 117: ...117 Notes ...
Страница 176: ...176 ...
Страница 177: ...177 ...
Страница 178: ...178 ...