background image

72

Considérations relatives à l’installation

Rappelez-vous que la portée maximum du système à 
l’extérieur est de 35 mètres*; par conséquent, tant que 
la distance entre l’émetteur et l’AudioRock le plus éloigné 
dans n’importe quel sens est inférieure à 35 mètres*, 
vous pouvez placer l’émetteur à l’endroit de votre choix.

Sélection du lieu d’installation de l’AudioRock™

Votre AudioRock portatif peut être placé à n’importe 
quel endroit que vous jugerez pratique dans vos zones 
d’écoute en plein air. Vous pouvez même espacer de 
multiples AudioRocks de façon qu’aucun haut-parleur 
ne soit à plus d’une dizaine de mètres d’un autre. 
Ceci assurera la meilleure couverture possible, et 
la couverture la plus uniforme, pour vous permettre 
d’écouter un son de qualité exceptionnelle. 

*La portée d’utilisation varie selon l’environnement
d’utilisation.

Содержание XDOM ROCKSPEAKER - PRODUCTSHEET

Страница 1: ...to an existing LightSpeaker System You need a LightSpeaker Transmitter to supply audio and control the music on this unit The Transmitter and Remote discussed in the manual are sold separately User gu...

Страница 2: ...his product Do not short the positive terminal and the negative terminal with metals such as wire coins etc Also do not store or carry the batteries with metal necklaces etc Do not disassemble or modi...

Страница 3: ...er liquids The product is water resistant not water proof 3 Clean only with a wet rag or light spray of water from garden hose Do not use high pressure hoses or washers to clean the product 4 Do not b...

Страница 4: ...electronics With proper installation and operation you will enjoy years of trouble free use ebode electronics offers numerous loudspeakers for use inside or outside your home To see the complete ebod...

Страница 5: ...cations 8 Setting up Zones 9 Preparing AudioRock for Installation 10 Installation Instructions 11 Pairing the AudioRock to the Transmitter 12 Operating and Controlling Your AudioRock 14 Specifications...

Страница 6: ...e and install an outdoor system to be enjoyed by all Additionally the system can be expanded by adding our patented LightSpeakers These LightSpeakers install in minutes and fit into table lamps as wel...

Страница 7: ...ctronics wireless LightSpeaker transmitter It cannot be used or operated without the LightSpeaker transmitter What s in this Box Wireless AudioRock Owner s Manual One Charger One Rechargeable Lithium...

Страница 8: ...ection is less than 35 meter the placement of the transmitter is up to you Selecting AudioRock Locations Your wireless AudioRock can be placed anywhere it is convenient in your outdoor listening areas...

Страница 9: ...the same If you want an area to have different volume level or play a different set of music then use the two zone option Please note that there is no right or wrong way to do this it is simply how yo...

Страница 10: ...the charger making sure that it is inserted correctly and that you do not have to force the battery into the charger Step 4 When the battery is fully charged the LED on the front of the charger will...

Страница 11: ...sliding the tabs over the battery until they are pointing straight at each other Step 2 Be sure the zone switch on the back of your AudioRock is set to zone 1 unless you are setting up a two zone syst...

Страница 12: ...ng button on the back of the unit You may need a sharp object like a pen to press the button in When you do you will see the LED on the front of the transmitter flash This means the unit is in the pai...

Страница 13: ...time to pair all of your AudioRocks simply repeat for each AudioRock in your system Step 3 When all units are paired you are ready to start using and controlling the system Step 4 If you have more Au...

Страница 14: ...allows reception and control of the AudioRock up to 35 meter away from your LightSpeaker transmitter and remote control You can also control ON OFF and Volume from the adjustment buttons on the back o...

Страница 15: ...ol allow direct volume adjustment without need of the supplied RF remote Weatherproof sealing of electronics assures reliability of unit over time when left outdoors Acoustics Dual Voice Coil 5 Enviro...

Страница 16: ...ronics To obtain warranty service please visit your dealer A factory return authorization number will be sent to you Do not return any unit without first receiving written authorization and shipping i...

Страница 17: ...Talk to the people who know them best We re waiting to hear from you WRITE THE PART NUMBER AND SERIAL NUMBER FROM YOUR PRODUCT BOX HERE AND RETAIN FOR PRODUCT REGISTRATION Part Number _______________...

Страница 18: ...ie Ausrichtung der Pole Laden Sie nicht mit Ladeger ten die f r dieses Ger t nicht spezifiziert sind Schlie en Sie Plus und Minuspol nicht kurz beispielsweise mit Dr hten M nzen usw Bewahren Sie Akkus...

Страница 19: ...e keinen Hochdruckreiniger 4 Blockieren Sie keine Entl ftungs ffnungen Installieren Sie das Ger t entsprechend den Anleitungen des Herstellers 5 Installieren Sie das Ger t nicht in unmittelbarer N he...

Страница 20: ...aben Bei sachgem er Installation und Benutzung werden Sie das Ger t f r viele Jahre problemlos nutzen k nnen ebode electronics bietet eine Vielzahl von Lautsprechern f r Innen und Au enmontage in Ihre...

Страница 21: ...e w hlen 24 Zonen einrichten 25 AudioRock zur Installation vorbereiten 26 Installationsanleitungen 27 AudioRockundSenderaufeinanderabstimmen Pairing 28 Bedienung und Steuerung Ihres AudioRock 30 Spezi...

Страница 22: ...konfigurieren und installieren k nnen Das System kann weiterhin um unsere patentierten LightSpeaker Lautsprecher erweitert werden Die LightSpeaker sind in Minutenschnelle installiert und passen in Ti...

Страница 23: ...tronics drahtlosen LightSpeaker Sender benutzt werden Er kann nicht ohne den LightSpeaker Sender betrieben werden Lieferumfang Drahtloser AudioRock Bedienungsanleitung Ein Ladeger t Ein Lithium Ionen...

Страница 24: ...der in allen Richtungen zum entferntesten AudioRock geringer als 35 m ist Standorte f r AudioRocks w hlen Ihr drahtloser AudioRock kann in Ihren H rbereichen im Freien an beliebiger Stelle aufgestellt...

Страница 25: ...ch eine abweichende Lautst rke oder eine andere Musikrichtung so nutzen Sie die Zwei Zonenoption Bitte beachten Sie dass es hierbei kein richtig oder falsch gibt es ist ganz allein Ihnen berlassen wie...

Страница 26: ...orrekt in das Ladeger t ein wenden Sie hierbei keine Kraft an Schritt 4 Sobald der Akku voll geladen ist schaltet die LED auf der Frontblende des Ladeger ts auf GR N um Schritt 5 Nehmen Sie den Akku a...

Страница 27: ...mit den Nasen bis sie aufeinander ausgerichtet sind Schritt 2 Achten Sie darauf dass der Zonenschalter auf der R ckseite Ihres AudioRock auf Zone 1 eingestellt ist es sein denn Sie richten ein Zwei Zo...

Страница 28: ...Ger ter ckseite Sie ben tigen einen spitzen Gegenstand wie einen Kugelschreiber um die Taste zu dr cken W hrend Sie dr cken blinkt die LED auf der Frontblende des Senders Das Ger t ist jetzt im Pairin...

Страница 29: ...einfach f r jeden AudioRock in Ihrem System Schritt 3 Nachdem alle Ger te abgestimmt sind k nnen Sie das System benutzen und steuern Schritt 4 Haben Sie weitere AudioRocks LightSpeaker oder sonstige...

Страница 30: ...euerung des AudioRock bis zu 35 m von Ihrem LightSpeaker Sender und der Fernbedienung entfernt Sie steuern ebenfalls Ein Aus und die Lautst rke mit den Bedienelementen auf der R ckseite Ihres AudioRoc...

Страница 31: ...keregelung zur direkten Einstellung ohne die mitgelieferte RF Fernbedienung Die wetterfeste Versiegelung der Elektronik gew hrleistet die Zuverl ssigkeit des Ger ts bei Au enmontage Akustik 5 Zoll kol...

Страница 32: ...Garantie bitte wenden Sie sich an Ihren Fachh ndler Ihnen wird eine R ckgabenummer bersandt Geben Sie kein Ger t zur ck ohne zuvor schriftliche Best tigung und Versandanleitungen von Ihren Fachh ndle...

Страница 33: ...ndler Haben Sie Fragen zu Ihren LightSpeaker Lautsprechern Wenden Sie sich an die Menschen die davon am meisten verstehen NOTIEREN SIE HIER MODELLNUMMER UND SERIENNUMMER Modellnummer ________________...

Страница 34: ...negatieve contacten niet met metalen voorwerpen zoals draad muntjes enz in contact Zorg er ook voor dat u de batterijen niet opbergt of draagt in de buurt van metalen kettingen enz Demonteer de batter...

Страница 35: ...choon met een natte doek of een kleine waterstraal uit de tuinslang Gebruik geen hogedrukreinigers of hogedrukslangen om het apparaat schoon te maken 4 Blokkeer geen enkele ventilatieopening Installee...

Страница 36: ...de juiste installatie en bediening zult u jarenlang probleemloos kunnen genieten van dit apparaat ebode electronics biedt u een grote keuze aan luidsprekers zowel voor binnen als voor buiten Om het h...

Страница 37: ...atsbepalen 40 Zones installeren 41 De AudioRock gereedmaken voor installatie 42 Installatie instructies 43 De AudioRock koppelen aan de zender 44 Het bedienen van uw AudioRock 46 Specificaties 47 Acce...

Страница 38: ...ren audiosysteem voor buiten waar iedereen van kan genieten Bovendien kan het systeem ook nog uitgebreid worden door toevoeging van onze gepatenteerde LightSpeakers Deze LightSpeakers kunnen binnen en...

Страница 39: ...Speaker zender van ebode electronics De AudioRock kan niet worden gebruikt of bediend zonder de LightSpeaker zender Wat zit er in deze doos Draadloze AudioRock Handleiding voor de eigenaar Een oplader...

Страница 40: ...erde AudioRock ongeacht welke richting kleiner is dan 35 meter kunt u de plaats van de zender vrij bepalen De plaats van de AudioRocks bepalen Uw draadloze AudioRock kan buiten overal waar u dat wilt...

Страница 41: ...in deze zone naar andere muziek wilt luisteren kunt u de twee zones optie gebruiken Wij wijzen u erop dat er geen goede of verkeerde manier is om dit te doen het hangt gewoon af van wat u met uw Audi...

Страница 42: ...de juiste plaats zorg ervoor dat de batterij correct is geplaatst en dat u niet hoeft te forceren om de batterij in de oplader te plaatsen Stap 4 Als de batterij geheel is opgeladen dan zal het LED la...

Страница 43: ...es over de batterij heen te draaien totdat deze recht naar elkaar toe wijzen Stap 2 Zorg ervoor dat de zone knop aan de achterkant van uw AudioRock op zone 1 staat tenzij u een twee zones systeem op w...

Страница 44: ...n een scherp voorwerp nodig zoals een pen om de knop in te drukken Als u op de knop drukt ziet u dat het LED lampje aan de voorkant gaat knipperen Dit betekent dat het toestel in de pairing mode staat...

Страница 45: ...rocedure voor iedere AudioRock in uw systeem Stap 3 Als alle speakers gekoppeld zijn bent u klaar om uw systeem te gebruiken en te bedienen Stap 4 Indien u meer AudioRocks LightSpeakers of andere luid...

Страница 46: ...ock binnen een bereik van 35 meter gerekend vanaf de LightSpeaker zender en afstandsbediening Extra bedieningsfuncties AAN UIT en VOLUME via de regelknoppen aan de achterkant van uw AudioRock De weerb...

Страница 47: ...eert de weerbestendige afdichting van de elektronica u langdurige betrouwbaarheid Akoestiek Dubbele spreekspoel Dual Voice Coil van 5 inch 13 35 cm In een natuurlijke ogende gespuitgiete polypropyleen...

Страница 48: ...uitgevoerd door iemand anders dan ebode electronics Bezoek voor garantieservice uw dealer Hij kan een autorisatienummer verstrekken voor een retour Stuur geen product terug zonder eerst een schriftel...

Страница 49: ...Heeft u een vraag over uw Lightspeaker Systeem Praat met de mensen die er het meest van weten U kunt hier het model en serienummer opschrijven U vindt deze op de verpakking Model Nummer ______________...

Страница 50: ...med metallobjekt som st ltr d mynt eller liknande F rvara eller b r aldrig batterierna tillsammans med halsband och armband eller liknande i metall Ta aldrig is r eller modifiera batteriet G r inte h...

Страница 51: ...kada S nk inte ner produkten i vatten eller annan v tska Produkten r vattent lig men inte vattent t 3 Reng r enbart med v t trasa eller genom att sk lja av den f rsiktigt med vattenslang Anv nd inte h...

Страница 52: ...ed korrekt installation och anv ndning kommer du att ha m nga rs gl dje av problemfri anv ndning ebode electronics s ljer ett stort antal h gtalare f r b de utomhus och inomhusbruk Vill du se ebode el...

Страница 53: ...V lja placering 56 St lla in zoner 57 F rbereda AudioRock f r installation 58 Installationsanvisningar 59 Parkoppla AudioRock med s ndaren 60 Anv nda och kontrollera AudioRock 62 Specifikationer 63 Ti...

Страница 54: ...a in ditt utomhussystem s att alla kan njuta av det Dessutom kan systemet byggas ut genom att l gga till v ra patenterade LightSpeakers LightSpeakers installeras p n gra minuter och passar i bordslamp...

Страница 55: ...electronics tr dl sa LightSpeaker s ndare Den kan inte anv ndas eller styras utan LightSpeaker s ndaren Vad finns i l dan Tr dl sa AudioRock Bruksanvisning En laddare Ett laddningsbart litiumjonbatte...

Страница 56: ...n till den AudioRock som r l ngst bort r mindre n 35 meter kan du placera s ndaren var som helst V lja placering Tr dl sa AudioRock kan placeras var som helst d r du nskar utomhus Du kan ven placera u...

Страница 57: ...a annan volym eller spela upp en annan k lla s kan du anv nda alternativet med tv zoner Observera att det inte finns n got r tt eller fel s tt att g ra det h r p det r helt upp till hur du vill anv nd...

Страница 58: ...iet i laddaren kontrollera att det placeras r tt och att du inte beh ver tvinga i batteriet i laddaren Steg 4 N r batteriet r fulladdat kommer LED indikatorn p framsidan att lysa GR NT Steg 5 Ta ur ba...

Страница 59: ...iet genom att f ra flikarna ver batteriet tills de pekar rakt mot varandra Steg 2 Se till att zonv ljaren p baksidan av AudioRock st r p zon 1 om du inte t nker st lla in ett tv zonssystem Om du t nke...

Страница 60: ...penna f r att trycka p knappen N r du trycker p den kommer LED indikatorn p s ndarens framsida att b rja blinka Det inneb r att enheten r i parkopplingsl ge Steg 2 S tt omedelbart str mbrytaren p baks...

Страница 61: ...f r alla AudioRock i systemet Steg 3 N r samtliga enheter r parkopplade kan du b rja anv nda och kontrollera systemet Steg 4 Om du har flera AudioRock LightSpeaker eller andra h gtalare som fungerar...

Страница 62: ...mot och styr AudioRock p upp till 35 meters avst nd fr n LightSpeaker s ndaren och fj rrkontrollen Du kan ocks styra ON OFF och Volume med justeringsknapparna p baksidan av AudioRock Den vattent ta f...

Страница 63: ...lutningen av elektroniken g r att p litligheten f r enheten bibeh lls under l ng tid ven om enheten r placerad utomhus Akustik Dubbla Voice Coil 5 tums Environmental Injection Molded Polypropylene Woo...

Страница 64: ...lokala terf rs ljare Ett godk nt hanteringsnummer fr n fabriken kommer att skickas till dig Returnera ingen produkt utan att f rst ha f tt skriftligt godk nnande och fraktinstruktioner fr n din lokala...

Страница 65: ...s ljare Har du n gon fr ga om dina LightSpeaker h gtalare Fr ga de som kan produkterna b st SKRIV NER MODELLNUMMER OCH SERIENUMMER FR N DIN PRODUKTF RPACKNING H R Modellnummer _______________________...

Страница 66: ...e positive et la borne n gative avec des objets en m tal tels que du fil de fer des pi ces de monnaie etc Il ne faut pas non plus ranger ou transporter la pile avec un collier en m tal etc Il ne faut...

Страница 67: ...oduit est prot g contre les projections d eau mais il n est pas tanche 3 Ne nettoyez qu avec un chiffon humide ou un l ger jet d eau d un tuyau d arrosage N utilisez pas de tuyaux ou d appareils de la...

Страница 68: ...de ce produit pendant des ann es sans probl mes si vous l installez et l utilisez correctement ebode electronics offre de nombreux haut parleurs pour emploi l int rieur ou l ext rieur chez vous Pour v...

Страница 69: ...nfiguration des zones 73 Pr paration de l AudioRock en vue de son installation 74 Charge de la pile AudioRock 74 Instructions pour l installation 75 Pairage de l AudioRock avec l metteur 76 Utilisatio...

Страница 70: ...pouvez m me diviser vos espaces l ext rieur en zones distinctes dans lesquelles des sources diff rentes et un syst me de contr le du son vous donnent la flexibilit n cessaire pour configurer et insta...

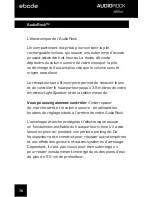
Страница 71: ...us de flexibilit en tant que propri taire parce que vous pouvez l emporter avec vous si vous d m nagez Si vous avez besoin de le retirer le syst me ne laisse pas la moindre trace de son installation o...

Страница 72: ...lection du lieu d installation de l AudioRock Votre AudioRock portatif peut tre plac n importe quel endroit que vous jugerez pratique dans vos zones d coute en plein air Vous pouvez m me espacer de mu...

Страница 73: ...sonore soit diff rent dans une zone vous pouvez utiliser l option d avoir deux zones distinctes Veuillez noter qu il n y a pas de fa on correcte ou incorrecte de faire ceci c est simplement vous qu i...

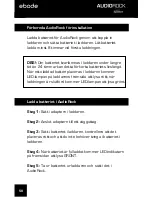
Страница 74: ...ant c a Troisi me tape faites glisser la pile dans le chargeur en vous assurant qu elle est ins r e correctement et que vous n avez pas besoin de forcer la pile dans le chargeur Quatri me tape lorsque...

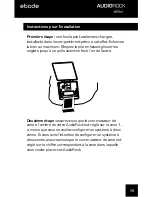
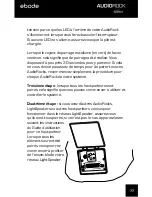
Страница 75: ...qu ils soient en face l un de l autre Deuxi me tape assurez vous que le commutateur de zone l arri re de votre AudioRock est r gl sur la zone 1 moins que vous ne vouliez configurer un syst me deux zon...

Страница 76: ...ut tre besoin d un objet pointu tel qu un stylo pour enfoncer le bouton Apr s l avoir enfonc vous verrez la LED sur le devant de l metteur clignoter Cela signifie que le haut parleur est dans le mode...

Страница 77: ...a proc dure pour chaque AudioRock de votre syst me Troisi me tape lorsque tous les haut parleurs sont pair s cela signifie que vous pouvez commencer utiliser et contr ler le syst me Quatri me tape si...

Страница 78: ...es de votre metteur LightSpeaker et de la t l commande Vous pouvez galement contr ler l interrupteur de marche arr t et le volume sonore en utilisant les boutons de r glage situ s l arri re de votre A...

Страница 79: ...l commande RF fournie L enveloppe tanche prot geant l lectronique assure un fonctionnement fiable du haut parleur m me s il a t laiss en plein air pendant une p riode prolong e Acoustique Haut parleu...

Страница 80: ...revendeur local Un num ro d autorisation de retour en usine vous sera envoy Veuillez ne pas retourner l unit avant d avoir re u l autorisation crite et les instructions d envoi de la part de votre rev...

Страница 81: ...ocal Vous avez une question concernant les haut parleurs LightSpeaker Parlez en des experts NOTEZ ICI LE NUMERO DE MODELE ET LE NUMERO DE SERIE SITUES SUR L EMBALLAGE Num ro de mod le ________________...

Страница 82: ...rgadores no especificados para este producto No haga un corto circuito con el terminal positivo y el terminal negativo con metales como alambres monedas etc Tampoco guarde o lleve las bater as con col...

Страница 83: ...producto es resistente al agua pero no es impermeable 3 L mpielo nicamente con un trapo h mero o roc elo ligeramente con una manguera de jard n No use mangueras de alta presi n ni lavadores para limpi...

Страница 84: ...cos y port tiles Con la instalaci n y el funcionamiento correctos usted disfrutar a os de uso sin problemas ebode electronics Speakers ofrece numerosos parlantes para uso adentro o afuera de su hogar...

Страница 85: ...ubicaciones 88 Fijaci n de zonas 89 Preparaci n del AudioRock para instalaci n 90 Instrucciones de instalaci n 91 Pareamiento el AudioRock con el transmisor 92 Funcionamiento y control de su AudioRoc...

Страница 86: ...o le otorga la flexibilidad de configurar e instalar f cilmente un sistema al aire libre que pueda ser disfrutado por todos Adem s el sistema se puede expandir a adiendo nuestros LightSpeakers patenta...

Страница 87: ...o LightSpeaker de ebode electronics No se puede usar ni hacer funcionar sin el transmisor LightSpeaker Qu hay en esta caja Wireless AudioRock Manual del propietario Un cargador Una bater a recargable...

Страница 88: ...l transmisor donde lo desee Selecci n de ubicaciones del AudioRock Puede colocar el AudioRock en cualquier lugar que le resulte c modo en los lugares en que escucha m sica al aire libre Hasta puede es...

Страница 89: ...s igual Si desea que una zona tenga un volumen de sonido diferente o que toque otra m sica use la opci n de dos zonas Note que no hay una manera correcta o incorrecta de hacer esto es simplemente la m...

Страница 90: ...eslice la bater a en el cargador cercior ndose de que est insertada correctamente y de que no tenga que forzar la bater a en el cargador Paso 4 Cuando la bater a est completamente cargada el LED en el...

Страница 91: ...jada toda hasta adentro Paso 2 Verifique que el interruptor de zona en la parte de atr s de su AudioRock est puesto en la Zona 1 excepto si est instalando un sistema de dos zonas Si va a instalar un s...

Страница 92: ...la unidad Es posible que necesite un objeto puntiagudo como una lapicera para oprimir el bot n Cuando lo haga ver que el LED en el frente del transmisor se pondr intermitente Esto quiere decir que la...

Страница 93: ...o como para pareamiento todos sus AudioRock simplemente repita el proceso para cada AudioRock en su sistema Paso 3 Cuando pareamiento todas las unidades estar listo para empezar a usar y controlar su...

Страница 94: ...de su AudioRock El sello a prueba de agua de los componentes electr nicos garantiza la fiabilidad de la unidad a lo largo del tiempo cuando se la deja a la intemperie Esta unidad est construida para t...

Страница 95: ...la deja a la intemperie Ac stica Woofer de polipropileno ambiental moldeado a inyecci n de 5 1 4 pulgadas con bobina dual para voz Tweeters duales de polipropileno de Los impulsores est n en un ngulo...

Страница 96: ...ronics Para obtener el servicio de garant a visite con su concesionario local Se le enviar un n mero de autorizaci n de devoluci n a f brica No devuelva ninguna unidad sin antes recibir una autorizaci...

Страница 97: ...egunta relacionada con sus altavoces Lightspeaker Hable con las personas que mejor lo conocen ESCRIBA AQU EL N MERO DEL MODELO Y EL N MERO DE SERIE QUE APARECEN EN LA CAJA DE SU PRODUCTO N mero del mo...

Страница 98: ...nais positivos e negativo em curto circuito com metais como fios moedas etc Al m disso n o guarde nem carregue a bateria com colares de metal etc N o desmonte nem modifique sua bateria N o fure a bate...

Страница 99: ...u danos N o o mergulhe em gua ou outros l quidos O produto resistente a gua n o prova de gua 3 Limpe apenas com um pano h mido ou borrifadas leves de gua com uma mangueira N o utilize mangueiras de al...

Страница 100: ...e adequadamente instalado e utilizado o produto durar por v rios anos sem problemas A ebode electronics oferece v rios altifalantes para utiliza o em ambientes internos ou externos Para ver a lista co...

Страница 101: ...o local 104 Ajuste das zonas 105 Prepara o do AudioRock para instala o 106 Instru es de instala o 107 Emparelhamento do AudioRock com o transmissor 108 Funcionamento e controlo do seu AudioRock 110 Es...

Страница 102: ...lidade e facilidade um sistema externo para ser desfrutado por todos Al m disso o sistema pode ser expandido adicionando se nossos altifalantes LightSpeakers patenteados Estes altifalantes podem ser i...

Страница 103: ...peaker sem fios da ebode electronics N o pode ser utilizado ou operado sem o transmissor LightSpeaker Conte do da embalagem AudioRock sem fios Manual de instru es Um carregador Uma bateria de i es de...

Страница 104: ...m qualquer dire o seja menor que 35 metros o posicionamento do transmissor depende da escolha do utilizador Escolha do local do AudioRock O seu AudioRock sem fios pode ser colocado em qualquer local c...

Страница 105: ...quiser que outra rea tenha volumes diferentes ou toque uma lista diferente de can es utilize a op o de duas zonas Lembre se de que n o h forma correta nem incorreta de fazer isto depende de como o ut...

Страница 106: ...no carregador certificando se de que esteja inserida corretamente e de que n o seja preciso for la para dentro Passo 4 quando a bateria estiver completamente carregada o painel LED na frente do apare...

Страница 107: ...re a bateria at que estejam a apontar diretamente uma para a outra Passo 2 certifique se de que o bot o de zona na parte de tr s do seu AudioRock esteja na posi o 1 a menos que deseje configurar um si...

Страница 108: ...na parte de tr s da unidade Ser necess rio utilizar um objeto pontiagudo como por exemplo uma caneta para premir o bot o Ao premi lo ver o painel LED frontal do transmissor piscar Isto significa que...

Страница 109: ...amento de todos os seus AudioRocks basta repetir a opera o para cada AudioRock do seu sistema Passo 3 quando todas as unidades estiverem emparelhadas o sistema poder ser utilizado e controlado Passo 4...

Страница 110: ...es de ajuste na parte de tr s do seu AudioRock O inv lucro resistente a interfer ncias clim ticas de produtos eletr nicos garante a durabilidade do produto ao longo do tempo quando deixado do lado de...

Страница 111: ...ando deixado do lado de fora Ac stica Woofer de polipropileno moldado com inje o ambiental com serpentina de 5 em dois canais Tweeters duplos de polipropileno de Altifalantes instalados num ngulo de 2...

Страница 112: ...a ebode electronics Para obter uma repara o em garantia visite por favor seu distribuidor local Ser lhe enviado um n mero de autoriza o de devolu o de f brica N o devolva nenhum equipamento sem prime...

Страница 113: ...m uma d vida acerca das colunas do seu Lightspeaker Fale com as pessoas que os conhecem melhor ESCREVA AQUI O N MERO DO MODELO E O N MERO DE S RIE DA CAIXA DO SEU PRODUTO N mero do Modelo ____________...

Страница 114: ...otto Non mandare in corto il polo positivo e polo negativo con metalli come fili monete ecc Inoltre non conservare o trasportare le batterie con collane di metallo ecc Non smontare o modificare la bat...

Страница 115: ...Non immergere in acqua o altri liquidi Il prodotto resistente all acqua non impermeabile 3 Pulire solo con uno straccio bagnato o spruzzi di acqua dal tubo da giardino Non utilizzare i tubi flessibil...

Страница 116: ...retta installazione e funzionamento potrete godere di anni di uso senza problemi ebode electronics offre numerosi altoparlanti per l uso all interno o fuori della vostra casa Per vedere l intero assor...

Страница 117: ...sizioni 120 Impostazione delle Zone 121 Preparazione di AudioRock per l installazione 122 Istruzioni per l installazione 123 Accoppiamento del AudioRock al Trasmettitore 124 Uso e Controllo dell Audio...

Страница 118: ...urare facilmente e installare un impianto esterno che possa essere usufruito da tutti Inoltre il sistema pu essere ampliato con l aggiunta dei nostri LightSpeakers brevettati Questi LightSpeakers si i...

Страница 119: ...li di ebode electronics Non pu essere utilizzato o fatto funzionare senza il trasmettitore LightSpeaker Cosa c nella confezione AudioRock Senza Fili Manuale del proprietario Un caricabatteria Una batt...

Страница 120: ...ri sta a voi decidere dove mettere il trasmettitore Scelta del posizionamento per AudioRock L AudioRock senza fili pu essere inserito in qualsiasi punto ritenuto comodo nelle vostre aree d ascolto all...

Страница 121: ...ole avere un area che abbia un diverso livello di volume o riprodurre un diverso tipo di musica si deve utilizzare l opzione dei due zone Si prega di notare che non vi alcun modo giusto o sbagliato pe...

Страница 122: ...el caricatore facendo attenzione che sia inserita correttamente e che non sia necessario forzare la batteria all interno del caricatore Passaggio 4 Quando la batteria completamente carica il LED sulla...

Страница 123: ...ria fino a che non siano rivolte direttamente l una verso l altra Passaggio 2 Assicurarsi che l interruttore di zona sul retro del vostro AudioRock sia impostato su zona 1 a meno che non si sta config...

Страница 124: ...appuntito come una penna per premere il tasto Una volta fatto si vedr il LED sulla parte anteriore del trasmettitore lampeggiare Questo significa che l unit in modalit accoppiamento Passaggio 2 Impos...

Страница 125: ...nel vostro sistema Passaggio 3 Quando tutte le unit sono accoppiate si pronti per iniziare a utilizzare e controllare il sistema Passaggio 4 Se avete pi AudioRocks LightSpeakers o altri diffusori prog...

Страница 126: ...ssicura l affidabilit dell unit nel corso del tempo se lasciata all aperto Questo apparecchio costruito per resistere alle condizioni di maltempo e agli effetti degli spruzzatori e altri sistemi di ir...

Страница 127: ...one ambientale da 5 a doppia bobina mobile Doppio Tweeter in polipropilene da I driver sono angolati verso l alto di 20 gradi per offrire un suono ampio quando il sistema posto al livello del suolo Il...

Страница 128: ...fine di ottenere il servizio di garanzia visitare al rivenditore locale egli verr inviato il numero di autorizzazione per la restituzione in fabbrica Non restituire le unit senza aver prima ricevuto...

Страница 129: ...re locale Vi sono dubbi sui diffusori Lightspeaker Rivolgetevi a chi li conosce meglio SCRIVERE QUI IL NUMERO DEL MODELLO E DI SERIE RIPORTATO SULLA CONFEZIONE DEL PRODOTTO Numero modello ____________...

Страница 130: ...nergy using Technical data and copies of the original Declaration of Conformity are available and can be obtained from ebode electronics PB 25 NL 4264ZG the Netherlands User Information for Consumer P...

Страница 131: ...exigences essentielles et aux autres dispositions pertinentes de la Directive 1999 5 EC Espa ol Spanish Este equipo cumple con los requisitos esenciales asi como con otras disposiciones de la Directi...

Страница 132: ...h LED lights only or enjoy the same music outdoors as well as indoors visit www ebodeelectronics eu For more detailed installation instructions go to www ebodeelectronics eu AudioRock Technical Suppor...

Отзывы: