background image

6

DE

EN

FR

ES

IT

Warning:

Fingers can get crushed between the fixed parts and the moving hose guide system.

Warning:

Do not operate the hose guide without the protective cover (for example, during annual cleaning/maintenance).
Hands may get injured in the pulley/timing belt.

1. General warings

The automatic hose guide frame correctly positions the hose on the drum of the
hose reel for orderly rewinding.
This device is intended only for installation OSM and OSK hose reels (painted and
stainless).

Warning:

Do not fit the hose reel with the automatic hose guide in a potentially explosive
environment.

During rewinding, the hose must always be guided by hand, it is forbidden to
release the hose during the rewinding phase, to avoid subjecting the hose to impact
or abrasions that may compromise its integrity and to avoid damage to people or
things.

Whilst unwinding and rewinding, the hose guide operator should always keep the
hose reel in their view and ensure that there are no people near it.

Carefully read this instruction booklet before using the
equipment!

The hose reel can be installed in an inaccessible area according to standards
EN13857 (i.e., at a height > 2500 mm - 98.4", on a stable surface and unreachable
by the operator).

2. Intended use and limitations of use
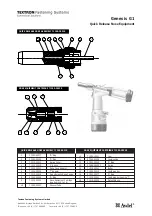
C

B

E

F

D

A

OSM/OSK

A

B

C

D

E

F

400, 410

314 mm

12,3“

283 mm

11,1“

134 mm

5,2“

377 mm

14,8“

209 mm

8,2“

314 mm

12,3“

500, 510

371 mm

14,6“

341 mm

13,4“

136 mm

5,3“

488 mm

19,2“

223 mm

8,7“

187 mm

7,3“

610

371 mm

14,6“

341 mm

13,4“

136 mm

5,3“

488 mm

19,2“

288 mm

11,3“

252 mm

9,9“

710

371 mm

14,6“

341 mm

13,4“

136 mm

5,3““

488 mm

19,2“

472mm

18,5“

436mm

17,1“

Содержание OSM 400

Страница 1: ...guidatubo automatica ES Manual de instrucciones boca de gu a de tubo autom tica FR Manual de mode d emploi embout guide c ble automatique GB Instruction booklet automatic hose guide DE Bedienungsanle...

Страница 2: ...Sommaire 1 Mises en garde generales 9 2 Utilisation prevue et limites d utilisation 9 3 Embout automatique 10 4 D montage de l embout standard 10 5 Installation de l embout automatique 10 6 Entretien...

Страница 3: ...rollen loszulassen um Personen und Sachsch den zu vermeiden und den Schlauch vor St en und Abrieb zu sch tzen die seine Funktion beeintr chtigen w rden Der Bediener der den Schlauch w hrend der Abwick...

Страница 4: ...g des Riemenscheibenbolzens Mit einem 5 er Sechskantschl ssel den Riemenscheibenbolzen an der Buchsen ffnung auf der Federseite Abb 4 befestigen Achtung Der Sechskantbolzen stimmt nicht mit der Buchse...

Страница 5: ...en Schlauchf hrung ist es m glich dass der Riemenspanner sich im Laufe der Zeit lockert die Spannung ist regelm ig zu pr fen und gegebenenfalls anzupassen siehe Einstellen des Riemenspanners Verschlis...

Страница 6: ...rewinding phase to avoid subjecting the hose to impact or abrasions that may compromise its integrity and to avoid damage to people or things Whilst unwinding and rewinding the hose guide operator sho...

Страница 7: ...10 hexagonal key from 5 and 4 fig 3 fig 2 fig 1 1 1 2 3 Fastening the pulley pivot With an allen key from 5 mm secure the pulley pivot to the spring side axle hole fig 4 Warning The hex screw does not...

Страница 8: ...omatic hose guide Periodically check the tension and adjust it when necessary see Adjusting belt tension Worn parts must be replaced with original replacement parts fig 7 7 1 2 0 4 Nm 1 Nm 8 7 1 2 3 3...

Страница 9: ...uyau pendant la phase de r enroulement pour viter tout choc et abrasion au tuyau pouvant porter atteinte son int grit et viter de causer des dommages corpo rels ou mat riels L op rateur qui accompagne...

Страница 10: ...e 5 et de 4 fig 3 fig 2 fig 1 1 1 2 3 Fixation du pivot de la poulie Avec une cl hexagonale de 5 mm fixer le pivot de la poulie sur le trou de la bague c t ressort fig 4 Attention Le pivot hexagonal n...

Страница 11: ...ie au fil du temps se desserre Il faut donc v rifier p riodiquement la tension et la r gler si n cessaire voir R glage de la courroie de tension Les parties us es doivent tre remplac es par des pi ces...

Страница 12: ...ano se proh be soltar el tubo durante la fase de rebobinado a fin de no someter al tubo a golpes o abrasiones que podr an menoscabar su integridad y para evitar da os a personas o cosas El operador qu...

Страница 13: ...llave hexagonal de 5 y 4 fig 3 fig 2 fig 1 1 1 2 3 F aci n pivote polea Con una llave hexagonal de 5 mm fije el pivote polea en el orificio del casquillo del lado muelle fig 4 Atenci n El perno hexago...

Страница 14: ...el pasar del tiempo la correa se afloje hay que verificar peri dicamente el tensado y si fuese necesario ajustarlo v ase Regular la correa de tensado Las partes desgastadas deben reemplazarse con rec...

Страница 15: ...il rilascio del tubo durante la fase di riavvolgimento al fine di non sottoporre il tubo a urti o abrasioni che ne compromettano l integrit ed evitare danni a persone o cose L operatore che accompagn...

Страница 16: ...5 e da 4 fig 3 fig 2 fig 1 1 1 2 3 Fissaggion perno puleggia Con chiave a brugola da 5 mm fissare il perno puleggia sul foro della boccola lato molla fig 4 Attenzione II perno esagonale non si accopp...

Страница 17: ...passare del tempo si allenti occorre verificare periodicamente la tensione e nel caso regolarla vedere Regolare la cinghia tendicinghia Le parti usurate vanno sostituite con ricambi originali fig 7 7...

Страница 18: ...conformes dans toutes leurs parties aux directives europennes applicables suivantes 2006 42 CE directive machines FR DE GB ES IT Zur sachgerechten Umsetzung der in der EG Richtlinien genannten Sicher...

Страница 19: ...19 Notizen notes notas note...

Страница 20: ...y eche un vistazo a nuestra completa cartera de productos Visitate il nostro sito web all indirizzo www ebinger gmbh com e date un occhiata al nostro portafoglio completo di prodotti Veuillez consulte...

Отзывы: