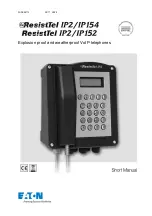
background image


2


Brand  names  are  used  with  no  guarantee  that  they  may  be  freely  employed.  Almost  all  hardware  and 
software designations in this manual are registered trademarks or should be treated as such. 
 
All rights reserved. No part of this manual may be reproduced in any way (print, photocopy, microfilm or 
by  any  other  means)  or  processed,  duplicated  or  distributed  using  electronic  systems  without  explicit 
approval. 
 
Texts  and  illustrations  have  been  compiled  and  software  created  with  the  utmost  care,  however  errors 
cannot be completely ruled out. This documentation is therefore supplied under exclusion of any liability or 
warranty  of  suitability  for  specific  purposes.  FHF  reserves  the  right  to  improve  or  modify  this 
documentation without prior notice. 


Note 

Please read the operating manual carefully before installing the device. 

This  is  only  a  short  manual.  The  most  important  operating  procedures 
and the mounting and installation instructions are part of this document. 
For  the  complete  configuration  and  operating  of  all  features  the 
knowledge of the complete manual is necessary. 

The complete manual is attached on the CD. 

Please check the contents of the box for completeness. 


Table of Contents 

1


VoIP Telephone ResistTel IP2 / IP152 and 
ExResistTel IP2 / IP154 .............................................. 4


1.1


Keypad ......................................................................... 4


1.2


Keypad Description ..................................................... 5


1.3


Display ......................................................................... 6


11.3.1


Default Display .................................................................. 6


21.3.1


Menu and Listing Display ................................................... 7


1.4


As-Delivered Condition ............................................... 8


11.4.1


Default Version one LAN Connection

Fehler! Textmarke nicht 

definiert.


21.4.1


Version one Switch LAN Module with two LAN Connections
 .................................. 

Fehler! Textmarke nicht definiert.


1.5


Mounting and Installing .............................................. 8


11.5.1


LAN-Connections ............................................................. 13


1.5.1.1


Default Version one LAN Connection with a Cable Gland .... 13


1.5.1.2


Version with Switch LAN Module with two LAN Connections with 
Cable Glands ................................................................... 13


21.5.1


External Power Supply Connection ................................... 14


31.5.1


Relay Connection ............................................................ 14


41.5.1


Other Terminals .............................................................. 15


51.5.1


Sling Holder ................ 

Fehler! Textmarke nicht definiert.


61.5.1


General ....................... 

Fehler! Textmarke nicht definiert.


Содержание ResistTel IP2/IP154

Страница 1: ...FHF BA9710 09 17 V8 V9 Explosion proof and weatherproof VoIP telephones...

Страница 2: ...res and the mounting and installation instructions are part of this document For the complete configuration and operating of all features the knowledge of the complete manual is necessary The complete...

Страница 3: ...ode to Headset Mode 20 72 2 1 Changeover from Headset Mode to Headset Mode with Open Listening 20 82 2 1 Changeover from Headset Mode with Open Listening to Headset Mode 20 92 2 1 Changeover from Head...

Страница 4: ...4 1 VoIP Telephone ResistTel IP2 IP152 and ExResistTel IP2 IP154 1 1 Keypad Figure 1 Keypad of the VoIP Telephone...

Страница 5: ...only be adjusted during a call long The asterisk key also serves as a mute key During a call a longer press switches the microphone off or on Digit keys for entering phone numbers The asterisk and ha...

Страница 6: ...ration is displayed in the first line The middle lines display special information relating to the condition The date time and registration status is displayed in the last line 1 4 2 3 5 Torsten 72 06...

Страница 7: ...all diversion activated Handset activate Headset active Telephone locked Calling number transmission locked 3 Own call number E 164 4 Called party Calling party Unknown number name unresolved number D...

Страница 8: ...r for cable mounting Optional relay module Accessories optional Headset with connection cable and attachment of the bracket connecting cable RJ45 RJ45 LAN female connector for cable mounting Cable gla...

Страница 9: ...e glands have to be considered Prior to assembly check cover seal for tightness Using the plug connector 7 plug the ribbon cable onto the pin contact strip 8 in the upper part of the housing Attach th...

Страница 10: ...10 Figure 6 Set View Figure 7 Inside View of Telephone upper Part...

Страница 11: ...11 Figure 8 Inside View of Telephone lower Part Figure 9 Connection Diagram with Single LAN Module 1 2 3 4 5 6 7 8 9 10 11 12 13 X 1 0 X11 X1 X2 X3 X4 X5 X6 LAN PoE X7 X 8 X 1 2 X 9...

Страница 12: ...onal X10 Amplifier Module optional X11 Handset X12 Relay Module optional LAN PoE LAN with PoE LAN Link single LAN Module LAN1 PoE LAN1 with PoE LAN Link Switch LAN Module LAN2 PC LAN2 PC Link Switch L...

Страница 13: ...an external connection to supply the ResistTel IP2 IP152 with power Don t use both at the same time to prevent damage to the equipment 1 5 1 2 Version with Switch LAN Module with two LAN Connections w...

Страница 14: ...rnal power connection will be used you must not use PoE at the LAN connection 1 5 3 Relay Connection The phone can be build up with a relay module with two relays with a single changeover switch optio...

Страница 15: ...th mains both SELV or both TNV circuits It is not permissible to connect different types of circuits to these relays 1 5 4 Other Terminals The terminals 1 4 are for connecting a headset A detailed des...

Страница 16: ...key left Delete character in front of cursor Clearing key Pressing and holding the numeric key activates the character mode Refer to chapter 2 1 5 Input of Characters and Special Characters beginning...

Страница 17: ...ns on this level after the call The Vol indicator shows the current value see Figure 13 You can increase the ringer volume level by pressing the key You can reduce the ringer volume level by pressing...

Страница 18: ...H 323 names The is removed before dialling however 2 1 5 Input of Characters and Special Characters You can enter any Western European characters in accordance with ISO 8859 1 using the keypad The as...

Страница 19: ...is connected and configured 4 Headset mode At headset mode the call will be operated with the headset 5 Headset mode with open listening At headset mode with open listening the call will be operated...

Страница 20: ...ngeover from Hands Free Mode to Headset Mode To change from hands free mode to headset mode you have to press the headset key Key long longer than a second and then the loudspeaker key 2 2 7 Changeove...

Страница 21: ...r rejecting calls If you would like to answer the call you have different possibilities Lift the handset Press the loudspeaker key Press the headset key Key long longer than a second and then the loud...

Страница 22: ...handset back on its rest handset mode Press the key All modes Press the loudspeaker key hands free mode Press the headset key Key long longer than a second and then the loudspeaker key headset mode 2...

Страница 23: ...Indirect Dialling If you use the cursor keys to select the menu item Call as User and then press the key the menu User List appears see manual Now the User can be changed prior to dialling The change...

Страница 24: ...last is displayed see Figure 18 Success connected not connected The symbol on the display indicates that there has been a successful call A not connected call will be displayed without a symbol The sy...

Страница 25: ...display indicates that there has been a call The symbol on the display indicates that there has been a redirected call The symbol on the display indicates that there has been a transferred call The sy...

Страница 26: ...hold can t hear the second call The hold function is also needed to switch or transfer a call Torsten 72 Peter 36 Torsten 72 Please dial 06 01 10 14 40 0 22 Figure 21 Holding a Call 1 Press the key s...

Страница 27: ...3 9 Transferring a Call You are making a call and would like to transfer it to another party Torsten 72 Peter 36 Torsten 72 Thomas 70 06 01 10 14 40 0 22 Figure 23 Transferring a Call 1 Press the key...

Страница 28: ...24 Transferring a Call Directly 1 Press the key long during a call 2 You will be left The actual connection will not be displayed 3 Dial the call number of your choice 4 Press the key short or key 5...

Страница 29: ...to the initiated conference is now on hold again and the previously active call is active once again If you end the conference with pressing the key short twice the call put on hold prior to the init...

Страница 30: ...Glands 267 x 225 x 132 mm Weight default version ca 5 0 kg Display 182 x 64 pixel Field of view ca 78 mm x 26 mm Keypad Metal keypad with ice protection 21 keys with ABC marking Hook switch Reed cont...

Страница 31: ...to the Steering Magnetic compass 0 70 m reduced 0 35 m For the operation on the bridge of the ship the maximum prescribed ringer volume of 75 85 dB A must not be exceeded Therefore the factory setting...

Страница 32: ...0 Fax 49 208 82 68 286 Mail info fhf de www fhf de Orders fhf orders eaton com Requests fhf sales eaton com Support fhf support eaton com Eaton s Crouse Hinds Business 1201 Wolf Street Syracuse NY 132...

Отзывы: