background image

PXG 900 User's Guide - Firmware Version 4.3 - 1/9/2017

39

1.  
2.  
3.  
4.  
5.  
6.  

7.  
8.  

9.  

10.  

11.  

Setting Alarms

You can set custom alarms for any channel on any connected device directly in the PXG. Each alarm configuration
references values on a single channel and specifies either:

A High or Low alarm value for analog channels.
A Between value for power factor channels (explained below).
An On Value trigger that matches a state in a multi-state alarm.

If you wish to have both High and Low alarms set for a single channel, create an alarm configuration for each. You
configure alarms through Settings, on the Alarm Settings tab.

Creating an Alarm Configuration

Click Edit.
Click Add Alarm Configuration. A sidebar appears with all of the alarm settings.
Select the device from the drop down list.
Select the channel type; i.e., Voltage, Current, Power Factor, etc.
Select the individual channel.
For analog channels other than power factor, choose whether it's a High or Low alarm, then set the alarm
trigger value. For Boolean channels, set whether to trigger an alarm on either True or False.  Other discrete
multi-state channels may have more than two options, e.g. the Status channel on many of the devices. See
below for more about multi-state alarms and alarm levels. 
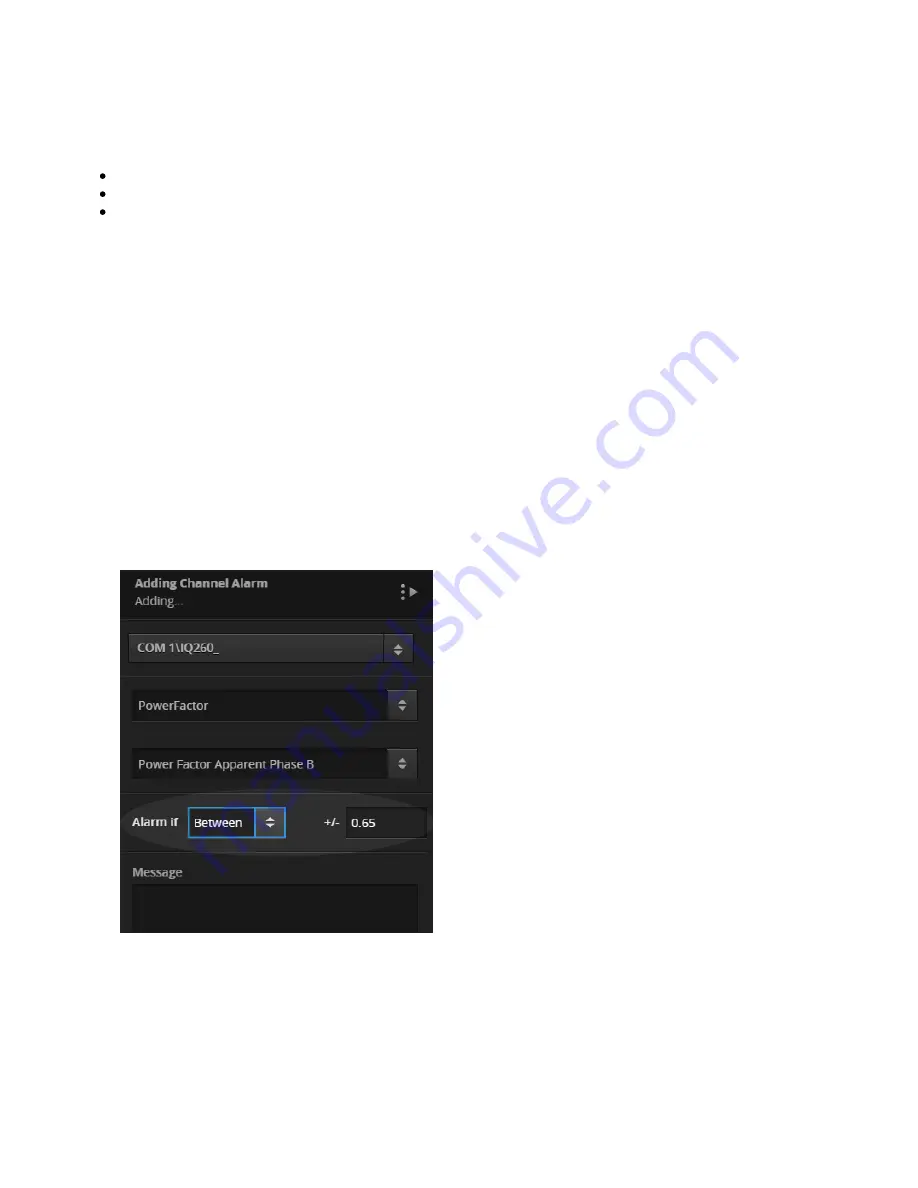
Power factor channels have a "Between" setting that applies to both positive and negative power factor. So, if
you set power factor to 0.90, any value less than that will raise an alarm for both positive and negative power
factor. Like other analog alarms, power factor alarms are automatically assigned a level. 

Power Factor Between Setting

Type a custom message that will appear with this alarm.
Set Suppress Changes less than to eliminate alarm "chatter" (rapid oscillation above and below the trigger
point) by setting a dead band value.
Choose if the alarm should be acknowledged automatically if the value falls outside the trigger range.
Choose if the alarm will be a Priority Alarm. Priority alarms are shown with an exclamation point and you can
filter on these in the Alarms tab.
Save the Alarm Configuration when you're done. If you're going to create a similar configuration, choose
Save and Duplicate Alarm. You can then just edit the fields in the copy to create a new configuration.

Содержание PXG 900

Страница 1: ...PXG 900 User s Guide Power Xpert Gateway 900 ...

Страница 2: ... OTHER THAN THOSE SPECIFICALLY SET OUT IN ANY EXISTING CONTRACT BETWEEN THE PARTIES ANY SUCH CONTRACT STATES THE ENTIRE OBLIGATION OF EATON THE CONTENTS OF THIS DOCUMENT SHALL NOT BECOME PART OF OR MODIFY ANY CONTRACT BETWEEN THE PARTIES In no event will Eaton be responsible to the purchaser or user in contract in tort including negligence strict liability or other wise for any special indirect in...

Страница 3: ... 20 1 6 Modbus TCP Server 1 7 BACnet IP Server 25 1 8 Notifications 27 1 9 Users and Access Control 30 1 10 Advanced Administration 36 1 11 Setting Alarms 39 1 12 One lines 44 1 13 Connecting to the Web Interface 48 1 14 Network Tab 49 1 15 Alarms Tab 52 1 16 Trend Viewer 53 1 17 Waveforms 54 1 18 One lines Tab 59 1 19 Cybersecurity Hardening the PXG 62 1 20 Reset Button 72 ...

Страница 4: ...d party software This guide will show you how to configure the PXG from its web interface and how to work with the Network One lines and Alarms tabs You can configure and interact with the PXG through its web interface This is best viewed in either Google Chrome current version or Microsoft Internet Explorer 10 or 11 The screen resolution should be at least 1280 x 1024 pixels Note You may experien...

Страница 5: ...ia a cable You can t connect this way via a LAN until you configure the Ethernet settings Connecting With a USB Cable You can initially connect the PXG to a PC via the USB A to USB mini B cable shipped with the gateway Before your PC can connect to the gateway you may first need to install the USB driver from Eaton You ll need administrative privilege on the PC in order to install the driver Also ...

Страница 6: ...PXG 900 User s Guide Firmware Version 4 3 1 9 2017 4 5 6 Right click and select Update Driver Software Update Driver Software Select Browse my computer for driver software ...

Страница 7: ... of this driver software displays select Install this driver software anyway To verify that the device is installed Go to Control Panel Hardware and Sound Devices and Printers Device Manager Expand Network adapters Verify that Linux USB Ethernet RNDIS Gadget is listed under Network adapters Linux USB Ethernet RNDIS Gadget From the Start menu go to All Programs Accessories Command Prompt to open a ...

Страница 8: ...hat is completely disconnected from all networks including wireless To ensure this you may wish to turn off your wireless network adapter A CAT5 Ethernet cable to connect to a single unconfigured gateway To connect Plug the Ethernet cable into both the PC and the Network 1 Ethernet port on the PXG Wait at least 30 seconds for the PC and gateway to negotiate a connection Point your PC browser to ht...

Страница 9: ...aton recommends that you don t use this approach Software controlled bridging is used to allow other Ethernet devices to access the gateway s LAN connection when the devices are plugged into Network 2 When power is applied to the PXG the bridged LAN connection is not immediately available to the devices connected to Network 2 If you do choose to use DHCP you should use DHCP Reservations on your LA...

Страница 10: ...7 8 3 Gateway Configuration Sidebar Click Edit again to exit edit mode After you ve completed configuring an IP address either through DHCP Reservations or as a static IP write this on the label under the connectors Record the IP address on the label ...

Страница 11: ...using the Network 2 port see Bridged or Private Networks The total length of any Ethernet cable run must not exceed 295 3 ft 90 m If the gateway loses power any devices connected to Network 2 to bridge to the local area network will lose network communication NOTE The gateway s web interface uses TCP ports 80 and 7011 for its routine HTTP communications For HTTPS access ports 443 and 7012 are used...

Страница 12: ...ou should only change the timeout settings if absolutely necessary To attach a Modbus RTU network to the PXG Note If needed add an external 120 ohm resistor Attach one of the three pin Phoenix connectors shipped with the PXG to the Modbus twisted pair cable Connect the Modbus cable to the COM1 or COM2 port of the PXG INCOM Port Choose the gear icon to access the INCOM port serial settings For more...

Страница 13: ...will turn red and you won t be able to save the device configuration until you select a unique address If Enable Waveforms is available decide whether you wish to have the PXG capture these Choose Save Device Configuration The following examples assume that the devices are on the appropriate networks and that the ports are properly configured Example 1 Adding An IQ 250 Meter Connect the IQ 250 Met...

Страница 14: ...PXG 900 User s Guide Firmware Version 4 3 1 9 2017 12 Adding an IQ 250 ...

Страница 15: ... Device under INCOM Select Protection under Family Select Digitrip Breaker under Model Series Select Digitrip 1150 under Model Enter a name such as Digitrip 1150_1 under Name Set the Serial Address 1 FFE hexadecimal to match the address you set on the Digitrip Choose Enable Waveforms if you wish to view these in the PXG Choose Save Device Configuration Choose Edit ...

Страница 16: ...PXG 900 User s Guide Firmware Version 4 3 1 9 2017 14 Adding a Digitrip 1150 ...

Страница 17: ...the Network tab Choose Edit Choose Add Device under INCOM Select Accessories under Family Select Local Display under Model Series Select BIM II under Model Enter a name such as BIM II_1 under Name Set the Serial Address 1 FFE hexadecimal to match the address you set on the BIM II Choose Save Device Configuration Choose Edit ...

Страница 18: ...PXG 900 User s Guide Firmware Version 4 3 1 9 2017 16 Adding a BIM II ...

Страница 19: ... be 6 or higher For an AEM II Version 7 or higher only the following devices may be added to the sub network Digitrip T800 Digitrip 810 and Digitrip 910 For an AEM II version 6 only the following devices may be added to the sub network Digitrip T800 Digitrip 810 AEM II V6 and Digitrip 910 AEM II V6 If an incompatible device type is added to an AEM II sub network the gateway will fail to properly c...

Страница 20: ... NTP server on your network The PXG will periodically check the time and correct itself Under Manually Set Time and Date choose Set Time and Date to either set the clock to match your PC or set the time and date yourself Note Make sure you set the time zone under Locale as well Date and Time Settings Showing Manual Selected Locale The PXG was set to United States format for date and to US Eastern ...

Страница 21: ...PXG 900 User s Guide Firmware Version 4 3 1 9 2017 19 Locale Settings ...

Страница 22: ...ity you must You can set the gateway to use trusted hosts for HTTP and HTTPS access and if your PC isn t at be careful an address on the list you could be locked out via Ethernet To correct this situation you can still connect via the USB port Note You must enable Trusted Only for at least one Access Control type in order to save machine names or IP addresses you enter in the sidebar To add a trus...

Страница 23: ...e device and use the device s native Modbus register set You can set pass through for COM1 COM2 and Network 2 Ethernet Modbus TCP Server Setup Server setup is in Settings on the Network Access tab Choose Edit to access the configuration settings You enable the server under the Access Control group Modbus TCP must be enabled to see Modbus TCP Server Configuration You can also change the TCP port To...

Страница 24: ...s data from all scanned devices regardless of native protocol to self created Modbus TCP registers In edit Mode you can set the Modbus TCP ID for each device You can also select the Modbus map type for all devices at once or for each device individually The possible map types are Legacy PXG E matches the maps from previous versions of the gateway firmware Fixed reflects the native device map which...

Страница 25: ...n you should need including The register offset The number of registers for the channel The register type Possible values when there is a limited set such as for boolean and some integer values Whether you can write to the register Provides recommended Modbus Function code fro register The units for the data Whether the channel data is trendable To help you reconcile the register map with the devi...

Страница 26: ...a way to connect legacy software directly to the gateway via a UDP connection allowing that software to then connect to all of the downstream INCOM devices Setup You enable this mode through Settings on the Network Access tab You can change the port as well An important point INCOM networks can only have one master and when EMINT mode is active the externally connected software takes over that rol...

Страница 27: ...ution If you choose a Routed Network Number that is already in use communications problems will result Base ID for Auto Assign This is the base ID value used by auto assign if enabled to assign the gateway and virtual device instance numbers Auto Assign Gateway ID If enabled the ID for the gateway is automatically assigned If you set a Base ID the gateway will be the base value plus one If disable...

Страница 28: ...non edit mode If you are manually setting IDs you can do that in the Device Mapping dialog box You can also download an EPICS tpi file for each virtual device Click Edit to change the name of virtual device Object Name and if you re manually setting IDs to set the ID numbers You can sort devices by any of the column types To download an EPICS file for a device click the download arrow at the right...

Страница 29: ... requires that you define The address of the email server The username and password if required for the email account used by the PXG It s best if you use a username with a password that doesn t change If the password for that user changes you ll need to reset it here Otherwise Notifications will no longer work The port You append this to the IP address machine name by first entering a colon For e...

Страница 30: ...her audit logs will contain the full log contents not just data from the 24 hours unless the content is extensive then it will be truncated to only contain the more recent data The full content of the alarm and trend logs including the older records can be retrieved via export functions from the PXG s web interface Use Real Time Notifications to set what events trigger an email Emails can be sent ...

Страница 31: ...llowing figure Selecting the Waveform Available channel System Use Notification Use the System Use notification to display a system use warning whenever a user first accesses the PXG web interface This message appears before logging in and the user must acknowledge it Companies can use the warning to let the user know who is legally allowed to log into this system and state what are the legitimate...

Страница 32: ...min role The password for the admin account is also admin User can view any information on the tabs but can t access Settings or edit anything The password is user Before doing anything else change the default account names and logins Not only are these users not compliant with RBAC keeping them is a security hazard Keep in mind that this manual along with the login names and passwords is publishe...

Страница 33: ...k save Permission Details View devices and channels View devices and information from their channels Every user gets this by default Acknowledge alarms Click the Acknowledge button and enter a note about the alarm e g what caused the alarm and what action was taken Configure device channels Enable trending for channels where trending is available set alarm triggers and enable or disable individual...

Страница 34: ... is not currently logged in To delete a user On the Security tab in Settings click Edit Click the user that you wish to delete In the sidebar click Remove Click Save Before you can delete a Role it must not be assigned to any users If you get such a message when you attempt to delete it check if any users currently have that role and then reassign those roles first To delete a role On the Security...

Страница 35: ...Admin This role must be able to create delete users and roles as well as change user passwords or other settings Its permissions and capabilities are similar to the Security audit but with the added capabilities for user administration So in addition the following permission has been added Manage This lets the user not only view the current users and roles View users is selected automatically user...

Страница 36: ...difficult for unauthorized users to guess the passwords of their users It also provides a mechanism to control how often users must change their passwords This single password policy applies to all users in the system To change the password policy On the Security tab in Settings click Edit Expand the Password Policy section Change any of the settings Click Save After changes are made any attempts ...

Страница 37: ... when the Password Expires field is set to a number of days This sidebar also provides the ability to immediately lock out or unlock a user account and the ability to force a user to change the password on next login vs waiting for the password to expire To change a user s password settings On the Security tab in Settings click Edit Expand the User Password Management section Click the user that y...

Страница 38: ...ou should always save a configuration file to your PC after setting up the PXG You can also reload configurations with this function If you re replacing an original PXG A or PXG E model gateway this feature may also be used to restore a saved configuration from the older gateway Firmware Update Check the web site for firmware upgrades You can download the new firmware eaton com PXG file from there...

Страница 39: ...sions of the gateway s firmware Newly logged data will appear in the more specific log files User Content related to changes made to users or roles including password changes Device Content related to the addition removal enabling and disabling of connected devices Configuration Content related to individual changes to system setup e g device or channel settings time zone etc Session Content relat...

Страница 40: ...PXG 900 User s Guide Firmware Version 4 3 1 9 2017 38 Audit Logs ...

Страница 41: ...whether to trigger an alarm on either True or False Other discrete multi state channels may have more than two options e g the Status channel on many of the devices See below for more about multi state alarms and alarm levels Power factor channels have a Between setting that applies to both positive and negative power factor So if you set power factor to 0 90 any value less than that will raise an...

Страница 42: ... and Low Each time you define an additional High or Low alarm trigger point for a particular analog channel it automatically becomes a new alarm level The alarm level is assigned based on the comparative values of the trigger settings For High alarms greater values have higher levels The opposite is true for Low alarms The following table shows how this works ...

Страница 43: ...017 41 Type Value Level High 144 VAC 2 High 132 VAC 1 Low 108 VAC 1 Low 96 VAC 2 The following figures show the alarm logic and how this is affected by alarm levels Examples for both latching and non latching alarms are given Latching Alarm Example ...

Страница 44: ...lly assigned a level Instead you must assign the levels yourself when configuring alarms for such channels When configuring multi state channels the dialog box includes an Alarm level field for this purpose For multi state alarms there is no High or Low alarm just a single set of alarm levels Note that you cannot assign the same level to two alarms for the same multi state channel ...

Страница 45: ...PXG 900 User s Guide Firmware Version 4 3 1 9 2017 43 Alarm level field for multi state channels ...

Страница 46: ...ne line will appear with the name New Location You can update the name in the sidebar You can arrange the device tree by dragging Between One lines to change order Over a One line to nest From the All Devices section into the One lines Adding Devices to One Lines You add devices to the One lines in the same way drag a device over a One line and drop it One line Diagrams There are two types of One ...

Страница 47: ...ocation only one line Electrical One lines which you can draw quickly using the PXG s Auto draw technology Auto draw is assisted drawing where the PXG does much of the work in creating a One line for you yet still provides you with control over the drawing ...

Страница 48: ...w adds a source symbol in the upper left and connects all devices to this Choose Two sources and a second source symbol appears in the upper right Once sources are created you can place them anywhere you like Devices will automatically connect to the closest source If you ve chosen Zero Sources you can still add lines and symbols to the page Tie Breaker Symbol You can add a tie breaker to your dia...

Страница 49: ...d the Lettered Circle symbols the letter doesn t flip but the connection points do When you click on a device in edit mode the side bar changes to allow you to remove the device To go back to the configuration for the current one line click on any blank spot in the diagram Working with Symbols and Graphics When you click one of the Additional Symbols in the sidebar it appears in the upper left of ...

Страница 50: ...current version or Microsoft Internet Explorer 10 or 11 Users should have a screen resolution of at least 1280 x 1024 pixels The connection is https where is the machine name or IP machine_name machine_name address of the PXG You can also use HTTP to connect if that s enabled although Eaton recommends that you only connect via HTTPS For information about enabling HTTPs see Cybersecurity Hardening ...

Страница 51: ...evices are color coded based on status Red shows that there are alarms from one or more channels for that device Orange means that the device is no longer communicating Purple means that a device is disabled Black means the device is communicating Click a device to see its top 16 channels in the sidebar Any channels in alarm show as red here too Sidebar showing channels and values ...

Страница 52: ...t section shows All Channels from the device Channels are organized into groups by electrical measurement category You can also launch the Waveform export and capture dialog box as well as the Trend Viewer through Choose an Action Export Waveform saves a Comtrade file with waveform data from the chosen captured waveform s to your computer file system Export Trends saves a csv file with trend data ...

Страница 53: ...PXG 900 User s Guide Firmware Version 4 3 1 9 2017 51 Device Details ...

Страница 54: ...still shows under Active alarms until the condition goes away While alarms are initially sorted by date you can also sort them by device or priority The current time range for alarms in the list is shown next to the calendar button You can filter the list to show a specific date range You can further filter the list to show active alarms acknowledged alarms or unacknowledged alarms Any open alarms...

Страница 55: ...channel To zoom select the Zoom button then click and drag Dragging left or right zooms along the horizontal axis while dragging up or down zooms along the vertical axis Click the Zoom Out button to return to the default view To pan select the Pan button and then click the left or right arrows There are a few other controls Use the calendar control to select the date or time range Place the cursor...

Страница 56: ...he Enable Waveform setting and you can access this through the Network tab as follows Click Edit Select an INCOM device that supports waveforms Select Enable Waveforms in the sidebar Click Save Device Configuration Captured Waveforms List The PXG maintains a list of all waveforms captured for each device from which you can download any waveform as a set of Comtrade files The easiest way to access ...

Страница 57: ...ese Manual Waveform Capture If you wish you can initiate a waveform capture from an enabled device This is under the Command section of the Choose an Action menu within the sidebar The sidebar is available on the Network or One lines tab when the device is selected You can also access the menu on the Device Details pop out Signing up for Waveform Email Notifications To receive emails notifying you...

Страница 58: ...her audit logs will contain the full log contents not just data from the 24 hours unless the content is extensive then it will be truncated to only contain the more recent data The full content of the alarm and trend logs including the older records can be retrieved via export functions from the PXG s web interface Use Real Time Notifications to set what events trigger an email Emails can be sent ...

Страница 59: ...m as shown in the following figure Selecting the Waveform Available channel Waveform Link in Email Notifications When waveforms are manually or automatically generated you should receive an email in your inbox similar to the following Such email notifications contain a link to download an associated waveform file if such a file is available Clicking the link opens a log in page for the gateway Typ...

Страница 60: ...Version 4 3 1 9 2017 58 After authenticating you ll see something like the following page which you can use to download available waveform files The Home page button will take you to the gateway interface List of Available Waveforms ...

Страница 61: ...e or more link objects which lead to child One lines One or more electrical One line diagrams These can also contain links to child One lines Link Objects Link objects have a network symbol as shown below To navigate through link objects just click them As you navigate down through a branch of the tree the bread crumbs indicate your current position You can return to any level by clicking it in th...

Страница 62: ...able for that device organized Device Details by channel type It also includes navigational controls and for convenience the same set of controls in the device sidebar This shows which channels are currently active and which channels have trending enabled Channel Management If you are an Admin user you can click Edit and enable or disable channels and trending ...

Страница 63: ...nd Viewer and Trend Export more information on the Trend Viewer see Trend Viewer You can also export the trend information as a CSV file Commands The various Commands listed are specific to that type of device These are only available if you are logged in through the Admin account The following example figure shows the set of commands for a Digitrip ...

Страница 64: ...ion wizard will choose which is why you need permission to manage certificates Both enabling user management for certificates and installing a certificate require administrative privileges for the PC If you don t have such privileges you ll need to contact your IT organization for assistance before proceeding Enabling User Management of Root Certificates The process for either enabling this on a l...

Страница 65: ...rome or Microsoft Internet Explorer to the IP address of the gateway followed by ca html For example http 192 168 1 1 ca html Click the Root CA Certificate link The browser will download the certificate Note that the certificate uses SHA 256 as its cryptographic hash function to avoid incompatibility problems with various browsers ...

Страница 66: ...2 3 4 Installing the Certificate Double click the certificate file This will launch the certificate installation wizard Click Install certificate On the Welcome dialog box click Next Select Place all certificates in the following store and then click Browse ...

Страница 67: ...XG 900 User s Guide Firmware Version 4 3 1 9 2017 65 5 6 Select Trusted Root Certification Authorities from the list then click OK On the Completing the Certificate Import Wizard dialog box click Finish ...

Страница 68: ... For special situations you may elect to disable one or the other However disabling both prevents any web access to the gateway and is not recommended You may also choose to change the assigned port number for either The following ports and protocols are disabled by default You must elect to enable them and may choose to change the assigned port number Port Number Protocol Use TCP UDP 502 Modbus T...

Страница 69: ...oblems caused by the browser caching data Settings Network Access Tab Controlling Access to Various Protocol Servers BACnet IP Under BACnet IP you should only enable those services that you will be using Leave everything else disabled For those services that you do enable make sure that you also enable Trusted Hosts for each and then maintain the minimum number of trusted hostnames IP addresses th...

Страница 70: ...ry It s always good security practice to only use admin level accounts when performing Important admin activities By only using admin level accounts for such activity you minimize the risk of an admin being logged in and leaving their computer unlocked The Global Password Policy and User Password Management features are further documented in the Users and section Access Control You can verify who ...

Страница 71: ...any time by clicking on the Welcome text found next to the displayed Date and Time Login Menu Doing so produces the following menu Selecting the Last Login History Selecting Login History from the menu will provide the latest historical information associated with the username you re currently logged in as Login History ...

Страница 72: ...ch no browser activity is detected Once the specified number of minutes of account inactivity is reached the current browser session will be logged out A value of zero disables the time out function Browser Time Out Setting Restricting Concurrent Logins You can use Max Concurrent Logins on the Security tab under General Settings to limit on the number of login sessions that can share the same acco...

Страница 73: ...ber of users logging in using a shared account to just 2 Good security practice suggests setting this to the lowest practical non zero number for your specific installation As the gateway allows you to create additional users with specific roles and permissions you may consider restricting concurrent logins to just one ...

Страница 74: ...es three functions A momentary button press 5 Seconds will restart the gateway Pressing and holding the button for more than 5 seconds but less than 15 seconds will reset the stored username and password settings to their defaults Pressing and holding the button for 15 seconds or more will completely reset the gateway to factory defaults ...

Страница 75: ...d trademark All trademarks are property of their respective owners Eaton 1000 Eaton Boulevard Cleveland OH 44122 United States Eaton com 2017 Eaton All Rights Reserved Printed in USA Publication No MN152006EN February 2017 ...

Отзывы: