13
Section 3: General operation and circuit breaker description
Series NRX with PXR - type RF low voltage power (air) circuit breakers instruction manual
MN013002ENH03 September 2016 www.eaton.com
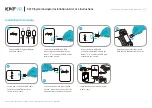
Figure 17. DISCONNECT position.
Figure 18. TEST position.
Figure 19. CONNECT position.
Breaker in cassette
Primary connections not made
Secondary connections not made
Breaker in cassette
Primary connections not made
Secondary connections made
Breaker in cassette
Primary connections made
Secondary connections made
With the circuit breaker sitting solidly on the extension rails
in its WITHDRAWN position, proceed with the following
five steps to move the circuit breaker through its other posi-
tions.
Step 1
:
Make sure the circuit breaker position indicator,
located in the right lower portion of the circuit breaker, indi-
cates DISCONNECT (Figure 17).
Step 2: If the indicator window indicates anything other than
DISCONNECT, use the breaker’s on board tool (racking tool)
or 3/8 in. extension and ratchet to get the circuit breaker
in the proper levering position. Open the levering access
door by sliding it to the left. Insert the levering tool into its
compatible front accessible fitting, and rotate it counter-
clockwise until DISCONNECT is indicated in the window. An
audible “click” may be heard. This is the levering-in’s detent
system engaging, which provides positive feedback when
the device is in each discrete position.
ote:
N
The Detent will engage at each discrete position
(DISCONNECT, TEST, CONNECT) and requires the
user to manually reset the system before proceeding
to the next position.
Figure 20. Step 2.
Figure 20a. Step 2.
“Click”sound
detent engaged
Detent reset