background image

3

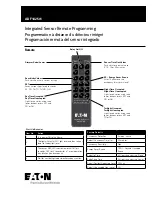
Integrated Sensor Remote Programming

Integrated Sensor Remote Programming

 ADF142501     www.eaton.com

ADJUSTING LIGHTING WITH HANDHELD 

(HHPRG-MS) OR (ISHH-01) OR (ISHH-02)

Manual On/Off


With lighting in the On position.


Point handheld remote at Integrated Sensor. 


Press the Relay On/Off button to toggle the lighting 

(LED blinks 2 times rapidly).

Manual Raise/ Lower


With lighting in the On position.


Point handheld remote at Integrated Sensor. 


Adjust light level using the Raise/Lower buttons to 

the desired Light Level. (LED blinks 2 times rapidly)


The lighting will remain at this light level until the 

occupancy sensor times out and is re-triggered.

Select Scene


With lighting in the On position.


Point handheld remote at Integrated Sensor. 


Press the MIN, 50, 75, MAX, ES, Occ, or UnOcc 

buttons (LED blinks 2 times rapidly)


The lighting will ramp to the selected scene light level.


The lighting will remain at this light level until the 

occupancy sensor times out and is re-triggered.

PROGRAMMING WITH HANDHELD  

(HHPRG-MS) OR (ISHH-01)

When to adjust programming in your fixtures


Daylight levels in any space are dependent on local 

conditions and may be effected by shades, window 

size and amount of natural light.


The best time to adjust daylight levels is when 

there is little natural light entering the space.  This 

could be done at night or by closing the shades.

Programming Order for a Single Fixture

It is recommended that the user saves their settings in 

the following order to streamline the process.


Sensitivity Level


Time Out Value


Daytime Occupied


Energy Saver Scene


Daytime Unoccupied Levels


Twilight Occupied/Unoccupied Levels


Nighttime occupied/Unoccupied Levels

Programming Order for a Multiple Fixtures in a Room

It is recommended that the user saves their settings in the 

following order to streamline the process.


Sensitivity Level


Time Out Value

When adjusting multiple fixtures, adjust all fixtures to the 

desired light level first then set the following.


Daytime Occupied


Energy Saver Scene


Daytime Unoccupied Levels


Twilight Occupied/Unoccupied Levels


Nighttime occupied/Unoccupied Levels

Set Sensitivity Level


With lighting in the On position.


Press the “LO” button to put the Occupancy Sensor 

into the Low (50%) sensitivity mode


Press the “HI” button to put the Occupancy Sensor 

into the High (full) coverage sensitivity mode

Set Sensor Time Out Value


With lighting in the On position.


Press the “5”,”10”,”15”,”20” button to select the proper 

time out value for the Occupancy Sensor


If the Time out value is greater than 10 minutes, after 

10 minutes of no occupancy the Occupancy Sensor 

will trigger the Energy Saver Scene.  The lighting will 

remain at the scene light level for the remainder of 

the time out value and then turn Off.


If the Time out value is 10 minutes or less, the  

occupancy sensor will turn off the lighting after 10 

minutes of no occupancy.

Set Daytime Occupied Light Level


With lighting in the On position.


Point handheld remote at Integrated Sensor. Adjust 

light level using On/Off, Raise/Lower buttons to the 

desired Daytime Occupied Light Level.


When light level has reached desired level


Press the “SET” button (LED blinks 3 times rapidly)


Then press the “DO” button (LED blinks 5 seconds 

continuously)


The desired light level is now stored as the Daytime 

Occupied Light Level

Содержание HHPRG-MS

Страница 1: ...Off Integrated Sensor Remote Programming Programmation distance du d tecteur int gr Programaci n remota del sensor integrado Relay On Off Dimmer Raise Lower Sensitivity Values Push sets sensitivity to...

Страница 2: ...ight balancing target in daytime mode is 500 lux This level can be adjusted higher or lower using the optional HHPRG MS remote and pressing SET and then the DO Daytime Occupied button to store the new...

Страница 3: ...rgy Saver Scene Daytime Unoccupied Levels Twilight Occupied Unoccupied Levels Nighttime occupied Unoccupied Levels Programming Order for a Multiple Fixtures in a Room It is recommended that the user s...

Страница 4: ...el has reached desired level Press the SET button LED blinks 3 times rapidly Then press the TO button LED links blinks continuously for 5 seconds The desired light level is now stored as the Twilight...

Страница 5: ...rn ON but remain at a dimmed level 0 10V Output Disconnect 0 10V wires from the Control Module If the lighting does not go to full bright check wiring for shorts Verify with a meter tha at least 10VDC...

Страница 6: ...S ou HI HAUT Valeurs de temps imparti du d tecteur Appuyez pour d finir la valeur de temps imparti 5 10 15 ou 20 minutes ES Position conomie d nergie Apr s 10 minutes sans occupation l clairage baisse...

Страница 7: ...de 500 lux par d faut Ce niveau peut tre ajust la hausse ou la baisse l aide de la t l commande HHPRG MS en option en appuyant sur la touche SET R GLER puis sur la touche DO Occup jour pour mettre en...

Страница 8: ...ant les volets Ordre de programmation pour un luminaire simple Nous recommandons l utilisateur d enregistrer ses r glages dans l ordre suivant pour simplifier le processus Niveau de sensibilit Valeur...

Страница 9: ...la position Occup cr puscule Lorsque vous avez atteint le niveau d clairage d sir Appuyez sur le bouton SET la DEL clignote rapidement trois fois Puis appuyez sur le bouton TO la DEL clignote en cont...

Страница 10: ...peut tre TEINT ALLUMEZ le relais appuyez sur SET R GLER et sur DO Occup jour cela r glera le mode Occup jour pour que le relais s ALLUME Les dispositifs d clairage ne restent pas ALLUM S Il est possib...

Страница 11: ...ogrammation HHPRG MS pour r gler le niveau d clairage du mode Occup jour Les dispositifs d clairage s ALLUMENT mais restent au niveau de luminosit maximal Flux de 0 10 V D branchez les fils de 0 10 V...

Страница 12: ...ensibilidad Establece la sensibilidad en Baja Low o Alta High Valores de tiempo de espera del sensor Establece valores de tiempo de espera fijos de 5 10 15 o 20 minutos ES Escenario de ahorro de energ...

Страница 13: ...a luz en modo diurno es de 500 lux Se puede aumentar o disminuir este nivel usando el control remoto opcional HHPRG MS y presionando los botones SET Configurar y luego DO Ocupado en modo diurno para g...

Страница 14: ...as cortinas Orden de programaci n en una sola luminaria Se le recomienda al usuario que guarde su configuraci n en el orden siguiente para acelerar el proceso Nivel de sensibilidad Valor de tiempo de...

Страница 15: ...alcanz el nivel deseado Presione el bot n SET Configurar la luz LED parpadear r pidamente 3 veces Luego presione el bot n TO la luz LED parpadear en forma continua durante 5 segundos El nivel de ilumi...

Страница 16: ...no lo que establecer el modo Ocupado en modo diurno y encender el rel Las luces no permanecen encendidas La sensibilidad de ocupaci n puede estar configurada en BAJA Verifique que el LED ROJO parpadee...

Страница 17: ...r mayor Use el control remoto de programaci n HHPRG MS para ajustar el nivel de iluminaci n para Ocupado en modo diurno Las luces se encender n pero permanecer n en el nivel de brillo m ximo Salida de...

Страница 18: ...18...

Страница 19: ...19...

Страница 20: ...odas las marcas comerciales son propiedad de sus respectivos propietarios Product availability specifications and compliances are subject to change without notice La disponibilit du produit les sp cif...

Отзывы: