8.
To make the final horizontal (radial) adjustment, loosen the four (4) slipfitter
base bolts.
9.
Rotate the floodlight housing to the desired position.
10. Tighten the slipfitter base bolts to 19 lbs.-ft. to lock in position.
11. Turn power on.
LAMP INSTALLATION AND REPLACEMENT
1.
Note both vertical and radial aiming angles. If these are disturbed during
relamping, they should be readjusted after relamping.
2.
Disconnect power to the floodlight and allow to cool completely. Allow the
capacitor to discharge for 15 minutes.
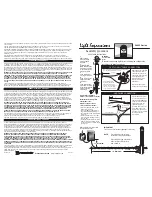
3.
Completely loosen the twelve (12) captive cover screws and swing open the
cover. See Figure 4.
4.
Remove lamp.
5.
Perform cleaning and inspection as noted in the MAINTENANCE section.
6.
Screw new lamp into lampholder and securely tighten lamp. New lamp must
be identical type, size, and wattage as marked on the floodlight nameplate.
7.
Thoroughly clean lens and cover gasket seal with a clean, damp cloth. If this
is not sufficient, use a mild soap or a liquid cleaner such as Collinite NCF or
Duco #7. Do not use an abrasive, strong alkaline, or acid cleaner. Damage
may result.
8.
Close floodlight cover door making sure that all wires are safely inside and
positioned away from the ballast area. Securely tighten all cover screws. For
proper gasket seal, torque the cover screws to 22 lbs.-in.
MAINTENANCE
Perform visual, electrical, and mechanical inspections on a regular basis. This
should be determined by the environment and frequency of use. However, it
is recommended that checks be made at least once a year. We recommend
an Electrical Preventive Maintenance Program as described in the National Fire
Protection Association Bulletin NFPA No. 70B. The lens should be cleaned
periodically to ensure continued lighting performance. To clean, wipe the lens with
a clean, damp, soft cloth. If this is not sufficient, use a mild soap or a liquid cleaner
such as Collinite NCF or Duco #7. DO NOT use an abrasive, strong alkaline or acid
cleaner.
•
Relamp high pressure sodium fixtures as soon as possible after the lamp
burns out to prevent damage to the ballast.
•
Visually check for undue heating evidenced by discoloration of wires or other
components, damaged parts, or leakage evidenced by water or corrosion
in the interior. Replace all damaged or malfunctioning components before
putting the fixture back into service.
•
Electrically check to make sure that all connections are clean and tight.
•
Mechanically check that all parts are properly assembled.
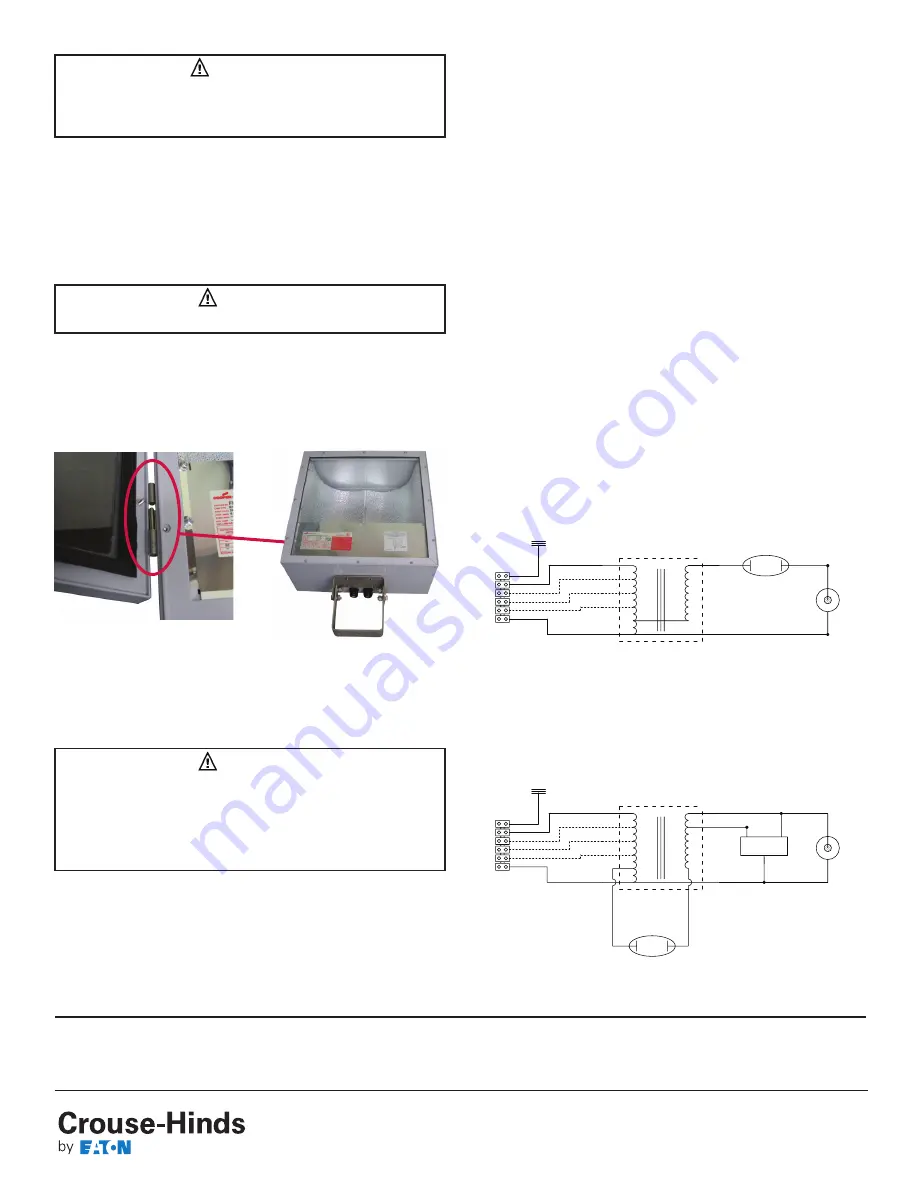
WIRING DIAGRAMS
WARNING
To avoid ignition of the hazardous atmospheres or overheating of the
floodlight:
Do not position the floodlight beyond the aiming range limits.
Figure 4 - Swing Open Cover with Lift-Off Door
CAUTION
To prevent ballast damage on high pressure sodium floodlights,
replace
burned out lamps as soon as possible.
To avoid shortened lamp life, lampholder failure, wiring faults, or
ballast failure,
tighten lamp firmly and completely.
To avoid injury,
guard against lamp breakage.
WARNING
Luminaire must be de-energized during lamp installation and replacement.
All statements, technical information and recommendations contained herein are based on information and tests we believe to be reliable. The
accuracy or completeness thereof are not guaranteed. In accordance with Crouse-Hinds “Terms and Conditions of Sale,” and since conditions of use
are outside our control, the purchaser should determine the suitability of the product for the intended use and assumes all risk and liability whatsoever
in connection therewith.
Eaton’s Crouse-Hinds Business
IF 1515
1201 Wolf Street Syracuse, New York 13208
Revision 5
Copyright © 2014
Revised 10/14
Supersedes 08/99
TERMINAL
BLOCK
LINE V
COM
LINE V
BALLAST
LINE V
LINE V
COM
LAMP
GRN
CAP
X1
X3
IGNITOR
X2
WHT
LAMP
BLK
HIGH PRESSURE SODIUM (HPS)
LINE V
COM
LINE V
BALLAST
LINE V
LINE V
COM
LAMP
METAL HALIDE (MH)
TERMINAL
BLOCK
GRN
CAP
WHT
LAMP
BLK
PULSE START METAL HALIDE (MH)