11
Mounting and Operating Instruction GuideLed DX/DXC 10011 CG-S 40071860286(F) April 2019 www.ceag.de
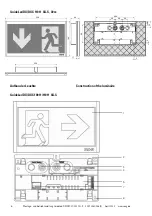
Baldachin-Querschnitt/
Canopy section
1
GuideLed DX/DXC 1x022/1x023 CG-S
Aufbau der Leuchte
Construction of the luminaire
• Netzkabel und Schaltkontakt / Loopleitung an
der Decke durch die Kabeleinführung einführen,
Deckenmontage-Adapter an den Befestigungs-
löchern mit geeigneten Schrauben an der Decke
befestigen
• Elektrischer Anschluss siehe Kapitel 4.1
• Adresse am Versorgungsmodul einstellen (siehe
Kapitel 4.2 und 4.3)
• Beiliegende Leitungsverlängerungen mit Hilfe der
Schraubklemmen anschließen
• Die Pendelrohre (4) über die Leitungen führen
(noch nicht am Adapter (6) einrasten) und am obe-
ren Ende einen Kabelbogen formen
• Durch die Pendelaufnahme am Baldachin führen
und durch die Aussparung wieder einführen. Die
Leuchte hängt nur an den Leitungen
• Pendelrohre auf Piktogrammscheibe stecken, bis
Nasen des Adapters (6) in den Löchern (5) einrasten
• Pendelrohre in Montage-Adapter (2) stecken, mit
Madenschrauben (3) fi xieren
• LED-Anschlussleitungen an Versorgungsmodul
anschließen.
Beigelegten Silikonschlauch als
Klemmschutz u. zusätzliche Isolation benutzen
• Beide Baldachin Gehäuse (1) auf den Deckenmon-
tage-Adapter schieben
• Feed mains cable and switching input / loop cable
through cable entry of ceiling mounting-adapter,
fi x it with suitable screws at the fi xing holes to
the ceiling
• Electrical connection see chapter 4.1
• Set address on supply module (see chapter 4.2
and 4.3)
• Connect enclosed cable extensions by the help of
screw terminals
• Lead pendulum tubes (4) over the cables (do not
click into the adapter (6)) and form a bend at the
top
• Lead them through the pendulum entry at the
mounting adapter and than back through the
recess. The luminaire only hangs at the cables
• Stick the pendulum tubes onto the pictogram
panel until the hooks of the adapter (6) snap in
the holes (5)
• Insert the pendulum tubes into the mounting
adapter (2), fi x them with the set screws (3).
• Connect LED connection-cable to the supply
module.
Use the enclosed silicone hose as
protection against jamming and additional
insulation
• Slide both canopies (1) onto the ceiling mounting-
adapter
2
3
4
5
6


