background image

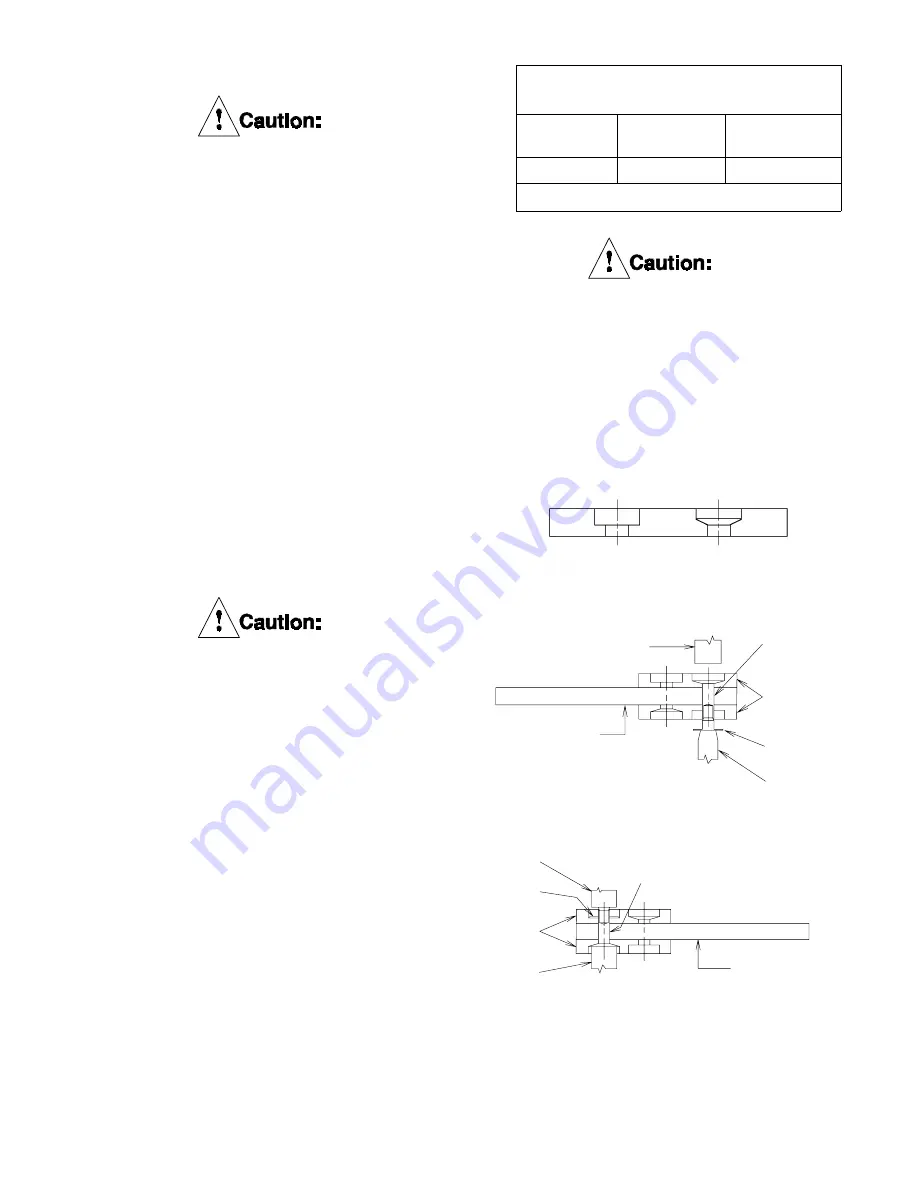
Figure 7

Figure 9

Friction Disc

Core

Rivet

Punch

Washer

Friction

Disc

Anvil

Figure 8

Rivet

Friction

Disc

Washer

Anvil Pin

Driver

Friction Disc Core

Use only genuine, Airflex friction 
material. Use of material not of 
Airflex origin may result in unpre-
dictable brake performance and/or
excessive wear of the brake 
components.

4.3.6.1

Drill out the old rivets and remove and 
discard the old friction discs.

4.3.6.2

Refer to Figure 7 and carefully examine the
counterbored holes in the new friction disc.
One set of counterbored holes is tapered
and designed to accept the rivet head,
while the other set of counterbored holes is
flat bottomed and designed to 
accept the clinched end of the rivet.

4.3.6.3

Position the friction discs on both sides of
the disc core and align the rivet holes. 
Remember, a tapered counterbored hole 
on one friction disc will mate with a flat-
bottomed counterbored hole on the opposite
friction disc.

Manual setting of the rivets using a
punch very frequently results in 
splitting of the clinched end of the
rivet. When this occurs, the rivet
will ultimately fail in service due to
fatigue. It is therefore recom-
mended that rivets be set using an
automatic rivet setting machine.

4.3.6.4

Insert a rivet through any hole and set using
a washer on the clinched end of the rivet. Be
sure to note the type of counterbored hole to
determine the position of the rivet head. See
Figures 8 and 9. Figure 8 shows machine-
setting and Figure 9 shows setting the rivet 
manually. When setting manually, use an ar-
bor press and keep the setting tool square
to avoid splitting the rivet.

The clinched end of the rivet must
have a washer in place prior to
clinching. Failure to use the washer,
or use of excessive force, when
clinching the rivet will fracture the
friction lining.

TABLE 5

Friction Disc Repair Kits

Brake Size

Kit Part

Number

Rivet

Setting Tool

20DBB

107744D

153x1096

Dual disc brakes require two kits.

DBB 8104   PDF format

9

© Copyright Eaton Corp., 1998. All rights reserved.

(Revised: January, 1998)

Содержание Airflex DBB

Страница 1: ...f genuine Airflex replacement parts The use of non genuine Airflex replacement parts could result in substandard product performance and may void your Eaton warranty For optimum performance contact Ai...

Страница 2: ...ic Maintenance 6 4 0 MAINTENANCE 6 4 1 Wear Limits 6 4 2 Wear Adjustment Disassembly 8 4 3 Friction Disc Replacement 8 4 4 Cylinder Seal Replacement 10 4 5 Spring Replacement 10 4 6 Bushing Replacemen...

Страница 3: ...Tube 16 Spring Housing 28 Gear 17 Flat Washer 29 Wear Spacer 18 Lock Nut 31 Reaction Plate Sub assembly 19 Cylinder 32 Decal Plate 20 Hex head Screw 34 Release Spring 21 Polypak seal 36 Hex Head Screw...

Страница 4: ...cast sur faces are painted with multiple coats of corrosion resistant paint Bronze bushings are provided in the reaction plate and pres sure plates to facilitate axial movement The clamp tubes 12 are...

Страница 5: ...ngage ment or disengagement of the brake NOTE Airflex recommends guarding the brake application The guard should cover the face and the entire outer diameter of the unit 2 1 Preparation 2 1 1 Figure 1...

Страница 6: ...e brake 2 2 1 Ensure the shaft is free of nicks or burrs and the ket fits properly in the shaft and gear Tap the key into the shaft keyway 2 2 2 Apply a light coat of anti seizing compound to the shaf...

Страница 7: ...ust be made with flexible hose 2 3 1 6 The DBB brake does not require lubricated air however the solenoid valve may Consult the valve manufacturer 2 3 1 7 A pressure switch should be located in the ai...

Страница 8: ...atic and electrical control interlocks should be periodically checked for correct settings and operation 3 3 5 Inspect for need for wear adjustment Refer to Section 4 2 4 0 MAINTENANCE Prior to perfor...

Страница 9: ...e in form of circular grooves on iron surface Reaction Holes Maximum wear is 031 in 80 mm Wear will be in the form of elongation of the holes Original hole diameter is 1 343 34 11mm 12 Clamp Tube Reac...

Страница 10: ...fer to section 4 5 for further dis assembly procedures 4 2 10 See section 4 4 for cylinder seal replacement 4 2 11 Inspect the clamp tubes springs 22 and release springs 34 and compare to the limits i...

Страница 11: ...pposite friction disc Manual setting of the rivets using a punch very frequently results in splitting of the clinched end of the rivet When this occurs the rivet will ultimately fail in service due to...

Страница 12: ...damaging the seal lips 4 4 7 Attach the cylinder to the pressure plate with the screws washers and spacer tubes removed in 4 4 1 Use Loctite Locquic Primer Grade T to clean and prepare the screw thre...

Страница 13: ...05 require replacement See figure 12 4 6 3 Heat up area around bushing to release Loctite and drive old bushing s out 4 6 4 Clean out bores and remove old Loctite 4 6 5 Apply Loctite RC601 635 or 680...

Страница 14: ...locknuts for use only when replacing friction discs See Figure 14 NOTE The socket size for locknuts 18 is 1 1 16 x 4 deep 4 7 9 While Supporting the weight of the cylin der spring housing pressure pl...

Страница 15: ...N Handling mixing recoat drying times and ap plications must be in strict accordance with instructions in manufacturers literature Within 8 hours after the surface is cleaned and when dry apply one co...

Страница 16: ...g 16 308137 12 308137 23 Polypak Seal 2 000402x0022 2 000402x0022 24 Warning Decal 1 203627 1 203627 25 Name Plate 1 307640 1 307640 26 Drive Screw 8 000153x0644 8 000153x0644 27 Spacer Tube 12 308201...

Страница 17: ...ate May 1997 Revision Date Change 1 DEC 97 Complete restructuring 20 JAN 98 ADD friction disc and ring gear P N s to 6 0 8 0 REVISIONS DBB8104 PDFformat 15 Copyright Eaton Corp 1998 All rights reserve...

Страница 18: ...t exists Eaton shall thereupon correct any defect at its option either by repairing any defective part or parts or by making available at Eaton s plant a repaired or replacement part This warranty doe...

Отзывы: