background image

UPS SYSTEM INSTALLATION

Eaton 9395 UPS (450–825 kVA) Installation and Operation Manual  

S

  164201725 Rev 4

 www.eaton.com/powerquality

4-8

Left Top Panel

Wireway Panel

Left Middle Panel

Corner Channel

UPM Section

Interior Left
Side Panel

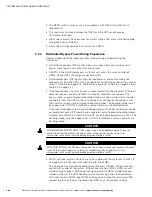
Figure 4‐7. Section Joining (Three UPM Section Shown)

5.

Remove the screws securing the left top panel and remove the panel (see
Figure 4‐7). Retain the hardware for later use.

6.

Remove the screws securing the left middle panel and remove the panel (see
Figure 4‐7). Retain the hardware for later use.

C


A


U


T


I


O


N

Use care during installation to protect components mounted on the right side of the ISBM section and the
intercabinet wiring harnesses attached to the left side UPM section from damage.

NOTE  

Clearance between the ISBM and the UPM sections must be less than 1/2” so that joining brackets

can be installed.

7.

Using a forklift with the forks in the front forklift slots, position the ISBM section
adjacent to the left side of the previously installed UPM section. Verify that the
ISBM section right side is against the UPM section left side and the front of the
cabinet bases are flush with each other (see Figure 4‐8).

8.

Reinstall the corner channel (see Figure 4‐7) and secure using the retained
hardware.

9.

Reinstall the left middle panel (see Figure 4‐7) and secure using the retained
hardware.

Содержание 9395 UPS

Страница 1: ...Powerware Series Eaton 9395 UPS Plus 1 UPS and 825 550 UPS 450 825 kVA Installation and Operation Manual For use with Two UPM 450 550 kVA Three UPM 650 825 kVA and Plus 1 650 825 kVA UPS Models...

Страница 2: ......

Страница 3: ...Powerware Series Eaton 9395 UPS Plus 1 UPS and 825 550 UPS 450 825 kVA Installation and Operation Manual For use with Two UPM 450 550 kVA Three UPM 650 825 kVA and Plus 1 650 825 kVA UPS Models...

Страница 4: ...G This is a product for restricted sales distribution to informed partners EN IEC 62040 2 Installation restrictions or additional measures may be needed to prevent electromagnetic disturbances Eaton P...

Страница 5: ...itoring and Communication 1 7 1 3 Battery System 1 8 1 4 Basic System Configurations 1 8 1 5 Using This Manual 1 9 1 6 Conventions Used in This Manual 1 9 1 7 Symbols Controls and Indicators 1 10 1 8...

Страница 6: ...l Powerware Hot Sync CAN Bridge Card 5 1 5 2 Installing Distributed Bypass Control Wiring 5 4 5 3 Installing an Optional Remote Monitor Panel II 5 9 5 4 Installing an Optional Relay Interface Module I...

Страница 7: ...mmand Menu 7 21 7 3 15 Starting the UPMs 7 21 7 3 16 Starting a Single UPM 7 23 7 3 17 Transfer from Online to Bypass Mode 7 24 7 3 18 Transfer from Bypass to Online Mode 7 24 7 3 19 Transfer from Onl...

Страница 8: ...eNotify Service 8 2 8 2 1 eNotify Service Features 8 2 8 2 2 Installing eNotify Service 8 2 8 3 Eaton LanSafe Power Management Software 8 3 8 4 Remote Notification 8 3 8 5 Terminal Mode 8 4 8 5 1 Disp...

Страница 9: ...gure 3 18 UPS Cabinet as Shipped on Pallet UPM Section Two UPM 3 32 Figure 4 1 Removing the ISBM Section Left Side Shipping Bracket 4 2 Figure 4 2 Removing the ISBM Section Right Side Shipping Bracket...

Страница 10: ...39 Typical Battery Interface Connection Separate Battery System 4 46 Figure 4 40 X Slot Communication Bays 4 47 Figure 4 41 REPO Switch 4 48 Figure 4 42 Normally Open REPO Switch Wiring 4 49 Figure 4...

Страница 11: ...e UPM Separate Rectifier Feed Separate Battery Dual Feed Configuration Momentary Static Switch 6 26 Figure 6 22 Plus 1 UPS System Four UPM Separate Rectifier Feed Separate Battery Dual Feed Configurat...

Страница 12: ...re 8 1 Optional X Slot Cards 8 2 Figure 8 2 Sample Event History Log 8 6 Figure 8 3 Remote Monitor Panel II Front Panel 8 7 Figure 8 4 Relay Interface Module II Customer Interface Connectors J1 throug...

Страница 13: ...ed bypass system see paragraph 1 2 5 The Eaton 9395 online power protection system is used to prevent loss of valuable electronic information minimize equipment downtime and minimize the adverse effec...

Страница 14: ...peration Manual S 164201725 Rev 4 www eaton com powerquality 1 2 UPM SECTION ISBM or IOM SECTION Figure 1 1 Eaton 9395 Three UPM UPS 650 825 kVA UPM SECTION FI UPM ISBM or IOM SECTION Figure 1 2 Eaton...

Страница 15: ...tion Manual S 164201725 Rev 4 www eaton com powerquality 1 3 UPM SECTION ISBM or IOM SECTION Figure 1 3 Eaton 9395 825 550 Two UPM UPS 450 550 kVA UPM SECTION ISBM or IOM SECTION Figure 1 4 Eaton 9395...

Страница 16: ...ts in the UPS are available to connect the facility s alarm system contacts Some system configurations may limit the number of inputs available The UPS uses these inputs to monitor the building alarms...

Страница 17: ...ts to a single feed configuration The kit consists of jumpers and bus bar extensions for each phase and the hardware required for installation 1 2 4 Separate Rectifier Input The UPS can be supplied wi...

Страница 18: ...ow the capacity of the UPMs minus the capacity of one UPM Under normal conditions the UPMs in the UPS share the load equally If one or more UPMs becomes unavailable and the load is at or below the cap...

Страница 19: ...the High Alert command is received during the one hour the one hour timer will be restarted 1 2 11 Monitoring and Communication S Remote Monitor Panel II RMP II An optional RMP II contains backlit st...

Страница 20: ...ne common battery system with a battery disconnect S Single 825 550 UPS with two common battery UPMs and a standalone common battery system with a battery disconnect S Single UPS with three separate b...

Страница 21: ...ure before beginning the procedure Perform only those procedures that apply to the UPS system being installed or operated 1 6 Conventions Used in This Manual This manual uses these type conventions S...

Страница 22: ...in the trash For proper disposal contact your local recycling reuse or hazardous waste center 1 8 For More Information Refer to the Eaton 9390 and 9395 Sync Control Installation and Operation Manual f...

Страница 23: ...ith any of the following S Scheduling initial startup S Regional locations and telephone numbers S A question about any of the information in this manual S A question this manual does not answer Pleas...

Страница 24: ...INTRODUCTION Eaton 9395 UPS 450 825 kVA Installation and Operation Manual S 164201725 Rev 4 www eaton com powerquality 1 12 This page intentionally left blank...

Страница 25: ...ecautions should be observed 1 Remove watches rings or other metal objects 2 Use tools with insulated handles 3 Do not lay tools or metal parts on top of batteries 4 Wear rubber gloves and boots S ELE...

Страница 26: ...rt forks partially into the base to move the cabinet S Forks may be partially inserted into the front or rear forklift slots for minor positioning if the forks are kept in a horizontal position with n...

Страница 27: ...Eaton 9395 UPS 450 825 kVA Installation and Operation Manual S 164201725 Rev 4 www eaton com powerquality 2 1 Section I Installation...

Страница 28: ...Eaton 9395 UPS 450 825 kVA Installation and Operation Manual S 164201725 Rev 4 www eaton com powerquality 2 2...

Страница 29: ...ed Use the procedures and illustrations in paragraph 3 2 and Chapter 4 to create a logical plan for installing the system 3 2 Preparing the Site For the UPS system to operate at peak efficiency the in...

Страница 30: ...1607 IOM 599 1321 490 1181 UPM Three UPM 1699 3745 1628 3590 Eaton 9395 825 825 ISBM MSS 652 1437 588 1297 ISBM CSS 797 1757 729 1607 IOM 599 1321 490 1181 UPM Three UPM 1699 3745 1628 3590 NOTE MSS...

Страница 31: ...sec 3200 cfm With Field Installed UPM Approximately 2265 liter sec 4800 cfm 480 480 88 22107 Eaton 9395 825 500 500 kVA CSS 400 400 96 24318 480 480 97 24563 Eaton 9395 825 550 550 kVA CSS 400 400 106...

Страница 32: ...nstallation and Operation Manual S 164201725 Rev 4 www eaton com powerquality 3 4 Dimensions are in millimeters inches Figure 3 1 UPS Cabinet Dimensions Three UPM Front View Dimensions are in millimet...

Страница 33: ...on 9395 UPS 450 825 kVA Installation and Operation Manual S 164201725 Rev 4 www eaton com powerquality 3 5 Figure 3 3 UPS Cabinet Dimensions Right Side View Dimensions are in millimeters inches Figure...

Страница 34: ...nstallation and Operation Manual S 164201725 Rev 4 www eaton com powerquality 3 6 Dimensions are in millimeters inches Figure 3 5 UPM Section Dimensions Three UPM Front View Dimensions are in millimet...

Страница 35: ...A Installation and Operation Manual S 164201725 Rev 4 www eaton com powerquality 3 7 Front Dimensions are in millimeters inches Figure 3 7 ISBM Section Dimensions Top View Front Dimensions are in mill...

Страница 36: ...llation and Operation Manual S 164201725 Rev 4 www eaton com powerquality 3 8 Front Dimensions are in millimeters inches Figure 3 9 UPM Section Dimensions Three UPM Top View Front Dimensions are in mi...

Страница 37: ...eration Manual S 164201725 Rev 4 www eaton com powerquality 3 9 Dimensions are in millimeters inches CG CG Figure 3 11 ISBM Section Center of Gravity Momentary Static Switch Dimensions are in millimet...

Страница 38: ...allation and Operation Manual S 164201725 Rev 4 www eaton com powerquality 3 10 Dimensions are in millimeters inches CG CG Figure 3 13 UPM Section Center of Gravity Three UPM Dimensions are in millime...

Страница 39: ...wiring only If wire is run in an ambient temperature greater than 30 C higher temperature wire and or larger size wire may be necessary Wire sizes are based on using the specified breakers S Wire amp...

Страница 40: ...neutral to ground bonding jumper be installed in the UPS S The ISBM and UPM sections are shipped with debris shields covering the ventilation grills on top of the sections Do not remove the debris shi...

Страница 41: ...ect overcurrent protection input battery and output breakers according to the UPS nameplate rated for either 80 or 100 S Follow all applicable NEC and local codes For three UPM external wiring require...

Страница 42: ...Full Load Current 3 Phases 1 Neutral 1 Ground B Amps 938 782 1083 902 1191 992 Minimum Conductor Size Number per Phase AWG or kcmil each 400 4 500 3 500 5 500 4 500 5 500 5 DC Input from Battery Disco...

Страница 43: ...902 1191 992 Minimum Conductor Size Number per Phase AWG or kcmil each 400 4 500 3 500 5 500 4 500 5 500 5 DC Input from Each Battery Disconnect to Each UPS UPM 1 Positive 1 Negative C Amps per UPM 5...

Страница 44: ...Number per Phase AWG or kcmil each 500 4 AC Input to UPS Bypass Five Wire Full Load Current 3 Phases 1 Neutral 1 Ground B Amps 650 541 722 601 794 662 Minimum Conductor Size Number per Phase AWG or k...

Страница 45: ...il each 500 4 AC Input to UPS Bypass Five Wire Full Load Current 3 Phases 1 Neutral 1 Ground B Amps 650 541 722 601 794 662 Minimum Conductor Size Number per Phase AWG or kcmil each 500 5 DC Input fro...

Страница 46: ...Table 3 8 Separate Rectifier Input UPM Ratings and External Wiring Requirements for the Three UPM Eaton 9395 825 650 9395 825 750 and 9395 825 825 and the Two UPM Eaton 9395 825 450 9395 825 500 9395...

Страница 47: ...m lb ft Stud AC Input to UPM Section E1A UPM 1 E1A UPM 2 E1A UPM 3 E1A UPM 4 Phase A 3 stud mounting 14 2 10 4 M8 E2A UPM 1 E2A UPM 2 E2A UPM 3 E2A UPM 4 Phase B 3 stud mounting 14 2 10 4 M8 E3A UPM 1...

Страница 48: ...M12 AC Input to Bypass E6 Phase A 6 2 bolt mounting 76 56 M12 E7 Phase B 6 2 bolt mounting 76 56 M12 E8 Phase C 6 2 bolt mounting 76 56 M12 AC Output to Critical Load E9 Phase A 6 2 bolt mounting 76...

Страница 49: ...ns are not applicable to IOM configurations Table 3 13 Recommended Installation Parts and Tools Not Supplied by Eaton Part Size Quantity Manufacturer Part Number Notes Long Barrel 2 Hole Lug 2 0 AWG A...

Страница 50: ...nput to UPS Rectifier Separate Feed A B C Ground 4 2 3 Each UPM AC Input to Bypass and Output Four Wire A B C Ground 4 3 3 AC Input to Bypass and Output Five Wire A B C Neutral Ground 5 3 4 480 Vac AC...

Страница 51: ...395 825 500 Eaton 9395 825 550 See Note 2 400 Vac AC Input to UPS Rectifier Separate Feed A B C Ground 4 2 3 Each UPM AC Input to Bypass and Output Four Wire A B C Ground 4 3 4 AC Input to Bypass and...

Страница 52: ...ng Load Rating 400V 480V Eaton 9395 825 650 80 Rated 1600A 1200A 100 Rated 1200A 1000A Eaton 9395 825 750 80 Rated 1600A 1600A 100 Rated 1600A 1200A Eaton 9395 825 825 80 Rated 2000A 1600A 100 Rated 1...

Страница 53: ...er Ratings UPS Model Bypass Output and MOB Rating Load Rating 400V 480V Eaton 9395 825 650 80 Rated 1200A 1000A 100 Rated 1000A 800A Eaton 9395 825 750 80 Rated 1600A 1200A 100 Rated 1200A 1000A Eaton...

Страница 54: ...izes are specified for an 825 kVA UPS Table 3 20 Recommended DC Input Battery Disconnect Ratings Separate Battery UPS Model Input Rating each UPM 400V 480V Eaton 9395 825 650 700A 700A Eaton 9395 825...

Страница 55: ...e wiring in separate conduit from the power wiring S When installing internal interface wiring to X Slot terminals route the wiring through the internal opening in the X Slot communication bay S All b...

Страница 56: ...net and then install a system neutral to ground bonding jumper The bonding jumper must be copper wire DO NOT install both a source neutral and a bonding jumper If the recommended system neutral bondin...

Страница 57: ...the forks are kept in a horizontal position with no upward angling If these instructions are not followed damage to the wiring channel and wiring will occur 1 Carefully inspect the outer packaging for...

Страница 58: ...r any evidence of physical damage and compare each item with the Bill of Lading If damage has occurred or shortages are evident contact an Eaton service representative immediately to determine the ext...

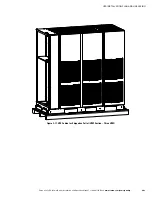
Страница 59: ...TALLATION PLAN AND UNPACKING Eaton 9395 UPS 450 825 kVA Installation and Operation Manual S 164201725 Rev 4 www eaton com powerquality 3 31 Figure 3 17 UPS Cabinet as Shipped on Pallet UPM Section Thr...

Страница 60: ...STALLATION PLAN AND UNPACKING Eaton 9395 UPS 450 825 kVA Installation and Operation Manual S 164201725 Rev 4 www eaton com powerquality 3 32 Figure 3 18 UPS Cabinet as Shipped on Pallet UPM Section Tw...

Страница 61: ...and unloading instructions are not closely followed the cabinets may tip and cause serious injury CAUTION S Do not tilt cabinets more than 10 from vertical S Lift the cabinets only with a forklift or...

Страница 62: ...of the pallet see Figure 3 11 through Figure 3 14 starting on page 3 9 for the ISBM and UPM section center of gravity measurements If the sections must be moved using the cabinet front or rear fork li...

Страница 63: ...Section Right Side Shipping Bracket 4 Using a forklift see the caution statement at the beginning of this procedure raise the cabinet until the cabinet bottom clears the pallet by approximately 3 mm 1...

Страница 64: ...n and Operation Manual S 164201725 Rev 4 www eaton com powerquality 4 4 Shipping Bracket Bolts Shipping Bracket Bolts Pallet Left Side Shipping Bracket UPM Removable Front Panels Wireway Panel Figure...

Страница 65: ...825 kVA Installation and Operation Manual S 164201725 Rev 4 www eaton com powerquality 4 5 Shipping Bracket Bolts Shipping Bracket Bolts Pallet Right Side Shipping Bracket Figure 4 4 Removing the Thr...

Страница 66: ...on and Operation Manual S 164201725 Rev 4 www eaton com powerquality 4 6 Shipping Bracket Bolts Shipping Bracket Bolts Pallet Left Side Shipping Bracket UPM Removable Front Panels Wireway Panel Figure...

Страница 67: ...NOTE For the following steps verify that the forklift or pallet jack is rated to handle the weight of the section see Table 3 1 on page 3 2 for cabinet weight 1 Using a forklift move the UPM section t...

Страница 68: ...ion to protect components mounted on the right side of the ISBM section and the intercabinet wiring harnesses attached to the left side UPM section from damage NOTE Clearance between the ISBM and the...

Страница 69: ...the top front top rear and front base see Steps 11 and 12 11 Locate the hardware kit packed inside a drawstring bag tied to the left middle panel of the UPM section Locate two flat brackets and screw...

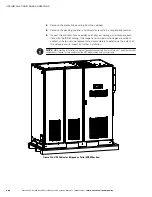
Страница 70: ...the front door latch and swing the door open see Figure 4 1 on page 4 2 2 Remove the door Remove the retaining screw located inside the door at the bottom hinge pivot point then lift the door off Ret...

Страница 71: ...terminals Follow the callout details in Figure 4 11 on page 4 15 for common rectifier feed with MSS Figure 4 13 on page 4 17 for common rectifier feed with CSS or Figure 4 15 on page 4 19 for separate...

Страница 72: ...e hardware see Figure 4 11 on page 4 15 for common rectifier feed with MSS Figure 4 13 on page 4 17 for common rectifier feed with CSS or Figure 4 30 on page 4 35 for separate rectifier feed This hard...

Страница 73: ...In the ISBM section locate the J39 inverter CAN connector on the Pl1 interface board and connect the RJ 45 CAN cable connector to the J39 connector see Figure 4 19 and Figure 4 20 on page 4 22 22 Dre...

Страница 74: ...to UPMs AC Output from UPMs Phase C Phase A Phase B Neutral from UPMs See Figure 4 17 for detail See Figure 4 17 for detail Phase A Phase C Phase B See Figure 4 16 for detail AC Input Breaker CB1 DC I...

Страница 75: ...tall the first lug on the stud with the raised barrel portion facing the back of the cabinet Install the second lug with the raised barrel portion facing the front of the cabinet NOTE On a UPS without...

Страница 76: ...o UPMs AC Output from UPMs Phase C Phase A Phase B Neutral from UPMs See Figure 4 17 for detail See Figure 4 17 for detail Phase A Phase C Phase B See Figure 4 16 for detail AC Input Breaker CB1 DC In...

Страница 77: ...barrel portion facing the front of the cabinet UPM 2 Cable 2G1 2G2 Brown UPM 3 Cable 3G1 3G2 Brown Phase B E2A UPM 1 Cable 1G1 1G2 Brown Phase B E2A UPM 4 FI UPM AC Input to UPMs UPM 1 Cable 1G1 1G2...

Страница 78: ...AC Input to UPMs AC Output from UPMs Phase C Phase A Phase B Neutral from UPMs See Figure 4 17 for detail See Figure 4 17 for detail Phase A Phase C Phase B See Figure 4 16 for detail DC Input to UPMs...

Страница 79: ...ch terminal stud When connecting the cable lugs install the first lug on the stud with the raised barrel portion facing the back of the cabinet Install the second lug with the raised barrel portion fa...

Страница 80: ...A E9A UPM 2 Cable 2G4 2G5 Orange UPM 3 Cable 3G4 3G5 Orange UPM 1 Cable 1G4 1G5 Brown UPM 2 Cable 2G4 2G5 Brown UPM 3 Cable 3G4 3G5 Brown UPM 1 Cable 1G4 1G5 Yellow UPM 2 Cable 2G4 2G5 Yellow UPM 3 Ca...

Страница 81: ...ity 4 21 Wiring Access Location of J50 J51 J61 and J70 Coiled Harnesses Location of RJ 45 Coiled CAN Cable UPM Wireway Location of P61 Harness Location of P50 P51 and P70 Harnesses UPM Section Left Si...

Страница 82: ...d Operation Manual S 164201725 Rev 4 www eaton com powerquality 4 22 ISBM Section Right Side Inside View Pl1 Interface Board Front Figure 4 19 Pl1 Interface Board Location Pl1 Interface Board J39 Inve...

Страница 83: ...according to the tie cabinet or distribution panel manufacturer s instructions and all applicable codes and regulations including the NEC Article 480 After the tie cabinet is installed proceed to para...

Страница 84: ...ling the lugs to the bus bars Tighten the nut to the torque value listed in Table 3 11 NOTE Conical washers are special purpose washers that look similar to flat washers except for a slight conical sh...

Страница 85: ...e 4 29 through Figure 4 31 for separate rectifier feed terminal locations Top Access Wiring Remove the top conduit plate from the top of the ISBM section Identify all conduit requirements and mark the...

Страница 86: ...26 ISBM Section Front Ventilation Grill Debris Shields Remove shields before operating system Three UPM Section Front Two UPM Section Front Ventilation Grill Debris Shields Remove shields before oper...

Страница 87: ...d DC Input Remove panel to drill or punch conduit holes TOP VIEW Interface Entry Conduit Landings for TB1 through TB3 Wiring and X Slot Connections Remove panels to drill or punch conduit holes Bottom...

Страница 88: ...Neutral if required bypass input power wiring from the utility source to the bypass input terminals and neutral terminals in the ISBM section See paragraph 3 2 2 on page 3 11 for wiring and terminati...

Страница 89: ...oper operation the following must be true 1A 2A 3A 4A 1B 2B 3B 4B NOTE Any difference in wire length will result in decreased capacity of the UPS system while on bypass For example a 10 difference bet...

Страница 90: ...PS Rectifier A B C AC Input to UPS Bypass A B C See Figure 4 26 for Detail AA ISBM See Figure 4 32 or Figure 4 33 for Detail BB See Figure 4 32 or Figure 4 33 for Detail BB AC Output to Critical Load...

Страница 91: ...4 31 Ground Terminals Phase A E6 Phase C E8 Phase B E7 AC Input to UPS Rectifier Phase C E3 Phase A E1 Phase B E2 AC Input to UPS Bypass Section A A Front NOTE AC Input to Bypass terminals are not ap...

Страница 92: ...for Detail AA DC Input from Battery E4 E5 DC Input from Battery AC Input to UPS Rectifier A B C AC Input to UPS Bypass A B C See Figure 4 28 for Detail AA ISBM See Figure 4 32 or Figure 4 33 for Detai...

Страница 93: ...01725 Rev 4 www eaton com powerquality 4 33 Phase A E6 Phase C E8 Phase B E7 AC Input to UPS Rectifier Phase A E1 Phase C E3 Phase B E2 AC Input to UPS Bypass Front Section A A Ground Terminals Figure...

Страница 94: ...to UPS Rectifier A B C AC Input to UPS Bypass A B C See Figure 4 30 for Detail AA ISBM See Figure 4 32 or Figure 4 33 for Detail BB See Figure 4 32 or Figure 4 33 for Detail BB AC Output to Critical L...

Страница 95: ...35 Ground Terminals Phase A E6 Phase C E8 Phase B E7 AC Input to UPS Bypass NOTE AC Input to Bypass terminals are not applicable to an IOM configuration Section A A UPM Rectifier Input Terminal Block...

Страница 96: ...4 www eaton com powerquality 4 36 AC Input to UPM Rectifiers Phase A E1 Phase C E3 Phase B E2 UPM 4 FI UPM UPM 2 UPM 1 UPM 3 Phase A E1A Phase C E3A Phase B E2A AC Input to UPM 4 FI UPM Not used with...

Страница 97: ...attery system or disconnect to the ISBM section battery and ground terminals Use both sets of terminals shown in Figure 4 32 as needed See paragraph 3 2 2 on page 3 11 for wiring and termination requi...

Страница 98: ...UPS 450 825 kVA Installation and Operation Manual S 164201725 Rev 4 www eaton com powerquality 4 38 DC Input from Battery E4 E5 DC Input from Battery Section B B Front Figure 4 32 ISBM Section Power...

Страница 99: ...from Battery DC Input from Battery E4 UPM 1 UPM 3 E5 DC Input from Battery UPM 2 Section B B Front E5 DC Input from Battery E5 DC Input from Battery UPM 1 DC Input from Battery E4 UPM 2 DC Input from...

Страница 100: ...e retaining screw located inside the door at the bottom hinge pivot point then lift the door off Retain the hardware for later use 4 Terminal block TB3 is accessible on the left side of the X Slot com...

Страница 101: ...install the front door removed in Step 3 and secure with the retained hardware 12 Close the door and secure the latch X Slot Communication Bays TB3 TB1 and TB2 See Figure 4 35 for detail See Figure 4...

Страница 102: ...purpose normally closed NC relay contact 4 Alarm Relay Common 5 Alarm Relay NO Output General purpose normally open NO relay contact 6 Alarm Relay Common 7 Not Used 8 Not Used 9 Not Used 10 Not Used T...

Страница 103: ...ting of 5A and a switched voltage rating of 30 Vac and 28 Vdc NOTE Alarm relay normally open and normally closed return terminals are separated on the terminal board but are electrically in common NOT...

Страница 104: ...normally closed contacts All control wiring and relay and switch contacts are customer supplied NOTE The building alarms can be programmed to display the alarm functional name NOTE A jumper wire must...

Страница 105: ...e the appropriate terminals and review the wiring and termination requirements see paragraph 3 2 2 on page 3 11 Table 4 1 on page 4 42 and Figure 4 34 through Figure 4 39 NOTE When installing shunt tr...

Страница 106: ...t trip wiring should be a minimum of 18 AWG 48 Vdc Figure 4 38 Typical Battery Interface Connection Common Battery System UPM 1 Battery Disconnect TB1 UPS ST UPM 2 Battery Disconnect ST UPM 4 Battery...

Страница 107: ...nstall wiring to connections 1 If not already installed install the LAN and telephone drops 2 Unfasten the front door latch and swing the door open see Figure 4 1 on page 4 2 3 Remove the right interf...

Страница 108: ...lly open or normally closed latching type switch not tied into any other circuits NOTE This procedure is intended for installing the Eaton supplied REPO switch If installing another manufacturer s swi...

Страница 109: ...on page 4 44 9 Route and connect the wiring as shown in Table 4 2 and Figure 4 42 10 If the normally closed REPO TB1 connection in the UPS is not used connect a jumper wire between pins 1 and 2 on TB...

Страница 110: ...ardware 14 Reinstall the front door removed in Step 4 and secure with the retained hardware 15 Close the door and secure the latch Figure 4 43 shows the wiring connections if the normally closed REPO...

Страница 111: ...e is offered as part of the sales contract for the UPS Contact an Eaton service representative in advance usually a two week notice is required to reserve a preferred startup date 4 13 Completing the...

Страница 112: ...AN and telephone drops are installed All telephone and LAN connections have been completed A ground conductor is properly installed Air conditioning equipment is installed and operating correctly The...

Страница 113: ...the tie cabinet or distribution panel All power cables are properly sized and terminated Neutral conductors are installed or bonded to ground as per requirements A ground conductor is properly instal...

Страница 114: ...______________________ _________________________________________________________________________ _________________________________________________________________________ _____________________________...

Страница 115: ...e Module II or a Supervisory Contact Module II to the UPS Plug in Terminal Block J3 Figure 5 1 Powerware Hot Sync CAN Bridge Card NOTE Only one Powerware Hot Sync CAN Bridge Card can be installed in t...

Страница 116: ...e NEC for interface and power wiring up to 30V The wire should be rated at 24V 1A minimum S Use Class 2 wiring methods as defined by the NEC for interface and power wiring from 30 to 600V S Signal wir...

Страница 117: ...CAN Bridge Card Connections Table 5 1 Powerware Hot Sync CAN Bridge Card Interface Connections J3 Terminal Name Description 1 Alarm Programmable UPS alarm Activated by a remote dry contact closure 2 A...

Страница 118: ...terface entry conduit landing plates to drill or punch holes see Figure 4 23 on page 4 27 5 Reinstall the interface entry plates and install the conduit 6 To locate the appropriate terminals and revie...

Страница 119: ...ring Shielded Twisted Pair Shielded Twisted Pair Shielded Twisted Pair UPS 1 CAN Bridge Card J3 UPS 2 CAN Bridge Card J3 UPS 3 CAN Bridge Card J3 If Installed UPS 4 CAN Bridge Card J3 If Installed NOT...

Страница 120: ...PS 3 If Installed 1 2 3 4 5 7 8 6 9 10 1 2 3 4 5 7 8 6 9 10 1 2 3 4 5 7 8 6 9 10 Twisted Pair UPS 4 If Installed TB1 TB1 TB1 TB1 TB2 TB2 TB2 TB2 NOTE Use twisted pair wiring between the UPS and MOB AU...

Страница 121: ...E Always confirm contact operation prior to wiring 1 2 3 4 5 6 7 8 9 10 UPS 1 UPS 2 TB2 TB2 TB2 TB2 TB1 TB1 TB1 UPS 3 If Installed UPS 4 If Installed 1 2 3 4 5 6 7 8 9 10 1 2 3 4 5 6 7 8 9 10 1 2 3 4...

Страница 122: ...arm UPS 2 CAN Bridge Card J3 2 Alarm Return MOB 2 Aux 1 Com UPS 2 TB2 1 Pull Chain MOB 2 Aux 2 NO Pull Chain UPS 2 TB2 2 Pull Chain Common UPS 3 TB2 2 Pull Chain Common Pull Chain Common UPS 3 CAN Bri...

Страница 123: ...vice and the UPS cabinet 4 Remove the ISBM cabinet top right interface conduit landing plate to drill or punch conduit holes see Figure 4 23 on page 4 27 5 Reinstall the conduit landing plate 6 Instal...

Страница 124: ...rminal Locations UPS Can Card J3 120 Vac from Critical Bus Line Neutral Twisted Pair Ground Terminal RMP II RIM II or SCM II Figure 5 8 Remote Monitor Panel II Relay Interface Module II or Supervisory...

Страница 125: ...ptional Relay Interface Module II To install RIM II wiring 1 Verify the UPS system is turned off and all power sources are removed See Chapter 7 UPS Operating Instructions for shutdown instructions 2...

Страница 126: ...J1 through J4 see Table 5 6 and Figure 5 9 You can order interface cables separately for connecting to the 15 Pin D Sub Connectors Table 5 6 J1 through J4 Interface Connectors Status J1 through J4 De...

Страница 127: ...Remove the ISBM cabinet top right interface conduit landing plate to drill or punch conduit holes see Figure 4 23 on page 4 27 5 Reinstall the conduit landing plate 6 Install conduit between the UPS a...

Страница 128: ...oring equipment See Figure 5 10 for terminal block location and Figure 5 11 for terminal assignments 10 Close the front door and secure the latch 11 Restart the UPS See Chapter 7 UPS Operating Instruc...

Страница 129: ...ensions Figure 5 12 through Figure 5 14 show the dimensions of the RMP II the RIM II and the SCM II Flush Mount using 10 Pan Head Screws Mount with vent holes facing up Surface Mount using 10 Pan Head...

Страница 130: ...v 4 www eaton com powerquality 5 16 Knockouts Provided on Five Surfaces Surface Mount using 10 Pan Head Screws for Hanging Mount with vent holes facing up Flush Mount using 10 Pan Head Screws Mount wi...

Страница 131: ...4 www eaton com powerquality 5 17 Knockouts Provided on Five Surfaces Surface Mount using 10 Pan Head Screws for Hanging Mount with vent holes facing up Flush Mount using 10 Pan Head Screws Mount with...

Страница 132: ...INSTALLING OPTIONS AND ACCESSORIES Eaton 9395 UPS 450 825 kVA Installation and Operation Manual S 164201725 Rev 4 www eaton com powerquality 5 18 This page intentionally left blank...

Страница 133: ...Eaton 9395 UPS 450 825 kVA Installation and Operation Manual S 164201725 Rev 4 www eaton com powerquality 5 19 Section II Operation...

Страница 134: ...Eaton 9395 UPS 450 825 kVA Installation and Operation Manual S 164201725 Rev 4 www eaton com powerquality 5 20...

Страница 135: ...p battery supply to maintain power to the critical load for a specified period of time or until the utility power returns For extended power outages the UPS allows you to either transfer to an alterna...

Страница 136: ...her automatically or manually With the exception of a battery cabinet no other cabinets or equipment are required for the single UPS to successfully support its applied loads 6 2 1 Modes The Eaton 939...

Страница 137: ...bucked regulated DC voltage charge current to the battery The battery is always connected to the UPS and ready to support the inverter should the utility input become unavailable The inverter produce...

Страница 138: ...put and output contactors are closed and the link is maintained through the diode bridge If commercial power voltage or frequency disturbances are detected the system forward transfers to Battery mode...

Страница 139: ...upplies the commercial AC power to the load directly Figure 6 3 shows the path of electrical power through the UPS system when operating in Bypass mode In Bypass mode the output of the system is provi...

Страница 140: ...r locks the critical load to the bypass source and requires operator intervention to transfer 6 2 6 Battery Mode The UPS automatically transfers to Battery mode if a utility power outage occurs or if...

Страница 141: ...ows required for normal operation the battery continues discharging until a DC voltage level is reached where the inverter output can no longer support the connected loads When this event occurs the U...

Страница 142: ...tion Continuous Static Switch Figure 6 11 on page 6 16 9395 825 650 9395 825 750 9395 825 825 400 480 400 480 Single Reverse Transfer UPS Four UPM Common Rectifier Feed Common Battery Dual Feed Config...

Страница 143: ...ate Battery Dual Feed Configuration Continuous Static Switch Figure 6 24 on page 6 29 9395 825 650 9395 825 750 9395 825 825 400 480 400 480 Single Reverse Transfer UPS Four UPM Separate Rectifier Fee...

Страница 144: ...Load E9 E10 E11 E12 Static Switch AC Input to UPS Rectifier 3 Wire A B C Rotation AC Input to Bypass 3 or 4 Wire A B C Rotation Interface Board Battery Aux Remote EPO Building Alarms Alarm Relays Fus...

Страница 145: ...e A B C Rotation AC Input to Bypass 3 or 4 Wire A B C Rotation Interface Board Battery Aux Remote EPO Building Alarms Alarm Relays Fuse Service Connector Battery Converter Inverter Output Contactor K3...

Страница 146: ...C Rotation AC Input to Bypass 3 or 4 Wire A B C Rotation Interface Board Battery Aux Remote EPO Building Alarms Alarm Relays Fuse Service Connector Battery Converter Inverter Output Contactor K3 Fuse...

Страница 147: ...ry Contactor K2 Fuse Fuse Fuse UPM 2 Battery Breaker E4 E5 Battery Converter Inverter Output Contactor K3 Fuse Rectifier Input Contactor K1 Battery Contactor K2 Fuse Fuse Fuse UPM 3 Battery Breaker E4...

Страница 148: ...Critical Load E9 E10 E11 E12 Static Switch AC Input to UPS Rectifier 3 Wire A B C Rotation AC Input to Bypass 3 or 4 Wire A B C Rotation Interface Board Battery Aux Remote EPO Building Alarms Alarm R...

Страница 149: ...er 3 Wire A B C Rotation AC Input to Bypass 3 or 4 Wire A B C Rotation Interface Board Battery Aux Remote EPO Building Alarms Alarm Relays Fuse Service Connector Battery Converter Inverter Output Cont...

Страница 150: ...ire A B C Rotation AC Input to Bypass 3 or 4 Wire A B C Rotation Interface Board Battery Aux Remote EPO Building Alarms Alarm Relays Fuse Service Connector Battery Converter Inverter Output Contactor...

Страница 151: ...K1 Battery Contactor K2 Fuse Fuse Fuse UPM 2 Battery Breaker E4 E5 Battery Converter Inverter Output Contactor K3 Fuse Rectifier Input Contactor K1 Battery Contactor K2 Fuse Fuse Fuse UPM 3 Battery B...

Страница 152: ...ding jumper UPS CABINET Backfeed Contactor K5 AC Output to Critical Load E9 E10 E11 E12 Static Switch AC Input to UPS Rectifier 3 Wire A B C Rotation AC Input to Bypass 3 or 4 Wire A B C Rotation Inte...

Страница 153: ...ontactor K5 AC Output to Critical Load E9 E10 E11 E12 Static Switch AC Input to UPS Rectifier 3 Wire A B C Rotation AC Input to Bypass 3 or 4 Wire A B C Rotation Interface Board Battery Aux Remote EPO...

Страница 154: ...ad E9 E10 E11 E12 Static Switch AC Input to UPS Rectifier 3 Wire A B C Rotation AC Input to Bypass 3 or 4 Wire A B C Rotation Interface Board Battery Aux Remote EPO Building Alarms Alarm Relays Fuse S...

Страница 155: ...rvice Connector Battery Converter Inverter Output Contactor K3 Fuse Rectifier Input Contactor K1 Battery Contactor K2 Fuse Fuse Fuse UPM 1 Battery Breaker E4 E5 Battery Converter Inverter Output Conta...

Страница 156: ...utral and a bonding jumper UPS CABINET AC Output to Critical Load E9 E10 E11 E12 AC Input to UPS Rectifier 3 Wire A B C Rotation Interface Board Battery Aux Remote EPO Building Alarms Alarm Relays Ser...

Страница 157: ...E9 E10 E11 E12 AC Input to UPS Rectifier 3 Wire A B C Rotation Interface Board Battery Aux Remote EPO Building Alarms Alarm Relays Service Connector Battery Converter Inverter Output Contactor K3 Fuse...

Страница 158: ...E11 E12 AC Input to UPS Rectifier 3 Wire A B C Rotation Interface Board Battery Aux Remote EPO Building Alarms Alarm Relays Service Connector Battery Converter Inverter Output Contactor K3 Fuse Recti...

Страница 159: ...2 Fuse Fuse Fuse UPM 2 Battery Breaker E4 E5 Battery Converter Inverter Output Contactor K3 Fuse Rectifier Input Contactor K1 Battery Contactor K2 Fuse Fuse Fuse UPM 3 Battery Breaker E4 E5 Battery Br...

Страница 160: ...pass 3 or 4 Wire A B C Rotation Fuse Service Connector Battery Converter Inverter Output Contactor K3 Fuse Rectifier Input Contactor K1 Battery Contactor K2 Fuse Fuse Fuse UPM 2 Battery Breaker E4 E5...

Страница 161: ...K2 Fuse Fuse Fuse UPM 3 Battery Breaker E4 E5 Battery Breaker E4 E5 Battery Converter Inverter Output Contactor K3 Fuse Rectifier Input Contactor K1 Battery Contactor K2 Fuse Fuse Fuse UPM 1 Battery...

Страница 162: ...put to Bypass 3 or 4 Wire A B C Rotation Fuse Service Connector Battery Converter Inverter Output Contactor K3 Fuse Rectifier Input Contactor K1 Battery Contactor K2 Fuse Fuse Fuse UPM 2 Battery Break...

Страница 163: ...Contactor K2 Fuse Fuse Fuse UPM 3 Battery Breaker E4 E5 Battery Breaker E4 E5 Battery Converter Inverter Output Contactor K3 Fuse Rectifier Input Contactor K1 Battery Contactor K2 Fuse Fuse Fuse UPM 1...

Страница 164: ...to Critical Load E9 E10 E11 E12 Static Switch AC Input to UPS Rectifiers 3 Wire A B C Rotation AC Input to Bypass 3 or 4 Wire A B C Rotation Fuse Service Connector Battery Converter Inverter Output Co...

Страница 165: ...reaker E4 E5 Battery Converter Inverter Output Contactor K3 Fuse Rectifier Input Contactor K1 Battery Contactor K2 Fuse Fuse Fuse UPM 2 Battery Breaker E4 E5 E4 E5 Battery Converter Inverter Output Co...

Страница 166: ...C Rotation Service Connector Battery Converter Inverter Output Contactor K3 Fuse Rectifier Input Contactor K1 Battery Contactor K2 Fuse Fuse Fuse UPM 2 Battery Breaker E4 E5 Battery Converter Inverte...

Страница 167: ...ter Output Contactor K3 Fuse Rectifier Input Contactor K1 Battery Contactor K2 Fuse Fuse Fuse UPM 3 Battery Breaker E4 E5 Battery Breaker E4 E5 Battery Converter Inverter Output Contactor K3 Fuse Rect...

Страница 168: ...o separate feeds with upstream feeder breakers or a single feed with two upstream feeder breakers must be provided one for the UPS or rectifier input breaker RIB if installed and one for the maintenan...

Страница 169: ...r system metering and mode control System level communication and control are accomplished using a Controller Area Network CAN A single building alarm in each UPS connected to the other UPSs in parall...

Страница 170: ...S A command is an intervention that is externally initiated by an operator or by some site action A command causes the UPSs to switch operating modes it usually does not require any further action S...

Страница 171: ...ass mode of operation The distributed bypass system automatically switches to Bypass mode if it detects a UPS system overload or load fault If one UPS becomes unavailable the distributed bypass system...

Страница 172: ...ass system automatically attempts to return to Online mode up to three times within a 10 minute period After three transfer attempts or an overload the system locks the critical load to the bypass sou...

Страница 173: ...ing mode until the input power to the rectifier is again within the specified voltage or frequency acceptance windows If the input power fails to return or is not within the acceptance windows require...

Страница 174: ...e UPSs but represent each UPS in the distributed bypass system The internal structure of each UPS is shown in Figure 6 5 through Figure 6 16 and Figure 6 21 through Figure 6 26 Oneline Drawing UPS Mod...

Страница 175: ...the UPS C E9 E10 E11 E12 D NOTE This oneline does not show each UPM in the UPSs but represents each UPS in the distributed bypass system The internal structure of each UPS is shown in Figure 6 5 throu...

Страница 176: ...e E6 E7 E8 E12 K5 Static Switch Fuse CB4 E1 E2 E3 CB1 optional UPS 3 A B E4 E5 BATTERY SYSTEM Not supplied with the UPS C E9 E10 E11 E12 D NOTE This oneline does not show each UPM in the UPSs but repr...

Страница 177: ...ed with the UPS C E9 E10 E11 E12 D Battery Breaker Battery Converter Inverter K3 Fuse Rectifier K1 K2 Fuse Fuse Fuse E6 E7 E8 E12 K5 Static Switch Fuse CB4 E1 E2 E3 CB1 optional UPS 4 A B E4 E5 BATTER...

Страница 178: ...the UPS C E9 E10 E11 E12 D NOTE This oneline does not show each UPM in the UPSs but represents each UPS in the distributed bypass system The internal structure of each UPS is shown in Figure 6 5 throu...

Страница 179: ...use E6 E7 E8 E12 K5 Static Switch Fuse E1 E2 E3 CB1 optional UPS 3 A B E4 E5 BATTERY SYSTEM Not supplied with the UPS C E9 E10 E11 E12 D NOTE This oneline does not show each UPM in the UPSs but repres...

Страница 180: ...with the UPS C E9 E10 E11 E12 D Battery Breaker Battery Converter Inverter K3 Fuse Rectifier K1 K2 Fuse Fuse Fuse E6 E7 E8 E12 K5 Static Switch Fuse E1 E2 E3 CB1 optional UPS 4 A B E4 E5 BATTERY SYST...

Страница 181: ...ead this section of the manual and have thorough knowledge of UPS operation before attempting to operate any of the controls NOTE The UPS displays 2 minutes of battery runtime at the initial startup A...

Страница 182: ...ed option Figure 7 2 UPS Controls and Indicators Continuous Static Switch 7 1 1 Control Panel The control panel is used to set up and control the UPS and to monitor UPS operation For a description of...

Страница 183: ...or of the UPS 3 1 2 PRESS ANY KEY TO CONTINUE Figure 7 3 UPS Control Panel The control panel consists of S A liquid crystal display LCD 1 S A horizontal row of pushbutton switches 2 S A vertical colum...

Страница 184: ...trol panel pushbutton once 7 2 2 System Events When the UPS system is running in Online mode it continually monitors itself and the incoming utility power In Battery or Bypass modes the UPS may issue...

Страница 185: ...needs attention Some notices and alarms may be accompanied by an audible horn To silence the horn press any control panel pushbutton once Shown is a typical alarm message For more information about a...

Страница 186: ...numbers LOAD OFF De energizes the critical load and powers down the UPS ESC Returns to Main Menu and Mimic screen from the Events Meters Controls or Setup screens Returns to the main System Setup Leve...

Страница 187: ...on these screens is phase to neutral However an authorized Eaton Customer Service Engineer can change the screens to display the voltage phase to phase A B B C C A Press the METERS pushbutton on the...

Страница 188: ...Storm Detection Counter screen Use the up or down arrow pushbutton to set the counter Press SAVE or ABORT Once the action is completed the Energy Saver System Setup screen is displayed Storm Detectio...

Страница 189: ...u save the new password retry another password or abort the password change Press SAVE RETRY or ABORT If SAVE or ABORT is pressed the action is completed and the System Setup screen displays If RETRY...

Страница 190: ...the setting to be changed Use the return arrow pushbutton to toggle through the values for the setting to make the change Press SAVE or ABORT Once the action is completed the COM Port Setup screen is...

Страница 191: ...ushbutton to display the command menu screen Table 7 4 lists the typical System Status Screen Messages that are displayed during UPS operation Table 7 5 describes the control functions and provides in...

Страница 192: ...ne mode Go to Online Starts the UPS in Online mode or transfers the UPS to Online mode from Bypass mode Enable Disable Energy Saver Enables or disables Energy Saver System mode Enable changes to Disab...

Страница 193: ...ndicating logic power 8 Press the CONTROLS pushbutton on the main menu bar The System Status screen is displayed 9 On the System Status screen verify the UPS status is SHUTDOWN and the UPM status is O...

Страница 194: ...Command Menu To enable Energy Saver System mode NOTE The Energy Saver System mode commands are displayed only if enabled at the factory or by an Eaton Customer Service Engineer NOTE The Variable Modu...

Страница 195: ...to Online mode The Online status indicator is illuminated The UPS status indicates ONLINE The UPM status indicates ONLINE 7 3 4 Start Energy Saver System High Alert Mode from the UPS Command Menu To s...

Страница 196: ...ximately twenty seconds the UPS calculates the required number of UPMs needed to support the load The Online status indicator is illuminated The UPS status indicates ONLINE VMMS The UPM status indicat...

Страница 197: ...The UPS starts High Alert mode with the UPMs online supplying the critical load After one hour the UPS transfers to Variable Module Management System mode The Online status indicator is illuminated T...

Страница 198: ...y Saver System mode commands are displayed only if enabled at the factory or by an Eaton Customer Service Engineer NOTE The Variable Module Management System and Energy Saver System modes are mutually...

Страница 199: ...to Online mode The Online status indicator is illuminated The UPS status indicates ONLINE The UPM status indicates ONLINE 7 3 11 Start Energy Saver System High Alert Mode from the Bypass Command Menu...

Страница 200: ...SELECT pushbutton on the Bypass Command menu bar If the UPS is online the UPS transfers to Variable Module Management System mode In approximately twenty seconds the UPS calculates the required number...

Страница 201: ...t the BYPASS command 3 Press the CONTROLS pushbutton on the System Status menu bar The Bypass Control Command screen is displayed 4 On the Bypass Control Command screen select START HIGH ALERT 5 Press...

Страница 202: ...1 rectifier and inverter turn on If the Inherent Redundancy option is enabled a loss of redundancy alarm will be issued Silence the alarm and continue to Step 17 17 Repeat Steps 12 through 15 selecti...

Страница 203: ...Bypass input feeder circuit breaker 5 If the UPS contains input breaker CB1 close input breaker CB1 6 Close the door and secure the latch 7 Observe the UPS control panel becoming active indicating log...

Страница 204: ...displayed 4 On the Bypass Control Command screen select GO TO BYPASS 5 Press the SELECT pushbutton on the Bypass Command menu bar The UPS transfers to Bypass mode and the critical load is immediately...

Страница 205: ...OFF 7 Press the SELECT pushbutton on the UPM 1 Command menu bar The UPM status indicates READY The input output and battery contactors open and the power module remains on 8 To turn off the power modu...

Страница 206: ...nue to supply the critical load Logic power remains on 7 3 21 Single UPM Restart To restart a single UPM from a shutdown state 1 Press the CONTROLS pushbutton on the main menu bar The System Status sc...

Страница 207: ...reen select the CHARGER command 3 Press the CONTROLS pushbutton on the System Status menu bar The Charger Control Command screen is displayed 4 On the Charger Control Command screen select CHARGER ON...

Страница 208: ...low the procedure in paragraph 7 3 1 on page 7 13 or 7 3 8 on page 7 17 WARNING Power is present inside the UPS cabinet until the upstream input feeder circuit breaker is opened To use the LOAD OFF co...

Страница 209: ...u should use this feature only when you want to de energize the critical load NOTE The following instructions are for the Eaton supplied REPO switch If a customer supplied REPO switch is used it may n...

Страница 210: ...IONS Eaton 9395 UPS 450 825 kVA Installation and Operation Manual S 164201725 Rev 4 www eaton com powerquality 7 30 Deactivated Unlock pushbutton to release Activated Pushbutton locked into place Figu...

Страница 211: ...ers 7 Close the doors and secure the latches 8 Observe the UPS control panel displays becoming active indicating logic power 9 On any UPS press the CONTROLS pushbutton on the main menu bar The System...

Страница 212: ...the UPS Command Menu To enable Energy Saver System mode NOTE The Energy Saver System mode commands are displayed only if enabled at the factory or by an Eaton Customer Service Engineer NOTE The Varia...

Страница 213: ...to Online mode The Online status indicator is illuminated The UPS status indicates ONLINE The UPM status indicates ONLINE 7 4 4 Start Energy Saver System High Alert Mode from the UPS Command Menu To s...

Страница 214: ...ximately twenty seconds the UPS calculates the required number of UPMs needed to support the load The Online status indicator is illuminated The UPS status indicates ONLINE VMMS The UPM status indicat...

Страница 215: ...starts High Alert mode with the UPMs online supplying the critical load After one hour the UPS transfers to Variable Module Management System mode The Online status indicator is illuminated The UPS st...

Страница 216: ...Menu To enable Energy Saver System mode NOTE The Energy Saver System mode commands are displayed only if enabled at the factory or by an Eaton Customer Service Engineer NOTE The Variable Module Manag...

Страница 217: ...to Online mode The Online status indicator is illuminated The UPS status indicates ONLINE The UPM status indicates ONLINE 7 4 11 Start Energy Saver System High Alert Mode from the Bypass Command Menu...

Страница 218: ...SELECT pushbutton on the Bypass Command menu bar If the UPS is online the UPS transfers to Variable Module Management System mode In approximately twenty seconds the UPS calculates the required number...

Страница 219: ...the CONTROLS pushbutton on the System Status menu bar The Bypass Control Command screen is displayed 4 On the Bypass Control Command screen select START HIGH ALERT 5 Press the SELECT pushbutton on the...

Страница 220: ...menu bar 16 Verify the following messages display sequentially on the UPM status line DC STARTING CHARGER OFF INVERTER STARTING INVERTER SYNCING READY The UPM 1 rectifier and inverter turn on If the...

Страница 221: ...wing the door open see Figure 4 1 on page 4 2 2 If the UPS contains input breaker CB1 verify that input breaker CB1 is open 3 Close the UPS input feeder circuit breaker 4 Close the UPS Bypass input fe...

Страница 222: ...uptions and abnormalities 1 On any UPS press the CONTROLS pushbutton on the main menu bar The System Status screen is displayed 2 On the System Status screen select the BYPASS command 3 Press the CONT...

Страница 223: ...us screen select the UPM command The UPS Control Command screen screen is displayed 4 On the UPS Control Command screen select the UPM 1 command 5 Press the CONTROLS pushbutton on the UPS Control Comm...

Страница 224: ...odule remains on The remaining UPMs supply the critical load 7 To turn off the power module press the CONTROLS pushbutton on the UPS Control Command menu bar The UPM Control Command screen is displaye...

Страница 225: ...the MOB for the UPS being shut down 2 On the UPS to shut down press the CONTROLS pushbutton on the main menu bar The System Status screen is displayed 3 On the System Status screen select the BYPASS c...

Страница 226: ...pushbutton on the main menu bar The System Status screen is displayed 3 On the System Status screen select the BYPASS command 4 Press the CONTROLS pushbutton on the System Status menu bar The Bypass C...

Страница 227: ...xpected event and will clear upon UPS restart 7 4 24 Single UPS Restart To restart a single UPS from a shutdown state 1 Close the MOB for the UPS being restarted 2 Close UPS input and bypass feeder ci...

Страница 228: ...roximately one minute for the UPS to achieve Online mode The Online status indicator is illuminated The UPS status indicates ONLINE The UPM status indicates ONLINE CHARGER ON 7 4 25 UPS and Critical L...

Страница 229: ...n off until restarted NOTE The UPS Load Off controls each UPS independently and does not shut down the whole distributed bypass system unless all UPSs have been transferred to bypass To immediately sh...

Страница 230: ...d or abort the shutdown CAUTION All power to the critical load is lost when LOAD OFF is selected in the following step You should use this feature only when you want to de energize the critical load 6...

Страница 231: ...d it may not activate in the same manner refer to the operating instructions provided with the switch To use the REPO switch 1 Firmly push the red pushbutton until it locks into place The switch latch...

Страница 232: ...UPS OPERATING INSTRUCTIONS Eaton 9395 UPS 450 825 kVA Installation and Operation Manual S 164201725 Rev 4 www eaton com powerquality 7 52 This page intentionally left blank...

Страница 233: ...of band remote notification and monitoring using modem communication directly to cell phones and pagers S Relay Interface Card AS 400 has isolated dry contact Form C relay outputs for UPS status Util...

Страница 234: ...es the status of the Eaton 9395 UPS on a daily basis All data gathered from the unit current and historical is analyzed at the Customer Reliability Center CRC for trending issues A set of factors or r...

Страница 235: ...rd of critical power events and notification of important UPS or power information With custom views for monitoring status and metering information various user groups can select the most useful view...

Страница 236: ...e UPS and modem 8 5 Terminal Mode In Terminal mode the user can request the following functions NOTE The brackets in the following bullets indicate standard keyboard characters To use a key combinatio...

Страница 237: ...through the serial port to the device connected to the port The printed log entries contain a time and date stamp and the alarm text message Terminal mode uses this format for printing alarm entries M...

Страница 238: ...21 25 20 515 N011 OUTPUT UNDER OR OVER FREQ PM1 03 16 2099 21 25 20 675 S302 EEPS CONFIGURING PM1 03 16 2099 21 25 23 475 N267 POWER MODULE CABLE FAIL 15 PM1 03 16 2099 21 25 25 180 N271 DC HW AMPS L...

Страница 239: ...se a normally closed or normally open contact If the state of the contact changes from the state you specify as normal a signal is issued You can connect this contact to equipment at your facility suc...

Страница 240: ...BYPASS The bypass source is supplying the critical load Usually this means that the UPS is not energized The load is not protected in Bypass mode and a horn sounds after 30 seconds UPS ALARM The UPS s...

Страница 241: ...tors labeled J1 through J4 Figure 8 4 Relay Interface Module II Customer Interface Connectors J1 through J4 The RIM II can provide the status and alarm signals shown in Table 8 2 Table 8 2 Customer In...

Страница 242: ...M II can be flush mounted or surface mounted on a desktop or secured to a wall Figure 8 5 shows the SCM II Figure 8 5 Supervisory Contact Module II Enclosure The SCM II provides signals for the indica...

Страница 243: ...h the cabinet doors open or protective panels removed Do not make any assumptions about the electrical state of any cabinet in the UPS system Because each battery string is an energy source in itself...

Страница 244: ...aragraph 3 2 1 on page 3 1 and Chapter 10 Product Specifications 4 Ensure the UPS is in Online mode Online status indicator is illuminated If an alarm lamp is illuminated or the Online status indicato...

Страница 245: ...he cabinet c If the UPS is a continuous static switch configuration unfasten the front door latch and swing the door open see Figure 4 1 on page 4 2 d Pull the foam filters over the screw heads on the...

Страница 246: ...Installation and Operation Manual S 164201725 Rev 4 www eaton com powerquality 9 4 Bottom Left ISBM Air Filters Bottom Right ISBM Air Filters Middle Right ISBM Air Filter Figure 9 2 ISBM Section Air...

Страница 247: ...UPS MAINTENANCE Eaton 9395 UPS 450 825 kVA Installation and Operation Manual S 164201725 Rev 4 www eaton com powerquality 9 5 UPM Air Filters Figure 9 3 Two UPM Section Air Filter Locations...

Страница 248: ...rew and two bottom screws securing the FI UPM front panel refer to the Eaton 9395 Field Installed UPM Mechanical Installation Manual listed in paragraph 1 8 on page 1 10 Lift the panel straight up to...

Страница 249: ...n to bolted connections Maintenance procedures should specify that the bolted connections be retorqued to values listed in this manual 9 2 4 ANNUAL Maintenance Annual preventive maintenance should be...

Страница 250: ...current or fire Observe proper precautions ATTENTION S Une batterie peut pr senter un risque de choc lectrique de brulure ou d incendie Suivre les pr cautions qui s imposent S Pour le remplacement ut...

Страница 251: ...0 two UPM 500 kVA 50 60 Hz Eaton 9395 825 550 two UPM 550 kVA 50 60 Hz 10 2 Specifications The following sections detail the input output environmental and battery specifications for the UPS 10 2 1 UP...

Страница 252: ...hronous to Bypass 10 to 10 3 Frequency Slew Rate 1 Hz per second maximum Load Compatibility 0 9 pF Leading 0 8 pF Lagging Overload Capability 110 for 10 minutes 125 for 30 seconds 150 for 10 seconds 1...

Страница 253: ...USA or Agent outside of the USA performs startup and commissioning of the Product b if the Product is moved to a new location by someone other than an authorized Eaton Customer Service Engineer in th...

Страница 254: ...WARRANTY Eaton 9395 UPS 450 825 kVA Installation and Operation Manual S 164201725 Rev 4 www eaton com powerquality W 2...

Страница 255: ......

Страница 256: ...1642017254 164201725 4...

Отзывы: