
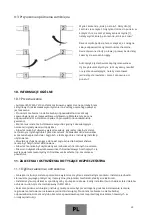


2.6 Installing the rear bracket to metal posts
a)
Attach the brackets to metal posts in the axis of the post.
b)
Set the bracket in the position that enables horizontal operation of the actuator (maintain the distance
“
E
”
between the connector on the gate and the bracket on the post, specified in the image above).
c)
The bracket should be attached with M8x130 carriage bolts.
d)
In the case of a 100x100 post, fasten the front connector with the
∅
4 hole on the inside (see the image
below).
e)
In the case of a 120x120 post, attach the bracket to the post with a M8x150 carriage bolt.
f)
Attach the front connector with the
∅
4 hole on the outside (see the image below).
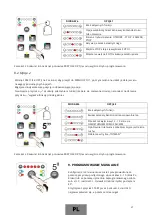
2.7 Installing the actuator arm
Insert the key (1) and rotate it 360° to the left to
unlock the device.
The device is unlocked.
33
Содержание 210
Страница 1: ......
Страница 13: ...3 INSTRUKCJA MONTAŻU JEDNOSTKI STEROWNICZEJ 12 ...
Страница 15: ...3 3 Połączenie elektryczne 14 ...
Страница 39: ...3 CONTROL UNIT INSTALLATION INSTRUCTIONS 38 ...
Страница 41: ...3 3 Electrical connections 40 ...
Страница 65: ...3 MONTAGEANLEITUNG FÜR DIE STEUERUNG 64 ...
Страница 67: ...3 3 Elektrische Verbindung 66 ...
Страница 91: ...3 NÁVOD NA MONTÁŽ OVLÁDACÍ JEDNOTKY 90 ...
Страница 93: ...3 3 Elektrické připojení 92 ...
Страница 117: ...3 MONTÁŽ RIADIACEJ JEDNOTKY 116 ...
Страница 119: ...3 3 Elektrické zapojenie 118 ...
Страница 143: ...3 VEZÉRLŐ EGYSÉG SZERELÉSI UTASÍTÁSA 142 ...
Страница 145: ...3 3 Elektromos bekötés 144 ...