background image


6


strong magnetic fields or radio waves to prevent them 
from damaging the product or affecting the sound and 
picture quality.


In the unlikely event of overheating, smoke or unpleasant 
odours coming from the unit, disconnect it immediately 
from the charging cable and remove the battery to avoid 
fire.


Please do not disassemble the product. 


Doing so will void any warranty.


Please dispose of the waste and residues at the end of the 
product's life in accordance with local laws and 
regulations. 


Operating environment 


To avoid condensation inside the housing or behind the lens,


the product should not be exposed to large differences in


temperature and humidity. 


Store the product in a cool place (at room temperature) in a 
dry and dust-free environment and never expose it to high 
temperatures or prolonged exposure to direct sunlight.


Protect the product from falls, bumps and knocks.


Содержание GOXTREME VISION+

Страница 1: ...net ES Puede encontrar un manual en su idioma en Internet PT Um manual em seu idioma pode ser encontrado na Internet PL Instrukcję w swoim języku możesz znaleźć na stronie SWE En handbok på ditt språk finns på Internet NL Een handleiding in uw taal vindt u op internet https bit ly VisionPlus21 www easypix info download manuals download goxtreme_vision_plus ...

Страница 2: ...2 Turn on off the camera 9 Step 3 Touch screen 9 Step 4 Setting the language 10 Step 5 Insert and format the MicroSD card 11 Step 6 Set date and time 12 Step 7 Switching between modes 12 Step 8 Changing the video photo settings 13 Camera settings 14 Video and photo functions 17 Shortcuts 19 Playback mode 20 Remote control 21 Connection to the XDV PRO app 21 Technical specifications 24 Box contents...

Страница 3: ...e let us know All relevant state regional and local safety regulations must be observed when installing and using this product For safety reasons and to ensure compliance with the documented system data only the manufacturer may carry out repairs on components Failure to observe this information may result in personal injury or equipment damage Copyright Easypix GmbH All rights reserved No part of...

Страница 4: ...on using the product has read and follows these warnings and instructions Keep all safety information and instructions for future reference and pass them on to subsequent users of the product The manufacturer is not liable for damage to property or personal injury resulting from incorrect handling or failure to observe the safety instructions Explanation of symbols Warning indicates a hazard with ...

Страница 5: ...s waterproof up to 30m as well as a wide range of additional brackets and accessories such as the wrist worn remote control Intended use This product is suitable for use during various sports or activities The supplied brackets allow the camera to be mounted in multiple positions on a bicycle helmet or on the body Restrictions The product is not suitable for children under 3 years of age Contains ...

Страница 6: ...clean the housing under tap water and allow it to dry After use under water the housing must be left open to dry in order to prevent condensation or rust formation Safety Instructions This product is only suitable for the purpose described The manufacturer is not liable for damage caused by improper use Please read these operating instructions carefully before use Always protect your camera from f...

Страница 7: ... Doing so will void any warranty Please dispose of the waste and residues at the end of the product s life in accordance with local laws and regulations Operating environment To avoid condensation inside the housing or behind the lens the product should not be exposed to large differences in temperature and humidity Store the product in a cool place at room temperature in a dry and dust free envir...

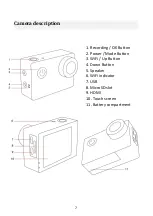
Страница 8: ...7 Camera description 1 Recording OK Button 2 Power Mode Button 3 WiFi Up Button 4 Down Button 5 Speaker 6 WiFi indicator 7 USB 8 MicroSD slot 9 HDMI 10 Touch screen 11 Battery compartment ...

Страница 9: ...the device away from children during charging Ensure that the camera is turned off during charging If the camera switches on automatically when connected to a power source please turn it off to ensure the battery can be fully charged Product should only be charged via the USB port of a computer or USB power supply with a maximum output of 1050mAh Disconnect the USB cable connected to the product b...

Страница 10: ... To turn off the camera press and hold the Power button again for about 3 seconds Step 3 Touch screen The camera s screen is a touch screen so you can operate the camera conveniently by touching the screen Mode Resolution Playback Battery level STANDBY MODE Swipe to the right to unlock the screen Settings ...

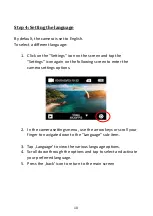
Страница 11: ... again on the following screen to enter the camera settings options 2 In the camera settings menu use the arrow keys or scroll your finger to navigate down to the Language sub item 3 Tap Language to view the various language options 4 Scroll down through the options and tap to select and activate your preferred language 5 Press the back icon to return to the main screen ...

Страница 12: ...ng a lower speed card may cause data transfer speed problems due to the large file size that a 4K video produces The recording time depends on the selected resolution A MicroSD card is not supplied with this product ATTENTION Formatting deletes all files on the card Format the MicroSD card 1 Click on the Settings icon on the screen and select Settings again 2 In the settings menu use the arrow key...

Страница 13: ...w keys or by scrolling with your finger 3 Set the time or date by tapping each of the on screen options and their corresponding up and down arrows Step 7 Switching between modes The Power key is also the Mode key Press this key to switch between the different modes of operation Video Photo Video etc You can also switch between modes by swiping the screen with your finger from left to right ...

Страница 14: ...When the camera is switched on it is in video mode by default Press the Mode button or swipe the screen to switch to Photo mode 2 To change the settings of your photo or video recordings tap the Settings icon in each mode 3 Then scroll to the function or settings you want to change Video photo settings General settings Back Detailed settings ...

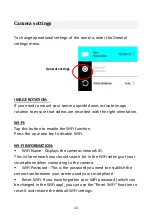
Страница 15: ...up arrow key to disable WiFi WI FI INFORMATION WiFi Name Displays the cameras network ID This is the network you should search for in the WiFi settings of your smartphone when connecting to the camera WiFi Password This is the password you need to establish the connection between your camera and your smartphone Reset WiFi If you have forgotten your WiFi password which can be changed in the WiFi ap...

Страница 16: ...REEN SAVER To prolong battery life the screen can be turned off after a preset time If the screen turns off during recording it will not affect the recording Simply press the shutter button to turn the screen back on AUTO POWER OFF To prolong battery life the camera can be turned off automatically after a preset time SOUND SETTINGS Controls the volume of the key tones DATE FORMAT Choose your prefe...

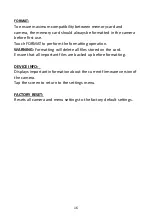
Страница 17: ...m the formatting operation WARNING Formatting will delete all files stored on the card Ensure that all important files are backed up before formatting DEVICE INFO Displays important information about the current firmware version of the camera Tap the screen to return to the settings menu FACTORY RESET Resets all camera and menu settings to the factory default settings ...

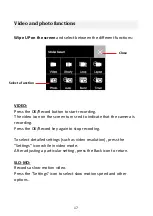
Страница 18: ...ed to indicate that the camera is recording Press the OK Record key again to stop recording To select detailed settings such as video resolution press the Settings icon while in video mode After adjusting a particular setting press the Back icon to return SLO MO Records a slow motion video Press the Settings icon to select slow motion speed and other options Select a function Close ...

Страница 19: ...video with only a few minutes playing time This creates a time lapse effect Press the Settings icon to configure the settings PHOTO Press the Record button to take a photo The photo icon on the screen will flash red briefly to indicate that a photo has been taken To make detailed settings such as image resolution then press the Settings icon After adjusting a particular setting press the Back icon...

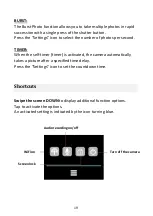
Страница 20: ...second TIMER When the self timer timer is activated the camera automatically takes a picture after a specified time delay Press the Settings icon to set the countdown time Shortcuts Swipe the screen DOWN to display additional function options Tap to activate the options An activated setting is indicated by the icon turning blue WiFi on Screen lock Audio recording on off Turn off the camera ...

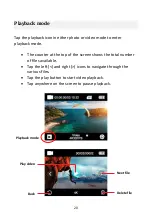
Страница 21: ...ode The counter at the top of the screen shows the total number of files available Tap the left and right icons to navigate through the various files Tap the play button to start video playback Tap anywhere on the screen to pause playback Playback mode Play video Back Next file Delete file ...

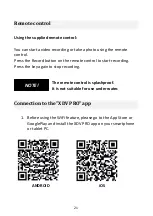
Страница 22: ...rd button on the remote control to start recording Press the key again to stop recording The remote control is splashproof It is not suitable for use under water Connection to the XDV PRO app 1 Before using the WiFi feature please go to the App Store or GooglePlay and install the XDV PRO app on your smartphone or tablet PC ANDROID iOS NOTE ...

Страница 23: ...e connection is confirmed exit the smartphone WiFi settings screen and open the XDV Pro app to complete the connection Ensure that you have downloaded the correct app Please note that wireless transmission of files via the app is not possible for videos with a resolution of more than 1080p Files with a resolution greater than 1080p can only be transferred using a computer or card reader When you u...

Страница 24: ... WiFi router regularly used by you your smartphone will often connect automatically to the router network as a priorty as your smartphone will have saved the router password rather than to the camera In this case please try to connect the camera to your smartphone while maintaining a distance further away from the router so that it does not connect to the router network ...

Страница 25: ...rproof housing Waterproof up to 30m Microphone Loudspeaker Integrated Wide angle 170 slow motion 1080p 4x 2x 720p 8x 4x Time lapse video 0 5s 1s 2s 5s 10s 30s 60s Time lapse photo 3s 10s 15s 20s 30s Photo intervals Series pictures 3 fps 5 fps 10 fps Loop recording 5min 10min 20min 60min intervals Self timer Off 3s 5s 10s 20s White Balance Car Daylight Cloudy Incandescent Fluorescent WiFi function ...

Страница 26: ...lass10 cards or higher Card not included Box contents Camera Waterproof housing Second cover for the housing not waterproof Remote control Orientation adaptors Tripod adapter Monopod adapter Clip Mount Bicycle mount Helmet mount Frame Mount Battery USB cable Manual EN DE Operating instructions in other languages are available for download at https bit ly VisionPlus21 or www easypix info download m...

Страница 27: ...aste electrical and electronic equipment and or batteries disposed of by users in private households in the European Union This symbol on the product or on its packaging indicates that it cannot be disposed of with household waste You must dispose of your old appliance and or battery by handing it over to the applicable collection system for the recycling of electrical and electronic equipment and...

Страница 28: ... the battery is replaced by an incorrect type there is a risk of explosion Keep the battery away from children Batteries can explode if exposed to an open fire Never throw batteries into fire Dispose of used batteries according to local regulations Before disposing of the device remove the battery and dispose of it separately Declaration of conformity The EC declaration of conformity for the produ...

Отзывы: