background image

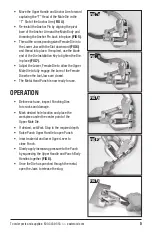
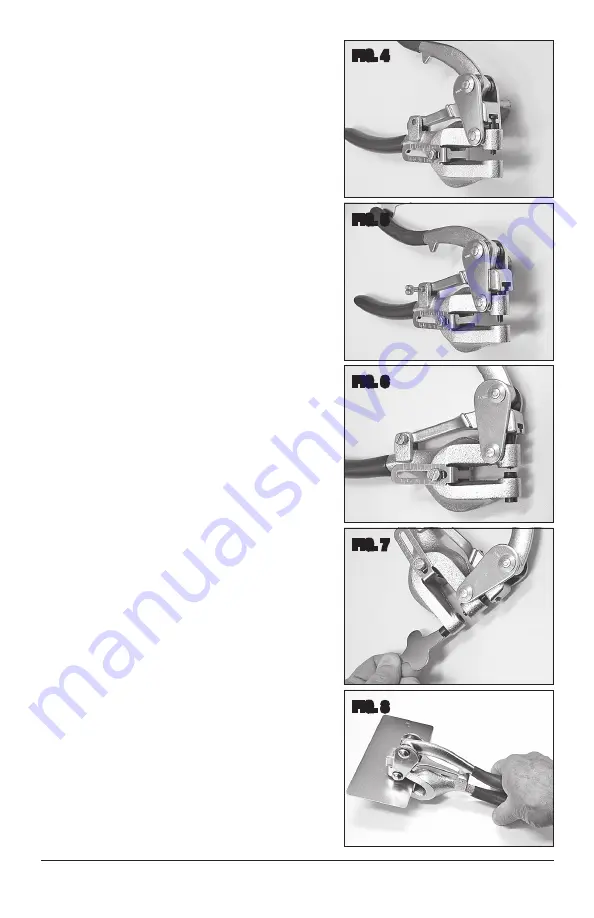
•  Move the Upper Handle and Anchor Arm forward 

capturing the “T” Head of the Male Die in the  
“T” Slot of the Anchor Arm

 (FIG 4)

.

•  Re-install the Anchor Pin by aligning the pivot 

bore of the Anchor Arm and the Main Body and 
threading the Anchor Pin back into place 

(FIG 5)

.

•  Thread the corresponding sized Female Die into 

the Lower Jaw with the Slot downward 

(FIG 6)


and thread into place. If required, use the blade 
end of the Die Installation Key to tighten the Die 
in place 

(FIG 7)

.

•  Adjust the Lower, Female Die to allow the Upper 

Male Die to fully engage the bore of the Female 
Die when the tool Jaws are closed.

•  The Metal Hand Punch is now ready for use.

OPERATION

•  Before each use, inspect Punching Dies  

for cracks and damage.

•  Mark desired hole location and place the  

workpiece under the center point of the  
Upper Male Die.

•  If desired, set Work Stop to the required depth.
•  Raise Punch Upper Handle to open Punch.
•  Insert material and lower Upper Lever to  

close Punch.

•  Slowly apply increasing pressure to the Punch 

by squeezing the Upper Handle and Punch Body 
Handles together 

(FIG 8)

.

•  Once the Die has punched through the metal, 

open the Jaws to release the slug.

To order parts and supplies: 800.343.9353  >>  eastwood.com 

5

FIG. 4

FIG. 5

FIG. 6

FIG. 7

FIG. 8

Содержание 32559

Страница 1: ...14 GAUGE METAL HAND PUNCH INSTRUCTIONS Item 32559...

Страница 2: ...nd Die Installation Tool CONTENTS 1 Metal Hand Punch with Depth Stop Gauge 1 Die Installation Key 1 Complete Set of 7 Male and Female Punch Dies 3 32 2 38mm 1 8 3 18mm 5 32 3 97mm 3 16 4 76mm 7 32 5 5...

Страница 3: ...ye protection when operating this tool Strenuous physical force may need to be applied to the Metal Hand Punch during use Failure to ensure proper footing can quickly result in a fall which could infl...

Страница 4: ...ve scale or remaining coatings Clean or repair as necessary or discard and begin with a new piece Also inspect Metal Hand Punch components for looseness or damage DIE INSTALLATION AND REPLACEMENT Usin...

Страница 5: ...er Male Die to fully engage the bore of the Female Die when the tool Jaws are closed The Metal Hand Punch is now ready for use OPERATION Before each use inspect Punching Dies for cracks and damage Mar...

Страница 6: ...ies for cracks or damage If damage is present do not use tool After each use clean tool of any debris and inspect punching dies for damage Apply a thin coat of machine oil on all Punching Die surfaces...

Страница 7: ...er Die Binding at Release With Lower Die Metal work piece too thick or too hard Stop all action to avoid serious damage Do not exceed material limitations described in the SPECIFICATIONS section Metal...

Страница 8: ...l Assistance Service Department 800 343 9353 email tech eastwood com PDF version of this manual is available at eastwood com The Eastwood Company 263 Shoemaker Road Pottstown PA 19464 USA 800 343 9353...

Отзывы: