


4
Eastwood Technical Assistance: 800.343.9353 >> [email protected]
FIG. 1
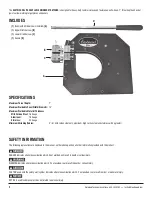
SET-UP
• The optionally available Eastwood Elite Deep Jaw Shrinker Stretcher
Stand (#21491) is strongly suggested for mounting the Shrinker
Stretcher. See Eastwood Elite Deep Jaw Shrinker Stretcher Stand
instruction manual for stand mounting.
• As an alternative, a sturdy, well anchored workbench with a mini-
mum 3/16” steel or 3/4” of a solid wood surface is recommended.
• Select a clean, level work surface with clear access to Handle and
sufficient room to manipulate workpieces through the Jaws.
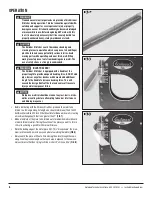
• With the (2) outer-most threaded holes in the base
(FIG 1)
as
a guide, mark the locations and centers on a piece of paper
with a pencil.
• Transfer the hole locations, then drill (2) 1/2” [12mm] mounting
holes in work surface.
NOTE:
A minimum thickness of 3/16” steel
or 3/4” of a solid wood surface is strongly recommended.
• Use (2) M10 x 40mm bolts (not included) and washers to secure
base to work surface.
NOTE:
Center hole enables the use of mounting holes drilled for
Eastwood #51088 Shrinker/Stretchers.
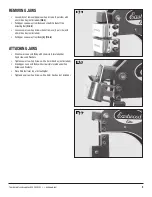
ASSEMBLY
• Place Handle [D] into bore in Fulcrum Lever
(FIG 2)
so that the
annular groove is positioned under the Set Screw.
• Using a 3mm Hex Key (not included) tighten Set Screw in
Fulcrum Lever to retain Handle
(FIG 3)
.
SWITCHING JAWS
• The Upper and Lower Shrinker and Stretcher Jaws are retained
by (4) Socket Head Cap Screws and washers each.
FIG. 2
FIG. 3
M10
Mounting Holes
✓
✓


