background image

t

P

2

1

P

P

2

1

7

5

6

7

8

t

P

1

t

C

2

1

12

13

1.1

1.2

2.2

1.1

1.2

2.2

A1

A2

9

11

10

4

2

1

M

3

1

2

1

PE

2

1

4

3

1.2

2.2

1.1

2.1

S2

S1

CB

PS

S3

S4

DS1

S5

K1

K3

K2

T1

K4

Br

B

Br

B

Br

B

Bk

Bk

Br

Br

B

B

B

B

B

B

B

B

B

R

R

R

R

Or

Y

Or

Y

Y

G

G

Or

Br

Pk

Or

Or

W

W

W

B

B

B

Br

G

Or

Or

B

B

B

B

B

B

R

Or

Or

Or

R

Bk

E-Tech W 

: 664Y6500 • B

en

16

EN

FR

NL

ES

IT

DE

PL

RU

INSTALLATION

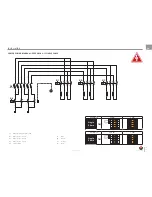
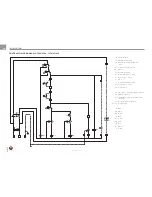
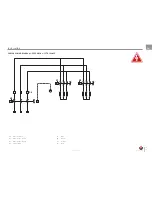
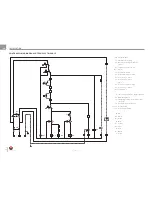
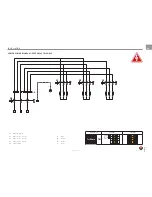
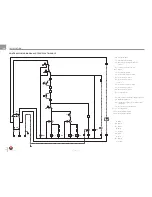
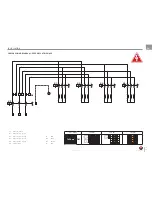
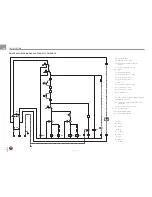
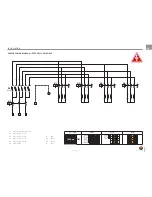
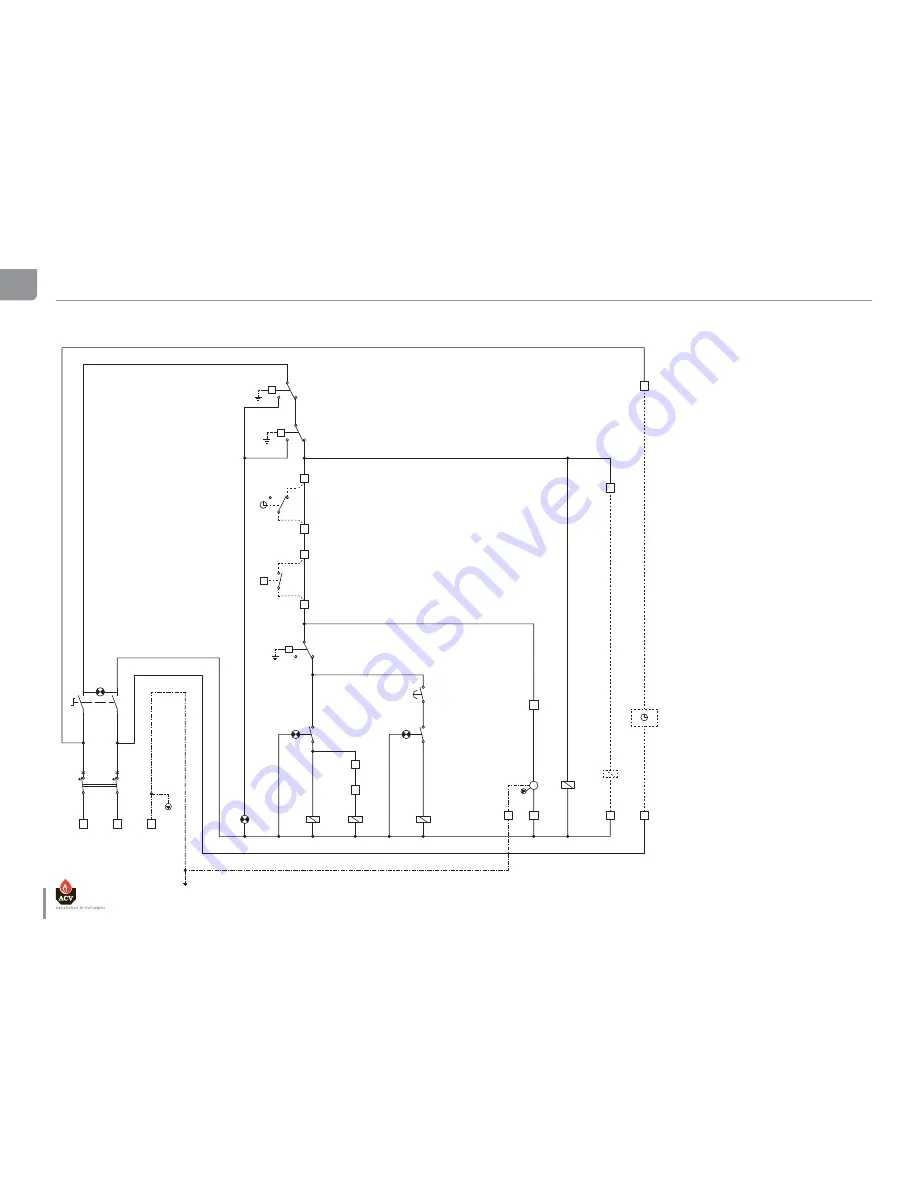
CONTROL WIRING DIAGRAM : E-TECH W 09 - 15 SINGLE PHASE


CB :  Circuit breaker


S1 :  ON/OFF lamp


S2 :  Manual reset safety thermostat 

[103°C]


PS :  Low-water pressure switch


DS1 :  Alarm


S3 :  Control thermostat


S4 :  Power switch level 1 + lamp


K1 :  Power relay 1 - level 1


K3 :  Power relay 2 - level 1


T1 :   Timer


S5 :  Power switch level 2 + lamp


K2 :  Power relay 1 - level 2


K4 :  Safety switch


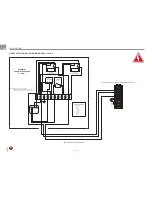
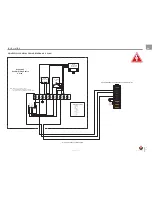
1-2 :  Time clock or controller supply (optional)


3-4 :  DHW kit (optional)


5-6 :  Stop Bridge or time clock switch control 

(optional)


7-8 :  Room thermostat (optional)

 9-10-11 :  Heating pump
  12-13 :  Relay K3 deactivated


B :   Blue


Bk :   Black


Br :   Brown


G :   Grey


Or :   Orange


Pk :   Pink


R :   Red


W :   White


Y :  Yellow

Содержание E-Tech W 09

Страница 1: ...664Y6500 B EN FR NL ES IT DE PL RU INSTALLATION OPERATION AND MAINTENANCE INSTRUCTIONS 09 15 22 28 36 Single Tri Phase...

Страница 2: ...mensions 10 Installation room 10 Disassembling 11 Heating connection 12 Heating connection dHW Y PLAN 12 Heating connection dHW S PLAN 12 Connecting the power supply 13 Connecting the electrical Acces...

Страница 3: ...ommend that the boiler be handled by two people until it is securely fixed to a wall The safest route from the vehicle to the point of installation should be carefully assessed before unloading the bo...

Страница 4: ...low direct connection to a heating system without the need for a feed and expansion cistern These components include primary 10 litre expansion vessel suitable for a system water content of up to 160...

Страница 5: ...FR NL ES IT DE PL RU INTRODUCTION LEGEND 1 Relay 2 Timer 3 Control terminals 4 Circuit breaker 5 Safety switch 6 Power terminals with fuse 25A or 32A 7 Power terminals E Tech W 09 15 Single Phase E T...

Страница 6: ...ng normal boiler operation depending on boiler temperature If the boiler is not in regular daily use during cold periods it is recommended that it be fitted with a frost sensing thermostat to override...

Страница 7: ...working pressure bar 3 Min working pressure bar 0 8 Max working temperature C 87 Hydraulic pressure drop E Tech W 09 Single Tri mbar 10 E Tech W 15 Single Tri mbar 20 E Tech W 22 Tri mbar 45 E Tech W...

Страница 8: ...14 4 Single Phase 9 6 kW 12 12 13 13 14 14 15 15 Terminal L1 A 20 8 20 8 41 6 Terminal N A 20 8 20 8 41 6 Power kW 4 8 4 8 9 6 ELECTRIC DATA OF MODEL 09 TRI PHASE STAGE 1 2 TOTAL Tri Phase 8 4 kW Term...

Страница 9: ...al L3 A 20 8 20 8 41 6 Power kW 14 4 14 4 28 8 Tri phase 21 6 kW 12 12 13 13 14 14 15 15 Terminal L1 A 20 8 10 4 31 2 Terminal L2 A 20 8 10 4 31 2 Terminal L3 A 20 8 10 4 31 2 Power kW 14 4 7 2 21 6 E...

Страница 10: ...suitable external frost thermostat should be fitted CONNECTING TO THE SYSTEM the boiler is designed to operate on a sealed system ie no open vent or feed and expansion cistern Hot water expansion with...

Страница 11: ...DISASSEMBLING Panel removal and access to hydraulic connections 1 Undo screws 2 Tilt panel towards you and lift clear remove the top cover 3 Loosen screws of the control panel 4 Turn up the control pa...

Страница 12: ...9 2 8 27 26 25 24 23 2 2 2 1 1 9 40 2 0 1 8 17 16 15 14 13 1 2 1 1 9 3 0 1 0 8 7 6 5 4 3 2 1 3 9 3 8 37 36 35 34 33 3 2 3 1 2 9 2 8 27 26 25 24 23 2 2 2 1 1 9 40 2 0 1 8 17 16 15 14 13 1 2 1 1 9 3 0 1...

Страница 13: ...0 Hz en 13 E Tech W 664Y6500 B EN FR NL ES IT DE PL RU INSTALLATION CONNECTING THE POWER SUPPLY This appliance must be permanently connected to fixed wiring and must be earthed The wiring must be carr...

Страница 14: ...or controller supply optional 3 4 DHW kit optional 5 6 Stop Bridge or time clock switch control optional 7 8 Room thermostat optional 9 10 11 Heating pump 12 13 Relay K3 deactivated 1 2 Time clock or...

Страница 15: ...insulation the wires canalisation the mounting and the environment The following values are given for information for an ambient temperature of 30 C and a maximal length of 5 meters In all the cases t...

Страница 16: ...H W 09 15 SINGLE PHASE CB Circuit breaker S1 ON OFF switch lamp S2 Manual reset safety thermostat 103 C PS Low water pressure switch DS1 Alarm S3 Control thermostat S4 Power switch level 1 lamp K1 Pow...

Страница 17: ...DE PL RU INSTALLATION POWER WIRING DIAGRAM E TECH W 09 15 SINGLE PHASE E Tech W 09 8 4 kW 5 6 kW Single Phase TB1 12 12 13 13 14 14 15 15 12 12 13 13 14 14 15 15 E Tech W 15 14 4 kW 9 6 kW Single Phas...

Страница 18: ...IRING DIAGRAM E TECH W 09 15 TRI PHASE CB Circuit breaker S1 ON OFF switch lamp S2 Manual reset safety thermostat 103 C PS Low water pressure switch DS1 Alarm S3 Control thermostat S4 Power switch lev...

Страница 19: ...k R Or Bk R Or B B B B B B Bk R Or Bk R en 19 E Tech W 664Y6500 B EN FR NL ES IT DE PL RU INSTALLATION POWER WIRING DIAGRAM E TECH W 09 15 TRI PHASE S6 Power terminals K1 Power relay 1 level 1 K2 Powe...

Страница 20: ...TECH W 22 TRI PHASE CB Circuit breaker S1 ON OFF switch lamp S2 Manual reset safety thermostat 103 C PS Low water pressure switch DS1 Alarm S3 Control thermostat S4 Power switch level 1 lamp K1 Power...

Страница 21: ...Bk R R en 21 E Tech W 664Y6500 B EN FR NL ES IT DE PL RU INSTALLATION POWER WIRING DIAGRAM E TECH W 22 TRI PHASE E Tech W 22 21 6 kW 14 4 kW Tri Phase TB1 12 12 13 13 14 14 15 15 12 12 13 13 14 14 15...

Страница 22: ...SE CB Circuit breaker S1 ON OFF switch lamp S2 Manual reset safety thermostat 103 C PS Low water pressure switch DS1 Alarm S3 Control thermostat S4 Power switch level 1 lamp K1 Power relay 1 level 1 K...

Страница 23: ...Tech W 664Y6500 B EN FR NL ES IT DE PL RU INSTALLATION POWER WIRING DIAGRAM E TECH W 28 TRI PHASE E Tech W 28 28 8 kW 21 6 kW 14 4 kW Tri Phase TB1 12 12 13 13 14 14 15 15 12 12 13 13 14 14 15 15 12 1...

Страница 24: ...SE CB Circuit breaker S1 ON OFF switch lamp S2 Manual reset safety thermostat 103 C PS Low water pressure switch DS1 Alarm S3 Control thermostat S4 Power switch level 1 lamp K1 Power relay 1 level 1 K...

Страница 25: ...R R en 25 E Tech W 664Y6500 B EN FR NL ES IT DE PL RU INSTALLATION POWER WIRING DIAGRAM E TECH W 36 TRI PHASE E Tech W 36 36 kW 27 kW 18 kW Tri Phase TB1 12 12 13 13 14 14 15 15 12 12 13 13 14 14 15 1...

Страница 26: ...7 8 9 10 V4043H DHW ZONE VALVE MOTOR Honeywell Sundial Wiring Centre S Plan Note Earth wires not shown for clarity During installation the earth wires from each component connect to terminal 3 in the...

Страница 27: ...wires from each component connect to terminal 3 in the wiring centre bk black br brown r red w white y yellow o orange b blue v violet p pink gr grey CABLE COLOUR CODES gr b b b o 1 2 C HW OFF V4073A...

Страница 28: ...stage 1 the first stage contactors will energise 6 Switch on the power levels switch stage 2 after a short delay the second stage contactors will energise Note the power stage delay timer settings sh...

Страница 29: ...en 29 E Tech W 664Y6500 B EN FR NL ES IT DE PL RU REMOVAL THE HEATING ELEMENTS 3 1 2...

Страница 30: ...E Tech W 664Y6500 B en 30 EN FR NL ES IT DE PL RU...

Отзывы: