background image


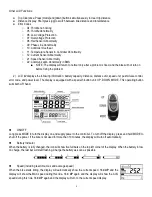
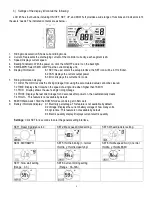
Distance and Current Ride Time 

Press 

MODE 

to switch between riding distance and total distance. This function is convenient for users 

to check the riding distance (TRIP) and the total distance (ODO). 


Walk Assist 

Press and hold DOWN to start walk assist mode. The bike will keep moving at an even speed of 6km/h. 

Release the button to exit walk assist mode. 

IMPORTANT!

 Walk assist can only be used when pushing the bike when walking next to it. Do not 

start this function when riding! 


Backlight 

Hold 

UP 

button


for 3 seconds to turn on the backlight, when the surrounding light is not enough or it is 

in the evening. Repeat the action


to turn the backlight off. The backlight brightness can be adjusted in 

the advanced settings.  


PAS Level 

The default pedal assist level of the display is 0. Short press UP or DOWN to change the output power 

of motor from 1 to 5, 1 is the lowest power, 5 is the highest. It is recommended to start riding the bike 

at level 0. For safety, when the bike is not in use, remember to switch to level 0 to deactivate the 

PAS/Thumb throttle in order to avoid a hazardous situation. 


Settings 

When the display is turned on, hold both 

UP 

and 

DOWN 

for 2.5 seconds at the same time to enter the settings.  

The first setting parameter is a wheel diameter. The default setting for GADIS is 26 inch. Do not change this setting. After the 

confirmation of the wheel size, short press 

MODE 

to reserve it and enter into the max speed setting. The max speed should 

be set in accordance with the local regulations. The default max speed is 25 km/h. Short press 

MODE

 to continue to the third 

setting parameter, backlight brightness. Press 

UP

 or 

DOWN

 to modify the backlight brightness. Choose from level 1 to level 

3. Level 1 is the minimum brightness. Level 3 is the maximum brightness. Press 

MODE 

to reserve it and enter into the speed 

unit setting (Metric system/British system). Press 

UP

 or 

DOWN

 to choose the display unit (MPH or Km/H). The distance unit 

will change accordingly with the speed unit. To quit the settings state, hold 

MODE

 for 3 seconds to confirm the input, save 

the current setting and exit. 
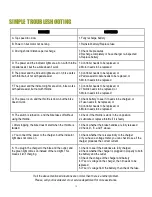


Error Code 

If there is something wrong with the electronic control system, the display will show the error code 

automatically. The following is the definition of the error code. The error interface can be exited only when 

the fault is excluded.  

Error Code 

Definition 

21 

Abnormal Current 

22 

Throttle Fault 

23 

Motor Phase Problem 

24 

Motor Hall Defect 

25 

Brakes Failed 

30 

Abnormal Communication 


FAQ 

Why does not the display turn on?  

Check the connections between the display and the controller. Make sure the battery is charged. 

How can I handle the error code of the display?  

DO NOT attempt to open and/or repair the bike components. Doing so will void the warranty and can result in a safety 

hazard. Visit your local e-JOE Bike Dealer, or call our technical s1-855-888-1891. 


Содержание Gadis

Страница 1: ...GADIS USER MANUAL 48V 500W OR 48V 350W Please read before operating your new e JOE electric bicycle...

Страница 2: ...ctly assembled You can do this either by taking it to your nearest bicycle shop or by inspecting it yourself if you are proficient in bicycle mechanics You must make sure you have the pedals saddle ha...

Страница 3: ...ires Electric System consisting of o Battery inside the frame o Hub motor o LCD Power Assist Display and thumb throttle o Pedal Assist Sensor o Controller o Wire harnesses Seat or saddle attached to t...

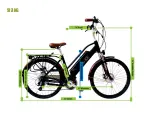
Страница 4: ...STRUCTURE OF YOUR E BIKE...

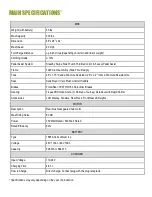
Страница 5: ...SIZING...

Страница 6: ...le Royal Velo Plush Comfort Saddle Brakes Front Rear TEKTRO 160 Rotor Disc Brakes Gearing 7 speed Shimano Acera or Shimano Tourney Derailleur with Rapid Shifter Accessories LCD Display Fenders Rear Ra...

Страница 7: ...es first stand in the front of the bike and locate the main wire harness with the green e JOE logo Connect the wires by matching the colors AND aligning the arrows LCD display green prongs thumb throt...

Страница 8: ...ove lock the battery To see the battery levels use the charge indicator on the handlebar when all lights are lit up NOTE The keys provided are ONLY used to lock and unlock the battery Turning the key...

Страница 9: ...he power to the motor To get the furthest distance it is recommended to pedal the bicycle with the Pedal Assist System ON When riding down hills do not turn off power otherwise the controller and moto...

Страница 10: ...de button for 5 seconds for both ON and OFF General Settings Hold up and down for 3 seconds LCD will enter general settings Display Unit Press up and down to choose a display unit Press mode to save a...

Страница 11: ...control error code and power level The display is equipped with a special 3 button unit UP DOWN MODE This operating button suits both L R hand ON OFF Long press MODE to turn the display on and supply...

Страница 12: ...the confirmation of the wheel size short press MODE to reserve it and enter into the max speed setting The max speed should be set in accordance with the local regulations The default max speed is 25...

Страница 13: ...nnot be cleared 7 2 TIME Displays the time when the speed of a single ride when higher than 1KM H 7 3 TRIP Display shows the user s single riding mileage 7 4 TRIP2 Displays the last ride mileage for 3...

Страница 14: ...off the front cog you can easily adjust the chain tension by loosening the rear axle nuts slightly and adjusting the tension bolts Make sure that the chain runs freely and retighten the axle nuts Dis...

Страница 15: ...original purchase The battery warranty does not include damage from power surges use of improper charger improper maintenance misuse normal wear or water damage LIMITED 30 DAYS FULL REPLACEMENT WARRAN...

Страница 16: ...of purchase photo video evidence of the defective part or product and main product information such as model serial number battery voltage motor wattage STEP 2 Read the respective manual and FAQs for...

Страница 17: ...laced or 3 Controller needs to be replaced or 4 Motor needs to be replaced H The switch is turned on and the bike takes off without using the throttle 1 Check if the throttle is stuck in the on positi...

Страница 18: ...you have any questions comments concerns or would like to share your e JOE bike experience please contact us at Telephone 855 888 1891 Email sales ejoebike com Website www ejoebike net Follow us on Fa...

Отзывы: