Dynatone DPR-1650 Скачать руководство пользователя страница 9

7

Setting Up Your Piano

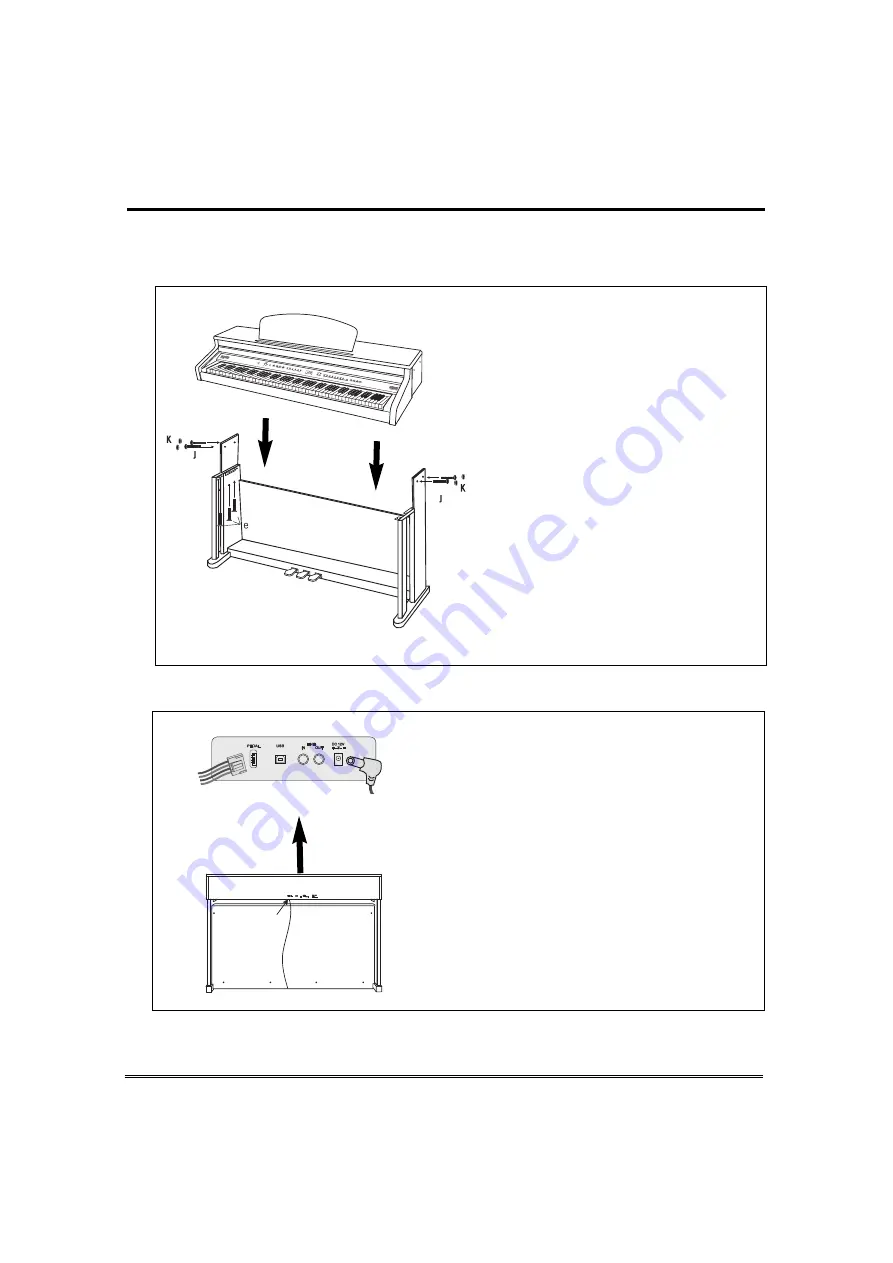
3. Attaching the main unit and stand

Set the stand upright and gently lower the
main unit on the stand.
Attach the main unit to the stand using the
six bolts (e) and four bolts(j) as shown in the
illustration.

After attaching main unit, put four caps
(k)onto four holes of the both legs.

4. Connecting the pedal cord.

Connect the AC Power Adapter.

Insert DC plug at the end of DC cord of the
AC adapter into the piano and AC plug at end
of the AC adapter into a standard AC outlet.

Connecting the Pedal Cord. 

Plug Pedal cord which is protruding from the top of
the pedal assembly into the corresponding port
on bottom of the main unit.

Terminals

Pedal Cord

AC Power Adpter

Содержание DPR-1650

Страница 1: ...OWNER S MANUAL N e w f e e l n e w l o o k a n d n e w s o u n d High Performance Digital Piano DPR 1650 ...

Страница 2: ......

Страница 3: ...t has been tested and found to comply with the limits for a class B digital device pursuant to part 15 of the FCC Rules These limits are designed to provide reasonable protection against harmful interferenceinaresidentialinstallation This equipment generates uses and can radiate radio frequency energy and if not installed and used in accordancewiththeinstructions maycauseharmfulinterference If thi...

Страница 4: ...autions listed below to avoid the possibility of physical injury to you or others damage to the piano or other property These precautions include but are not limited to the following PLEASE READ CAREFULLY BEFORE PROCEEDING Please keep these precautions in a safe place for future reference WARNING Always follow the basic precautions listed below to avoid the possibility of serious injury or even de...

Страница 5: ...ts between the slits of the key cover and keyboard If this happens immediately turn off the power and remove electric plug from outlet and inspect by qualified service personnel ㆍDo not place the piano against a wall allow at least 3 cm one inch from the wall since this can cause inadequate air circulation and possibly result in the piano overheating ㆍRead carefully the SETTING UP YOUR PIANO secti...

Страница 6: ... Voice Reverb Effect Touch Split Layer Using the Metronome SETUP Master Tune Transpose SETUP Octave Local Control Metronome Beat Auto Accompaniment Recording General MIDI Voice Drum Table MIDI Implementation Chart Troubleshooting Specifications 목Contents Contents 4 1 4 5 6 8 12 13 14 15 15 16 16 17 17 18 19 20 21 26 27 30 31 32 ...

Страница 7: ... Digital Piano set consists of the following items Inspect each item carefully to make sure that it is in good condition If you find any item missing or damaged contact the place of purchase immediately for replacement STAND BOX Piano Body Rear Plate d Pedal Box c Right Left Legs a b Four Self Tapping screws for Rear panel 4 X 20mm f Four bolts for Main unit Silver M6 X 30mm j Four caps for legs k...

Страница 8: ...nd is level The piano is composed with the piano body and stand and assemble the piano as following steps 1 Attaching the both legs and pedal box assembly 2 Assembling the stand Securely attach both Legs a b to the Pedal box c assembly using four Bolts h Before assembling pedal box untie the pedal cable in the pedal box For pedal stability rotate the adjusters on the bottom of the pedal assembly u...

Страница 9: ...ttaching main unit put four caps k onto four holes of the both legs 4 Connecting the pedal cord Connect the AC Power Adapter Insert DC plug at the end of DC cord of the AC adapter into the piano and AC plug at end of the AC adapter into a standard AC outlet Connecting the Pedal Cord PlugPedalcordwhichisprotrudingfromthetopof the pedal assembly into the corresponding port on bottom of the main unit...

Страница 10: ...e end of DC cord of the AC adapter into the piano and AC plug at end of the AC adapter into a standard AC power outlet See Connecting the pedal cord and AC adapter on page 7 Turn on the power Press POWER button The power turns on and the initial display appears in the Multi Function Display The voice of Grand Piano is selected automatically at first Adjust the volume by using MASTER VOLUME Press a...

Страница 11: ...ect the instrument s LINE OUT jack and the input jacks of a pair of powered speakers using appropriate stereo audio cable CONNECTING TO A COMPUTER By connecting a computer to the USB you can transfer MIDI and audio data between the instrument and the computer and take advantage of sophisticated computer music programs When connecting to a computer the digital piano can be used as an audio device o...

Страница 12: ...ons REVERB EFFECT TOUCH SPLIT LAYER METRONOME RHYTHM SECTION RHYTHM buttons ACCOMP INTRO END START STOP FILL SYNC TEMPO UP DOWN Page 12 Page 14 Page 15 Page 16 Page 16 Page 17 Page 17 Page 18 Page 21 Page 23 Page 23 Page 22 Page 23 Page 22 CONTROL PANEL ⓐ ⓑ ⓒ ⓓ ⓔ ⓖ ...

Страница 13: ...ECTION ⓐ MASTER TUNE ⓑ TRANSPOSE ⓒ OCTAVE ⓓ LOCAL CONTROL ⓔ METRONOME BEAT ⓕ DATA UP DOWN PLAYER SECTION ⓖ DEMO ⓗ PLAY ⓘ TRACK1 ⓙ TRACK2 ⓚ RECORD Page 19 Page 19 Page 20 Page 20 Page 20 Page 13 Page 13 26 Page 26 Page 26 Page 26 ⓕ ⓗ ⓘ ⓙ ⓚ ...

Страница 14: ...of the HEADPHONE s ADJUSTING PART VOLUME The part volume of accompaniment split layer demo metronome reverb and effect independently can be adjusted Press and hold down the desired part button and adjust the selected volume by pressing the DATA UP or DOWN button PART VOLUME RANGE Demo 20 100 Default Volume 80 Accomp 20 100 Default Volume 70 Reverb 00 100 Default Volume 30 Effect 00 100 Default Vol...

Страница 15: ...MPO UP or DOWN button 1 When playback of the next demo tempo goes to default tempo of the selected demo music 2 If you press both TEMPO UP and DOWN buttons tempo is set to default tempo of the selected music Playback of all demo music After finishing a demo tune playback of the next demo tune starts Demo Music There are 8 demo music in the piano ⓑ Stop playback of the desired music and exit demo m...

Страница 16: ...play lets you know the location of the voice of the selected button 1 5 After selecting a voice you can select one of five voice of the selected voice group by pressing the VOICE button Also the voice can be selected by pressing DATA UP and DOWN buttons POP UP Display The pop up display returns to the previous display after 5 seconds Backing Up the Selected Voice The last selected voice in each bu...

Страница 17: ...o turn on reverb press the REVERB button The lamp lights and reverb is set ON default on To turn off reverb press the REVERB button again The lamp turns off and reverb is no longer active SELECTING REVERB TYPE Press the REVERB button The display shows current reverb type for 5 seconds ADJUSTING THE REVERB DEPTH Press and hold the REVERB button and adjust the depth by using the DATA UP or DOWN butt...

Страница 18: ...R 2 C 10 FLANGER 3 C 11 CELESTE 1 C 12 CELESTE 2 C 13 CELESTE 3 Touch Touch determines how your playing strength velocity affects the volume of the voices 4 types are available for tailoring the keyboard response to the selected voice type of song or your own playing preference To turn on effect press the TOUCH button The lamp lights and touch is set ON default on The touch pop up display appears ...

Страница 19: ...it voice see the SELECTING VOICE section on page 14 ADJUSTING THE LAYERED VOICE VOLUME Press and hold the LAYER button and adjust the level by using the DATA UP or DOWN button ADJUSTING THE SPLIT VOICE VOLUME Press and hold the SPLIT button and adjust the level by using the DATA UP or DOWN button If you press both UP and DOWN Keys at the same time automatically return to the default volume 100 The...

Страница 20: ...aulttempooftheselectedrhythm SELECTING THE BEAT Press both LAYER and METRONOME buttons NOT HOLD DOWN The Metronome Beat pop up display appears and shows current beat of the metronome for 5 seconds Change the metronome beat by using the DATA UP or DOWN button Metronome beat can be selected to one of 8 preset beats 1 4 2 4 3 4 4 4 default 6 4 3 8 6 8 7 8 9 8 12 8 2 2 ADJUSTING THE METRONOME VOLUME Y...

Страница 21: ...ion can be retained in memory TRANSPOSE The TRANSPOSE function makes it s possible to shift the pitch of the keyboard in semi note units allowing you to match the pitch of the keyboard to the range of other instruments or singers or letting you easily play in a different key without having to change your fingering For example if the TRANSPOSE is set F key playing C results in a pitch of F or in ot...

Страница 22: ...e of 8 preset beats 1 4 2 4 3 4 4 4 default 6 4 3 8 6 8 7 8 9 8 12 8 2 2 Backing Up adjusted value The last adjusted value of each Function can be retained in memory LOCAL CONTROL Local control refers to the fact that normally the piano keyboard controls its internal tone generator allowing the internal voices to be played directly from the keyboard This situation is called Local Control ON When t...

Страница 23: ...the pop up display shows the location of the selected rhythm for 5 seconds as follows Left digit of the pop up display lets you know the location of the selected button 1 8 Right digit of the pop up display lets you know the location of the rhythm of the selected button 1 5 After selecting a voice you can select one of five voice of the selected voice group by pressing the button Also the rhythm c...

Страница 24: ...mpo in the Multi Function Display You can press either TEMPO UP or DOWN button briefly to decrement or increment the tempo value by one hold the button for continuous decrementing or incrementing Tempo Range 20 280 Default setting Differs depending on the style Restoring the Default Style Tempo You can restore the preset tempo for the selected Style at anytime by simultaneously pressing both TEMPO...

Страница 25: ...ck press the START STOP button To playbackanendingpatternbeforestopping presstheINTRO ENDbuttonduringplaybackofrhythm The INTRO ENDING lamp flashes during playback of ending If you need to cancel ending playback press the FILL SYNC button The ending pattern stops and the main loop starts after playback of the fill pattern The following procedure describes how to use the keyboard s Auto Accompanime...

Страница 26: ... of it three keys EXAMPLE Play C Hear a C major chord Play Cm Hear a C minor chord Play C7 Hear a C 7th chord Play Cm7 Hear a C minor 7th chord 24 Auto Accompaniment ⓓStart the Auto Accompaniment To start Auto Accompaniment press START STOP button Alternately press FILL SYNC then play the keyboard see the PLAYING A RHYTHM section on page 22 23 HOW TO PLAY CHORD ACCOMPANIMENT RANGE When accomp turn...

Страница 27: ...venth M7 11 Added ninth add9 Major ninth M9 Six ninth 6 9 Augmented aug Minor m Minor sixth m6 Minor seventh m7 Minor ninth flatted fifth m7b5 Minor added ninth m add9 Minor ninth m9 Minor eleventh m11 Minor major seventh mM7 Minor major ninth mM9 Diminished dim Diminished seventh dim7 Seventh 7 Seventh suspended fourth 7sus4 Seventh ninth 7 9 Seventh sharp eleventh 7 11 Seventh added thirteenth 7...

Страница 28: ...ecording ⓐPrepare recording to track 1 Select the desired voice and press both the RECORD and the TRACK 1buttons The record button turns on and the track 1button flashes Recording The piano features comprehensive song recording functions that allow you to record your own performance ⓑStart recording to the Track1 Recording starts when playing the keyboard or pressing the PLAY button Both buttons f...

Страница 29: ...0 0 2 0 0 3 0 0 4 0 0 5 0 0 6 0 0 7 0 0 8 Piano1 Piano2 Piano3 Honky Tonk Electric Piano 1 Electric Piano 2 Harpsichord Clavinet 0 0 9 0 1 0 0 1 1 0 1 2 0 1 3 0 1 4 0 1 5 0 1 6 Celesta Glockenspiel Music Box Vibraphone Marimba Xylophone Tubular Bell Dulcimer 0 1 7 0 1 8 0 1 9 0 2 0 0 2 1 0 2 2 0 2 3 0 2 4 Electric Organ Jazz Organ Rock Organ Pipe Organ Reed Organ Accordion Harmonica Bandonion 0 2 ...

Страница 30: ...OHH EXC1 38 B3 Low MidTom RoomMidTom1 RoomMidTom1 ElecMidTom1 808MidTom1 39 C4 HiMidTom RoomHiTom2 RoomHiTom2 ElecHiTom2 808HiTom2 40 C 4 CrashCymbal1 808Cymbal 41 D4 HighTom RoomHiTom1 RoomHiTom1 ElecHiTom1 808HiTom1 42 D 4 RideCymbal1 43 E4 ChineseCymbal ReverseCymbal 44 F4 RideBell 45 F 4 Tambourine 46 G4 SplashCymbal 47 G 4 Cowbell 808Cowbell 48 A4 CrashCymbal2 49 A 4 Vibraslap 50 B4 RideCymba...

Страница 31: ...MetronomeBell 38 B3 TimpaniB GuitarSlide 39 C4 Timpanic GtCutNoise dw 40 C 4 GtCutNoise up 41 D4 Timpanid DoubleBassSlap 42 D 4 KeyClick 43 E4 Laughing 44 F4 Screaming 45 F 4 Punch 46 G4 HeartBeat 47 G 4 Footsteps1 48 A4 ConcertCymbal2 Footsteps2 49 A 4 Applause 50 B4 ConcertCymbal1 DoorCreaking 51 C5 DoorClosing 52 C 5 Scratch 53 D5 WindChime 54 D 5 CarEngineStart 55 E5 CarBreaking 56 F5 CarPass ...

Страница 32: ... 07 BnH07Hcc O X Volume 10 BnH0AHcc O X PanOut 11 BnH0BHcc O X Expression 64 BnH40Hcc O O Sustain Damper Pedal 65 BnH41Hcc O X PortamentoON OFF 66 BnH42Hcc O O SostenutoPedal Control 67 BnH43Hcc O O SoftPedal Change 80 BnH80Hvv O X Prog vv 00H 70H 81 BnH51Hvv O X ChorusProg 91 BnH5BHvv O X Reverb SendLevel 93 BnH5DHvv O X ChorusSendLevel 120 BnH78H00H O X AllSoundOff 121 BnH79H00H O X ResetAllCont...

Страница 33: ...r supply problem 2 Volume setting is too low 3 Headphone is plugged in 1 Refrigerators washing machines and similar electric appliances are interfering 1 Volume setting is too low 2 Defective connection cord 1 Check the power cord whether it s properly in AC outlet 2 Adjust the volume 3 Unplug the headphone 1 Use outlet as far away as possible from appliance thought to be the cause 1 Adjust the vo...

Страница 34: ... STOP INTRO ENDING FILL SYCN FUNCTIONS LAYER SPLIT TUNE TRANSPOSE OCTAVE DIGITALSIGNALPROCESSING CHORUS 13 REVERB 8 METRONOME YES DISPLAY LEDMULTIFUNCTIONDISPLAY DEMO 8TUNES RECORD REAL TIME RECORDING 2TRACKS MAX 7 000NOTES TR VOLUMECONTROLS MAIN ACCOMPANIMENT LAYER SPLIT DEMO METRONOME I OTERMINALS USBTOHOST USBMIDI USBAUDIO STEREO LINE IN STEREOLINEOUT PEDALIN 2HEADPHONEJACKS SPEAKER 2INCHES 2 6...

Страница 35: ......

Страница 36: ...D Y N A T O N E C O R P w w w d y n a t o n e b i z Part No D1650 rev 1 0 ...

Отзывы: