background image

NEDERLANDS

 INSTALLATIE CONTROLEREN EN PROBLEMEN OPLOSSEN

24. 

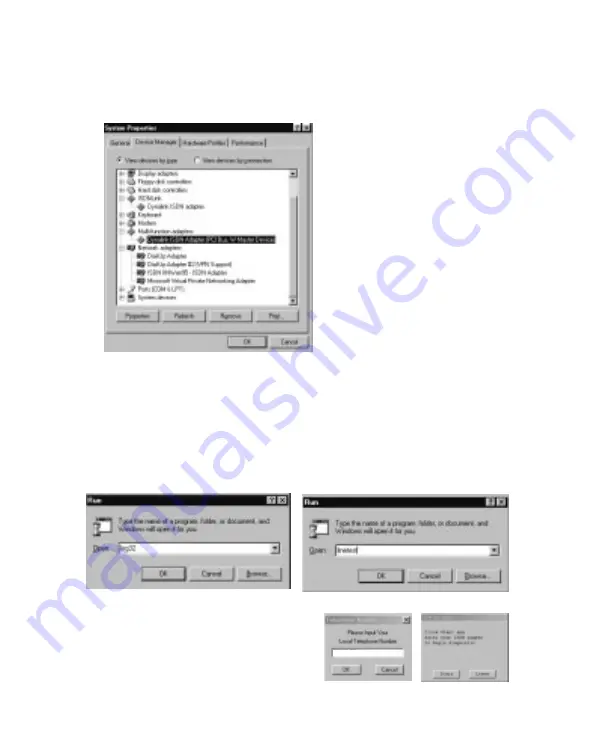
U kunt onder ‘Apparaatbeheer’ (Device Manager) zien of de hardware goed
is geïnstalleerd.

25. 

Bij problemen kunt u Log32 en Linetest gebruiken om de hardware te
controleren. Ga hiervoor naar ‘Start’ – 'Uitvoeren' (Run) en typ ‘Log32’ of
‘Linetest’.
Log32: met dit programma onderzoekt u problemen tijdens uitbellen. Zorg
dat u alle opties aankruist. Als u een probleem aan de klantsupport afdeling
mailt, moet u het logbestand meesturen.
Linetest: hiermee test u uw ISDN lijn. Toets uw (hoofd-)ISDN-nummer in,
zonder netnummer.

 Log 32

Linetest

4.2 Installatie onder Windows 98

123456

Содержание 128K

Страница 1: ...de gegevens nodig Een duidelijke beschrijving van het probleem Versienummers van gebruikte stuurprogramma s kijk altijd eerst op de Dynalink website of er een nieuwere versie beschikbaar is Type notebook of PC Besturingssysteem Voor meer informatie over Dynalink producten bent u altijd welkom op de Dynalink internet site www dynalink com Hoofdstukken van deze snelstart handleiding 1 Inleiding 2 Vo...

Страница 2: ... U hebt nodig 1 Een schroevendraaier alleen voor intern model 2 A een Plug en Play compatibel besturingssysteem zoals Windows 98 en B een notebook of PC die geschikt is voor Plug en Play versie 1 0a 3 Hardware installatie Bewaar het verpakkingsmateriaal Bewaar het verpakkingsmateriaal van dit product Als u om een of andere reden de ISDN adapter aan ons terugstuurt moet u de oorspronkelijke verpakk...

Страница 3: ... 32 bits PCI sleuf voor de kaart 3 Verwijder de schroef van het beschermplaatje van de sleuf Houd de schroef bij de hand u hebt hem straks nodig om de ISDN adapter vast te zetten 4 Bewaar ook het beschermplaatje van de sleuf 5 Schuif de kaart met de contactpunten in de lege sleuf Druk de kaart rustig aan tot hij stevig op zijn plaats zit 6 Zet de kaart vast met de schroef die u hiervoor hebt bewaa...

Страница 4: ...Nadat Windows 95 is opgestart verschijnt het dialoogvenster Nieuwe hardware gevonden New Hardware Found zoals getoond in de volgende afbeeldingen Klik op Volgende Next 2 Doe de cd met stuurprogramma s in het geselecteerde station waarschijnlijk D en klik op Overige locaties Other Locations ...

Страница 5: ...A Win95 Klik op OK nadat u de juiste map hebt gekozen PC Card PCMCIA Interne PCI kaart 4 Het stuurprogramma wordt gevonden Klik op Voltooien Finish 5 Als de te kopiëren bestanden niet worden gevonden selecteer dan het vakje Bestanden van fabrikant kopiëren van Copy manufacturer s files from en toets het pad D Internal Win95 in voor een interne PCI kaart of D PCMCIA Win95 voor de PCMCIA ISDN adapte...

Страница 6: ...lf een modem Don t detect my modem I will select it from a list aan en klik op Volgende Next 7 In het volgende dialoogvenster klikt u op Diskette Have disk 8 Kies voor Bladeren Browse en zorg dat de cd met stuurprogramma s in uw cd station zit Selecteer de juiste map D Internal Win95 voor een interne PCI kaart of D PCMCIA Win95 voor een PCMCIA ISDN adapter PC Card Klik op OK ...

Страница 7: ...jnt Als u uw ISDN Adapter voor internet wilt gebruiken kies dan ISDN Internet PPP 64K adapter en klik op Volgende Next 10 Kies een van de ISDN COM poorten en klik op Volgende Next 11 Vul het volgende dialoogvenster in en klik op Volgende Next ...

Страница 8: ...NEDERLANDS 12 De ISDN adapter verschijnt in het venster met modemeigenschappen Klik op OK ...

Страница 9: ...e New Hardware 13 Installeer het programma Microsoft Dial up Networking 1 3 dat u vindt op de cd met stuurprogramma s D Dun13 DUTCH Selecteer vervolgens Netwerkadapter Network Adapter en Volgende Next 14 Als u Microsoft Dial up Networking 1 3 hebt geïnstalleerd gaat u naar Configuratiescherm Control Panel en klikt u op Nieuwe hardware New Hardware 15 In het volgende venster kiest u Nee No en klikt...

Страница 10: ...er en Volgende Next 17 Het volgende dialoogvenster verschijnt Klik op Diskette Have disk 18 Ga naar de juiste map op de cd met stuurprogramma s D Internal Win95 voor de interne PCI kaart of D PCMCIA Win95 voor de PCMCIA ISDN adapter Klik vervolgens op OK ...

Страница 11: ...NEDERLANDS 19 Het volgende venster verschijnt Klik op OK 20 Kies Euro ISDN en klik op Volgende Next 21 Vul geen nummer in Klik op Volgende Next ...

Страница 12: ...nager en kies ISDN IINWan95 ISDN Adapter Klik op Eigenschappen Properties 23 Kies Setting en vul desgewenst uw MSN nummer en Calling Party in zie hoofdstuk 5 De nummers hebben altijd 9 cijfers inclusief netnummer zonder de nul Klik vervolgens op OK Voor u deze instelling kunt gebruiken moet u uw computer eerst opnieuw opstarten ...

Страница 13: ...rdware te controleren Ga hiervoor naar Start Uitvoeren Run en typ Log32 of Linetest Log32 met dit programma onderzoekt u problemen tijdens uitbellen Zorg dat u alle opties aankruist Als u een probleem aan de klantsupport afdeling mailt moet u het logbestand meesturen Linetest hiermee test u uw ISDN lijn Toets uw hoofd ISDN nummer in zonder netnummer Log 32 Linetest 4 2 Installatie onder Windows 98...

Страница 14: ...ndows 98 is opgestart verschijnt het dialoogvenster Nieuwe hardware gevonden New Hardware Found zoals getoond in de volgende afbeeldingen Klik op Volgende Next 2 Kies Zoeken naar het best stuurprogramma aanbevolen Search for the best driver Recommended en klik op OK ...

Страница 15: ...se te klikken Als u een PCI ISDN adapter hebt kiest u D Internal Win98 Voor een PCMCIA ISDN adapter PC Card is dit de map D PCMCIA Win98 Klik op OK nadat u de juiste map hebt gekozen 4 Het stuurprogramma wordt gevonden Klik op Voltooien Finish 5 Kies Euro ISDN en klik op Volgende Next D ...

Страница 16: ...Volgende Next MSN en Calling Party configureren 7 Ga naar Configuratiescherm Control Panel Systerm System Apparaatbeheer Device Manager en kies bij Netwerkadapters Network Adapters de Dynalink ISDN Adapter Klik dan op Eigenschappen Properties ...

Страница 17: ...en kunt u Log32 en Linetest gebruiken om de hardware te controleren Ga hiervoor naar Start Run en typ Log32 of Linetest Log32 met dit programma onderzoekt u problemen tijdens uitbellen Zorg dat u alle opties aankruist Als u een probleem aan de klantsupport afdeling mailt moet u het logbestand meesturen Linetest hiermee test u uw ISDN lijn Toets uw hoofd ISDN nummer in zonder netnummer Log 32 Linet...

Страница 18: ... Run en typt u het pad D Internal Win98 voor de PCI ISDN adapter of D PCMCIA Win98 voor de PCMCIA ISDN Adapter Klik op OK 11 Zorg ervoor dat de ISDN monitor rechtsonder in de taakbalk van het Windows bureaublad gesloten is Klik dan op Opruimen Clean waarna de stuurprogramma s worden verwijderd D ...

Страница 19: ...rt verschijnt het dialoogvenster Nieuwe hardware gevonden New Hardware Found zoals getoond in de volgende afbeeldingen Klik op Volgende Next 2 Kies Zoek een geschikt stuurprogramma Search for a suitable driver en klik op Volgende Next 3 Kies Geef een locatie Indicate a location en klik op Volgende Next Network Controller V ...

Страница 20: ...hebt kiest u D Internal Win2000 Voor een PCMCIA ISDN adapter PC Card is dit de map D PCMCIA Win2000 Klik op OK nadat u de juiste map hebt gekozen 5 Het stuurprogramma wordt gevonden Klik op Voltooien Finish 6 Klik op Ja Yes en op Voltooien Finish Het ISDN stuurprogramma is nu geïnstalleerd Start uw computer tenslotte opnieuw op ...

Страница 21: ... u problemen tijdens uitbellen Zorg dat u alle opties aankruist Als u een probleem aan de klantensupport afdeling mailt moet u het logbestand meesturen LT32 hiermee test u uw ISDN lijn Toets uw hoofd ISDN nummer in zonder netnummer Klik met de rechter muisknop op de ISDN knop in de Windows taakbalk en kies Log of LT32 Log Ga naar Optie Option en selecteer alle opties LT 32 ...

Страница 22: ...s taakbalk en selecteer Configuratie Configuration In de ISDN configuratie moet u ISDN apparaat lijn 01 of lijn 02 selecteren afhankelijk van de lijn waarmee u wilt gaan uitbellen Klik dan op Eigenschappen Properties 9 Hier in het ISDN B Channel Protocol kunt u het ISDN protocol selecteren door op het driehoekje te klikken HDLC X 75 V 120 ...

Страница 23: ...r Configuratie In het venster ISDN configuratie ISDN Configuration moet u ISDN apparaat lijn 01 kiezen en op Eigenschappen Properties klikken 11 In dit venster kruist u Enable Multilink PPP aan en klikt u op Advance 12 Klik op Toevoegen Add en selecteer ISDN apparaat 00 2 Klik op OK Voortaan wordt er als u uitbelt een 128 Kbps verbinding gemaakt ...

Страница 24: ...onfiguratie Configuration In het venster ISDN configuratie ISDN Configuration moet u ISDN apparaat 00 kiezen en op Eigenschappen Properties klikken 14 Klik onderaan het venster op MSN list zie hoofdstuk 5 15 Hier kunt u een van de telefoonnummers ingeven die u wilt gebruiken met de ISDN kaart Druk twee keer op OK om terug te gaan naar het ISDN configuratie venster ...

Страница 25: ...DN apparaten lijn 01 of 02 selecteren die u wilt gebruiken om naar buiten te bellen Klik op Eigenschappen Properties 17 In dit venster kunt u het telefoonnummer aangeven dat u voor MSN wilt gebruiken Druk op OK om de instelling te activeren ...

Страница 26: ...13 19 Zie punt 14 20 Klik op Toevoegen Add en typ het telefoonnummer dat u wilt gebruiken voor de analoge poort zonder de nul Druk twee keer op OK om terug te gaan naar het venster ISDN configuratie ISDN Configuration 21 Selecteer poort 1 onder Pots voice en klik op Eigenschappen Properties ...

Страница 27: ...NEDERLANDS 22 Hier moet u het telefoonnummer selecteren voor de analoge poort onder MSN zie hoofdstuk 5 Druk op OK om de instelling te activeren ...

Страница 28: ...erd U kunt RAS als volgt installeren ga naar Configuratiescherm Control Panel kies Netwerk Network Services en klik op Toevoegen Add Selecteer Remote Access Services Hierna moet u een modem installeren bijvoorbeeld een standaard modem op COM2 1 Ga naar uw Configuratiescherm en klik op Netwerk Network Kies Adapters en klik op Toevoegen Add 2 Klik op Diskette Have disk ...

Страница 29: ... typt u D PCMCIA WinNT of voor de PCI versie D Internal WinNT PC card Interne PCI kaart 4 Kies de ISDN adapter ISDN 128k PH adapter voor de PCI kaart of ISDN128k PC adapter voor de PC Card Klik vervolgens op OK 5 Kies PCI of PCMCIA en klik op OK d PCMCIA winnt ...

Страница 30: ...het type switch op Euro ISDN staat en klik op OK 7 Nu komt u in het RAS venster Klik op Toevoegen Add om ISDN 1 en 2 toe te voegen en klik op Configureren Configure 8 De ISDN adapter is nu geïnstalleerd Klik op Sluiten Close ...

Страница 31: ...elling Setting en vul desgewenst uw MSN nummer en Calling Party in De nummers hebben altijd 9 cijfers inclusief het netnummer zonder de nul Klik vervolgens op OK Nu kunt u de adapter bijvoorbeeld gebruiken om in te bellen op internet via externe toegang dial up networking ...

Страница 32: ...telefoonnummers te selecteren voor gebruik met uw ISDN adapter Calling Party Wanneer u Calling party gebruikt bevat uw telefoonrekening een afzonderlijke specificatie voor de nummers die u met uw ISDN adapter gebruikt BOD De optie Enable BOD staat voor Bandwith On Demand Wanneer u deze optie aanzet wordt tijdens een verbinding een van de twee ISDN lijnen opgehangen wanneer er een gesprek binnenkom...

Страница 33: ... we need the following details from you A clear description of the problem Version number of the drivers you are using always check the Dynalink website to see whether you are using the latest version Type of Notebook PC you are using Operating system you are using For more information about Dynalink products please visit the Dynalink Web Site www dynalink com Chapters of this Quick Installation 1...

Страница 34: ...should contain the following The ISDN Adapter This Quick Start Manual An ISDN RJ 45 cable CD ROM Requirements 1 A screwdriver only internal 2 A A Plug and Play compatible operating system such as Windows 98 and B A Plug and Play version 1 0a compatible PC or notebook 3 Hardware Installation Unpacking the ISDN Adapter Please keep all the packing materials of this product Should it ever become neces...

Страница 35: ...ove the cover and set it aside 11 Find an empty 32 bit PCI expansion slot for the card 12 Remove the screw that secures the protective cover of the expansion slot Keep the screw at hand you will need it again to secure the ISDN adapter 13 Also keep the cover plate of the slot for future use 14 Insert the card into the empty slot contacts edge first Press the card down until it is firmly seated 15 ...

Страница 36: ...up the computer and start Windows 95 After Windows 95 has started the New Hardware Found dialog box appears as shown in the following screen shots Click on Next 2 Insert the driver CD ROM in the selected drive probably D Click on Other Locations ...

Страница 37: ...ve to choose map D PCMCIA Win95 Click on OK if you have chosen the right map PCMCIA card Internal PCI card 4 The driver will be found Click on Finish 5 If the files that have to be copied are not found select the Copy manufacturer s files from field enter the path D Internal Win95 for internal PCI card and D PCMCIA Win95 for the PCMCIA ISDN Adapter D PCMCIA Win95 ...

Страница 38: ...etect my modem I will select it from a list and click on Next 7 The following screen will appear and click on Have Disk 8 Choose Browse and make sure that the driver CD ROM is in your CD player Select the correct map D Internal Win95 for internal PCI card and D PCMCIA Win95 for the PCMCIA ISDN Adapter Click on OK ...

Страница 39: ...wing box will appear If you want to use your ISDN Adapter for internet choose ISDN Internet PPP 64K adapter and click on Next 10 Choose one of the ISDN com ports and click on Next 11 Fill in this screen and click on Next ...

Страница 40: ...ENGLISH 12 The ISDN Adapter will appear in the modem box and click on OK ...

Страница 41: ... to Control Panel and click on New Hardware 13 Install the programm Microsoft Dial up Networking 1 3 which you can find on the driver CD ROM D Dun13 Eng Then select Network Adapter and Next 14 After you have installed Microsfort Dial up Networking 1 3 go to Control Panel and click on New Hardware 15 The following box will appear Choose No and click on Next ...

Страница 42: ...etwork adapter and Next 17 The following box will appear Click on Have Disk 18 Choose the correct map on the driver CD ROM D Internal Win95 for internal PCI card and D PCMCIA Win95 for the PCMCIA ISDN Adapter Then click on OK ...

Страница 43: ...ENGLISH 19 The following screen will appear Click on OK 20 Choose Euro ISDN and click on Next 21 Don t fill in a number and click on Next ...

Страница 44: ...ose ISDN IINWan95 ISDN Adapter Then click on Properties 23 Choose Setting and fill in your MSN Number and calling party see chapter 5 if you want The numbers must always be in 9 digits with the area code without zero Then click on OK To activate this setting you have to restart your computer first ...

Страница 45: ...test to check the hardware Do this by going to Start Run and type log32 and or linetest Log 32 is a program to trace problems during dialing out Make sure that all options are marked If you have problems you can mail the log file to our supportdepartment Linetest here you can test your ISDN line Enter your main ISDN telephone number without area code Log 32 Linetest 123456 ...

Страница 46: ...on 1 Power up the computer and start Windows 98 After Windows 98 has started the New Hardware Found dialog box appears as shown in the following screen shots Click on Next 2 Choose Search for the best driver Recommended and click on OK ...

Страница 47: ...icking on Browse For the PCI ISDN Adapter you choose D Internal Win98 For the PCMCIA ISDN Adapter you have to choose map D PCMCIA Win98 Click on OK if you have chosen the right map 4 The driver will be found Click on Next 5 Choose Euro ISDN and click on Next D ...

Страница 48: ...H 6 Don t fill in a number and click on Next Configuring the MSN and caller party 7 Go to Control Panel System Device Manager and choose at Network adapters the Dynalink ISDN Adapter Then click on Properties ...

Страница 49: ... you can check the Log 32 and linetest to check the hardware Do this by going to Start Run and type log32 and or linetest Log 32 is a program to trace problems during dialing out Make sure that all options are marked If you have problems you can mail the log file to our support department Linetest here you can test your ISDN line Enter your main ISDN telephone number without areacode Log 32 Linete...

Страница 50: ...Go to Start Run and enter the path D Internal Win98 for PCI ISDN adapter or D PCMCIA Win98 for PCMCIA ISDN Adapter Then click on OK 11 Make sure the ISDN monitor in the right under corner in the screen is closed Then click on Clean and the drivers will be removed D ...

Страница 51: ...d start Windows 2000 After Windows 2000 has started the New Hardware Found dialog box appears as shown in the following screen shots Click on Next 2 Choose Search for a suitable driver and click Next 3 Choose Specify a location and click on Next V Network Controller ...

Страница 52: ...e PCI ISDN Adapter you choose D Internal Win2000 For the PCMCIA ISDN Adapter you have to choose map D PCMCIA Win2000 Click on OK if you have chosen the right map 5 The driver will be found Click on Next 6 Click on Yes and on Finish The ISDN driver is now installed Reboot your PC now ...

Страница 53: ...e problems during dialing out Make sure that all options are marked If you have problems you can mail the log file to our support department LT32 here you can test your ISDN line Enter your main ISDN telephone number without area code Click on the ISDN button at the task bar with right mouse button and choose log or linetest Log Go to Option and select all options LT32 ...

Страница 54: ...ight under corner of the screen and select Configuration In the ISDN Configuration you must select the ISDN Device line 01 or line 02 This depends on which you are going to use to dial out Then click on Properties 9 Here in the ISDN B Channel Protocol you can select the ISDN protocol by clicking on the triangle HDLC X 75 V 120 ...

Страница 55: ...lect Configuration In the ISDN Configuration screen you must select the ISDN Device line 01 and click on Properties 11 Mark Enable Multilink PPP in this screen and click Advance 12 Click on Add and select ISDNDevice 00 2 Then press OK From now on you will make a 128 Kbps connection when you dial out Assign one of your telephone numbers to the ISDN card ...

Страница 56: ...0 and click on Properties 14 Click MSN list in the bottom of this screen see chapter 5 15 Here you can type one of your own telephone numbers you want to use with the ISDN card Then press OK twice so that you will come back in the ISDN configuration screen 16 Here you must select one of the ISDN devices line 01 or 02 which you are going to use for dialing out Then click on Properties ...

Страница 57: ...ENGLISH 17 In this screen you can select the telephone number you want to use under MSN Press OK to activate the setting ...

Страница 58: ...a telephone number to the analog port 18 See point 13 19 See point 14 20 Click Add and type here the telephone number you want to use for the analog port without a zero The press OK twice to come back in the ISDN Configuration screen ...

Страница 59: ...ENGLISH 21 Select port 1 under Pots voice and click on Properties 22 Here you must select the telephone number for the analog port in the MSN See chapter 5 Then press OK to activate the setting ...

Страница 60: ...hat RemoteAccessService is installed To do this you have to go the Control Panel choose Network Services and click on Add and select Remote Access Services After this you have to install a modem like a standard modem on COM2 1 Go to your Control Panel and click on Network Choose Adapters and click on Add 2 Click on Have disk ...

Страница 61: ...n type D PCMCIA WinNT or for PCI version D Internal WinNT PCMCIA card Internal PCI card 4 Choose the ISDN adapter ISDN 128k PH adapter for PCI card or ISDN128k PC adapter for PCMCIA card Then click on OK 5 Choose PCI or PCMCIA and click on OK d PCMCIA winnt ...

Страница 62: ... 6 Make sure that the switch type is Euro ISDN and click on OK 7 Now you will enter the RAS screen Click on Add to add the ISDN 1 and 2 and click on Configure 8 The ISDN adapter is now installed Click on Close ...

Страница 63: ...Adapter 9 Choose Setting and fill in your MSN Number and calling party if you want The numbers must be always in 9 digits with the area code without zero Then click on OK Now you can use the adapter for example for Internet with dial up networking ...

Страница 64: ... 5 Explanation of terms MSN To select one of your telephone numbers to use with your ISDN adapter Caller party When you select Caller party you separate your telephone bill into the numbers you used with your ISDN adapter BOD Enable BOD option stands for Bandwith on demand When you activate this option it will hang up one ISDN line when a call comes in so you can answer your incoming line Afterwar...

Страница 65: ...mos que nos indique los siguientes datos Descripción clara del problema Número de la versión de los controladores que está usando compruebe siempre en la página web de Dynalink si tiene la versión más actualizada Tipo de ordenador portátil PC que está usando Sistema operativo con el que trabaja En la siguiente dirección de Internet encontrará más detalles sobre los productos de Dynalink www dynali...

Страница 66: ...e que contener La tarjeta RDSI Este manual de instrucciones rápidas Un cable RDSI con clavija RJ 45 Un CD ROM Elementos necesarios 1 Un destornillador sólo para la versión de la tarjeta interna 2 A Un sistema operativo compatible con el estándar Plug Play como p ej Windows 98 y B un PC u ordenador portátil compatible con la versión 1 0a de Plug Play 3 Instalación del hardware Desembalaje de la tar...

Страница 67: ...re la caja y colóquela aparte 19 Busque una ranura de expansión PCI de 32 bit para la tarjeta 20 Retire el tornillo que sujeta la pestaña de protección de la ranura de expansión y manténgalo a mano porque lo volverá a necesitar para fijar el adaptador RDSI 21 Guarde también la pestaña de la ranura de expansión por si la vuelve a necesitar en el futuro 22 Inserte la tarjeta en la ranura libre con e...

Страница 68: ...cado Windows 95 aparece el cuadro de diálogo New Hardware Found Nuevo hardware encontrado tal y como se aprecia en la ilustración de abajo Haga clic en Next Siguiente 2 Introduzca el CD ROM con los controladores en la unidad seleccionada probablemente D Haga clic en Other Locations Otras ubicaciones ...

Страница 69: ...n OK después de seleccionar el directorio correcto Tarjeta PCMCIA Tarjeta PCI interna 4 Una vez que el sistema haya encontrado el controlador haga clic en Finish Finalizar 5 Si no se encuentran los archivos a copiar deberá seleccionar Copy manufacturer s files from Copiar archivos del fabricante desde el campo e introduzca como camino D Internal Win95 para la tarjeta PCI interna y D PCMCIA Win95 p...

Страница 70: ...o seleccionaré de una lista y haga clic en Next Siguiente 7 Después aparecerá la siguiente pantalla y deberá hacer clic en Have Disk Desde disquete 8 Seleccione Browse Examinar y asegúrese que el CD ROM con los controladores se encuentre en la unidad correspondiente Seleccione el directorio correspondiente D Internal Win95 para la tarjeta PCI interna y D PCMCIA Win95 para la tarjeta RDSI PCMCIA Ha...

Страница 71: ...ar su tarjeta RDSI para Internet seleccione RDSI Internet PPP 64K adapter y haga clic en Next Siguiente 10 Seleccione uno de los puertos de comunicaciones para RDSI y haga clic en Next Siguiente 11 Cumplimente los datos en esta pantalla y haga clic en Next Siguiente ...

Страница 72: ...ESPAÑOL 12 Ahora aparecerá la tarjeta RDSI en el cuadro de los módems y podrá hacer clic en OK ...

Страница 73: ...ale el programa Microsoft Dial up Networking 1 3 Acceso telefónico a redes versión 1 3 de Microsoft que puede encontrar en el CD ROM de los controladores D Dun13 SPANISH Seleccione a continuación Network Adapter Adaptadores de red y Next Siguiente 14 Después de instalar Microsoft Dial up Networking 1 3 debe acceder a Control Panel Panel de control y hacer clic en New Hardware 15 Después aparece el...

Страница 74: ...guiente 17 Después aparece el siguiente cuadro Haga clic en Have Disk Desde disquete 18 Seleccione el directorio correspondiente en el CD ROM de los controladores D Internal Win95 para la tarjeta PCI interna y D PCMCIA Win95 para la tarjeta RDSI PCMCIA Después haga clic en OK ...

Страница 75: ...ESPAÑOL 19 Después aparecerá la siguiente pantalla Haga clic en OK 20 Seleccione Euro RDSI y haga clic en Next Siguiente 21 No introduzca ningún número y haga clic en Next Siguiente ...

Страница 76: ... dispositivos y seleccione ISDN IINWan95 ISDN card Después haga clic en Properties Propiedades 23 Seleccione Setting Configuración e introduzca el número MSN y para el desglose de llamadas véase capítulo 5 Los números deberán contener siempre 9 dígitos incluyendo el prefijo sin el cero Después haga clic en OK Para activar esta configuración deberá reiniciar el ordenador ...

Страница 77: ... el hardware Para ello deberá acceder a Start Inicio Run Ejecutar y teclear log32 y o linetest Log 32 es un programa que registra los problemas durante el marcado Asegúrese de haber activado todas las opciones Si encuentra algún problema puede enviar el archivo de registro a nuestro departamento de asistencia técnica Linetest Con este programa puede probar su línea RDSI Introduzca el número RDSI p...

Страница 78: ...ués de arrancar Windows 98 aparece el cuadro de diálogo New Hardware Found Nuevo hardware encontrado tal y como puede apreciar en la ilustración de abajo Haga clic en Next Siguiente 2 Seleccione Search for the best driver Recommended Buscar el mejor controlador Recomendado y haga clic en OK ...

Страница 79: ... tarjeta RDSI PCI deberá seleccionar D Internal Win98 Para la tarjeta PCMCIA deberá seleccionar el directorio D PCMCIA Win98 Haga clic en OK después de seleccionar el directorio correcto 4 Una vez encontrado el controlador haga clic en Next Siguiente 5 Seleccione Euro RDSI y haga clic en Next Siguiente D ...

Страница 80: ... Configuración de MSN y desglose de llamadas 7 Acceda a Control Panel Panel de Control System Sistema Device Manager Administrador de dispositivos y seleccione entre los Network adapters Adaptadores de red Dynalink ISDN card Después haga clic en Properties Propiedades ...

Страница 81: ...problemas puede usar Log 32 y linetest para verificar el hardware Para ello deberá acceder a Start Inicio Run Ejecutar y teclear log32 y o linetest Log 32 es un programa que registra los problemas durante el marcado Asegúrese de haber activado todas las opciones Si encuentra algún problema puede enviar el archivo de registro a nuestro departamento de asistencia técnica Linetest Con este programa p...

Страница 82: ...cio Run Ejecutar e introduzca D Internal Win98 para el adaptador RDSI PCI o D PCMCIA Win98 para la tarjeta RDSI PCMCIA Después haga clic en OK 11 Asegúrese que el monitor ISDN en la esquina inferior derecha de la pantalla se encuentra cerrado Después haga clic en Clean Limpiar y se eliminarán los controladores D ...

Страница 83: ... diálogo New Hardware Found Nuevo hardware encontrado tal y como puede apreciar en la ilustración de abajo Haga clic en Next Siguiente 2 Seleccione Search for a suitable driver Buscar un controlador adecuado y haga clic en Next Siguiente 3 Seleccione Specify a location Especificar una ubicación y haga clic en Next Siguiente Network Controller V ...

Страница 84: ...onar D Internal Win2000 Para la tarjeta PCMCIA deberá seleccionar el directorio D PCMCIA Win2000 Haga clic en OK después de seleccionar el directorio correcto 5 Una vez encontrado el controlador haga clic en Next Siguiente 6 Haga clic en Yes Sí y en Finish Finalizar Ya se ha instalado el controlador RDSI y deberá reiniciar su ordenador ...

Страница 85: ...rograma que registra los problemas durante el marcado Asegúrese de haber activado todas las opciones Si encuentra algún problema puede enviar el archivo de registro a nuestro departamento de asistencia técnica Linetest Con este programa puede probar su línea RDSI Introduzca el número RDSI principal sin el prefijo Log Acceda a Option Opciones y seleccione todas las opciones Linetest ...

Страница 86: ...ione Configuration Configuración Una vez en la configuración de RDSI deberá seleccionar como ISDN Device Dispositivo RDSI la línea 01 o 02 según la que vaya a utilizar para realizar llamadas Después haga clic en Properties Propiedades 9 Ahora encontrará el ISDN B Channel Protocol Protocolo para el canal B de RDSI que puede seleccionar haciendo clic en el triángulo HDLC X 75 V 120 ...

Страница 87: ...uración de RDSI deberá seleccionar el ISDN Device line 01 Dispositivo de RDSI línea 01 y hacer clic en Properties Propiedades 11 Active Enable Multilink PPP Posibilitar PPP multienlaces en esta pantalla y haga clic en Advance Avanzada 12 Haga clic en Add Añadir y seleccione ISDN Device 00 2 Dispositivo de RDSI 00 02 A continuación haga clic en OK A partir de este momento se establecerán las conexi...

Страница 88: ...ón En la pantalla para la configuración de RDSI deberá seleccionar ISDN Device 00 Dispositivo de RDSI 00 y hacer clic en Properties Propiedades 14 Haga clic en MSN list Lista de MSN en la parte inferior de esta pantalla véase capítulo 5 15 Ahora podrá introducir uno de sus números de teléfono que pretende usar con la tarjeta RDSI Haga clic en OK dos veces hasta que haya vuelto a la pantalla para l...

Страница 89: ...vos RDSI línea 01 o 02 según la que vaya a utilizar para realizar sus llamadas Después haga clic en Properties Propiedades 17 En esta pantalla podrá seleccionar el número de teléfono que vaya a utilizar con MSN Haga clic en OK para aplicar esta configuración ...

Страница 90: ...no a un puerto analógico 18 Véase punto 13 19 Véase punto 14 20 Haga clic en Add Añadir y teclee el número de teléfono que desea utilizar para el puerto analógico sin el cero Después haga dos veces clic en OK para volver a la pantalla para la configuración de RDSI ...

Страница 91: ...1 en el apartado Ports voice Puertos voz y haga clic en Properties Propiedades 22 Ahora deberá seleccionar el número de teléfono para el puerto analógico de MSN Véase capítulo 5 Después haga clic en OK para aplicar esta configuración ...

Страница 92: ... ello deberá acceder a Control Panel Panel de control seleccionar Network Red Services Servicio y hacer clic en Add Añadir Seleccione Remote Access Services Después deberá instalar el módem como un módem estándar en COM2 1 Acceda al panel de control y haga clic en Network Red Seleccione Adapters Adaptadores y haga clic en Add Añadir 2 Haga clic en Have Disk Desde disquete ...

Страница 93: ...clear D PCMCIA WinNT o para la versión PCI D Internal WinNT Tarjeta PCMCIA Tarjeta PCI interna 4 Seleccione en adaptador de RDSI ISDN 128k PH adapter para la tarjeta PCI o ISDN128k PC adapter para la tarjeta PCMCIA Después haga clic en OK 5 Seleccione PCI o PCMCIA y haga clic en OK d PCMCIA winnt ...

Страница 94: ...tipo de switch Euro RDSI y haga clic en OK 7 A continuación accederá a la pantalla de RAS Haga clic en Add Añadir para agregar RDSI 1 y 2 y haga clic en Configure Configurar 8 Ahora se encuentra instalado el adaptador RDSI Haga clic en Close Cerrar ...

Страница 95: ...ón e introduzca su número MSN y para el desglose de llamadas si así lo desea Los números deberán tener siempre 9 dígitos e incluir el prefijo sin el cero Después haga clic en OK A partir de este momento podrá utilizar el adaptador para el acceso a Internet por medio del Acceso Telefónico a Redes ...

Страница 96: ...rminos MSN Para seleccionar uno de sus números de teléfonos que se debe utilizar con el adaptador RDSI Desglose de llamadas Si selecciona Caller party se desglosará su factura telefónica en los números usados con su adaptador RDSI BOD Enable BOD significa la activación de la opción Bandwith on demand Ancho de banda según demanda Si ha activado esta opción se cortará una de las líneas RDSI cuando e...

Страница 97: ...ne description claire du problème Le numéro de version des pilotes que vous utilisez vérifiez toujours sur le site Internet Dynalink que vous utilisez la dernière version Type d ordinateur portable PC que vous utilisez Système d exploitation que vous utilisez Pour de plus amples informations concernant les produits Dynalink veuillez visiter le site Internet Dynalink www dynalink com Chapitres conc...

Страница 98: ...ous La boîte devrait contenir les éléments suivants L adaptateur RNIS Ce Manuel d installation rapide Un câble RJ 45 RNIS CD ROM Matériel nécessaire 1 Un tournevis uniquement pour dispositif interne 2 A Un système d exploitation compatible Plug and Play tel que Windows 98 et B Un ordinateur portable ou PC compatible avec la version 1 0a du Plug and Play 3 Installation du matériel Déballage de l ad...

Страница 99: ... posez le à côté de vous 26 Trouvez un emplacement libre PCI 32 bit pour la carte 27 Enlevez la vis qui fixe le couvercle de protection de l emplacement libre Gardez la vis à la main vous en aurez à nouveau besoin pour fixer l adaptateur RNIS 28 Conservez également la plaque du couvercle de l emplacement dans le cas d une utilisation future 29 Insérez la carte dans l emplacement libre les bords de...

Страница 100: ...fois que Windows 95 a démarré la boîte de dialogue New Hardware Found Nouveau Matériel Détecté apparaît comme indiqué sur les captures d écran suivantes Cliquez sur Next Suivant 2 Insérez le CD ROM pilote dans l unité sélectionnée probablement D Cliquez sur Other Locations Autres emplacements ...

Страница 101: ...Win95 Cliquez sur OK Accepter si vous avez choisi le bon chemin Carte PCMCIA Carte PCI interne 4 Le pilote sera détecté Cliquez sur Finish Terminer 5 Si les fichiers devant être copiés ne sont pas détectés sélectionnez le champ Copy manufacturer s files from Copier fichiers du fabricant à partir de entrez le chemin D Internal Win95 D Interne Win95 pour une carte PCI interne et D PCMCIA Win95 pour ...

Страница 102: ...s détecter le modem le sélectionner à partir d une liste puis cliquez sur Next Suivant 7 L écran suivant apparaîtra Cliquez sur Have Disk Insérer Disque 8 Sélectionnez Browse Examiner et assurez vous que votre CD ROM pilote est bien dans votre lecteur de CD Sélectionnez le bon chemin D Internal Win95 D Interne Win95 pour une carte PCI interne et D PCMCIA Win95 pour l adaptateur RNIS PCMCIA Cliquez...

Страница 103: ... utiliser votre adaptateur RNIS pour Internet sélectionnez ISDN Internet PPP 64K adapter Adaptateur RNIS Internet PPP 64K et cliquez sur Next Suivant 10 Choisissez un des ports com RNIS et cliquez sur Next Suivant 11 Remplissez cet écran et cliquez sur Next Suivant ...

Страница 104: ...FRANÇAIS 12 L adaptateur RNIS apparaîtra dans la case du modem Cliquez sur OK Accepter ...

Страница 105: ... le programme Microsoft Dial up Networking 1 3 Réseau Commuté Microsoft 1 3 que vous pourrez trouver sur le CD ROM pilote D Dun13 FRENCH puis sélectionnez Network Adapter Adaptateur Réseau et cliquez sur Next Suivant 14 Après avoir installé Microsoft Dial up Networking 1 3 Réseau Commuté Microsoft 1 3 allez dans Control Panel Panneau de Configuration et cliquez sur New Hardware Nouveau Matériel 15...

Страница 106: ...uivant 17 La boîte de dialogue suivante s affichera Cliquez sur Have Disk Insérer Disque 18 Choisissez le bon chemin sur le CD ROM pilote D Internal Win95 D Interne Win95 pour une carte PCI interne et D PCMCIA Win95 pour l adaptateur RNIS PCMCIA Puis cliquez sur OK Accepter ...

Страница 107: ...FRANÇAIS 19 L écran suivant apparaît Cliquez sur OK Accepter 20 Choisissez Euro ISDN et cliquez sur Next Suivant 21 Ne mettez aucun numéro et cliquez sur Next Suivant ...

Страница 108: ...er RNIS IINWan95 Adaptateur RNIS Puis cliquez sur Properties Propriétés 23 Choisissez Setting Installation et remplissez votre Numéro MSN et l appelant reportez vous au chapitre 5 si vous le souhaitez Les numéros doivent toujours comporter 9 chiffres avec l indicatif régional sans le zéro Puis cliquez sur OK Accepter Pour activer cette installation vous devrez d abord redémarrer votre ordinateur ...

Страница 109: ...nt dans Start Démarrer Run Exécuter et en tapant log32 journal32 et ou linetest test de ligne Journal 32 est un programme permettant d analyser les problèmes lors de la numérotation Assurez vous que toutes les options sont cochées Si vous rencontrez des problèmes vous pouvez envoyer le fichier journal par e mail à notre service technique Test ligne vous pouvez tester ici votre ligne RNIS Entrez vo...

Страница 110: ...s que Windows 98 a démarré la boîte de dialogue New Hardware Found Nouveau Matériel Détecté apparaît comme indiqué sur les captures d écran suivantes Cliquez sur Next Suivant 2 Sélectionnez Search for the best driver Recommended Rechercher le meilleur pilote Recommandé et cliquez sur OK Accepter ...

Страница 111: ...r RNIS PCI vous devrez choisir D Internal Win98 D Interne Win98 Pour l adaptateur RNIS PCMCIA vous devrez choisir l application D PCMCIA Win98 Cliquez sur OK Accepter si vous avez choisi le bon chemin 4 Le pilote sera détecté Cliquez sur Finish Terminer 5 Choisissez Euro ISDN et cliquez sur Next Suivant D ...

Страница 112: ... de MSN et de l appelant 7 Allez dans Control Panel Panneau de Configuration System Système Device Manager Gestionnaire de Périphérique et dans Network adapters Adaptateurs Réseau choisissez Dynalink ISDN Adapter Adaptateur RNIS Dynalink Puis cliquez sur Properties Propriétés ...

Страница 113: ...t de ligne pour vérifier le matériel en allant dans Start Démarrer Run Exécuter et en tapant log32 journal32 et ou linetest test de ligne Journal 32 est un programme permettant d analyser les problèmes lors de la numérotation Assurez vous que toutes les options sont cochées Si vous rencontrez des problèmes vous pouvez envoyer le fichier journal par e mail à notre service technique Test ligne vous ...

Страница 114: ...cuter et entrez le chemin D Internal Win98 D Interne Win98 pour l adaptateur RNIS PCI ou D PCMCIA Win98 pour l adaptateur RNIS PCMCIA Puis cliquez sur OK Accepter 11 Veillez à ce que le moniteur ISDN dans le coin inférieur droit de l écran soit fermé Puis cliquez sur Clean Nettoyer les pilotes seront alors enlevés D ...

Страница 115: ...dialogue New Hardware Found Nouveau Matériel Détecté apparaît comme indiqué sur les captures d écran suivantes Cliquez sur Next Suivant 2 Choisissez Search for a suitable driver Rechercher le pilote approprié et cliquez sur Next Suivant 3 Choisissez Specify a location Préciser un emplacement et cliquez sur Next Suivant Network Controller V ...

Страница 116: ...ternal Win2000 D Interne Win2000 Pour l adaptateur RNIS PCMCIA vous devrez choisir le chemin D PCMCIA Win2000 Cliquez sur OK Accepter si vous avez choisi le bon chemin 5 Le pilote sera détecté Cliquez sur Next Suivant 6 Cliquez sur Yes Oui et sur Finish Terminer Le pilote RNIS est maintenant installé Vous pouvez maintenant réinitialiser le PC ...

Страница 117: ...mérotation Assurez vous que toutes les options sont cochées Si vous rencontrez des problèmes vous pouvez envoyer le fichier journal par e mail à notre service technique Test de ligne vous pouvez tester ici votre ligne RNIS Entrez votre numéro de téléphone RNIS principal sans l indicatif régional Cliquez sur le bouton RNIS dans la barre des tâches avec le bouton droit de la souris et choisissez jou...

Страница 118: ...ctionnez Configuration Dans la Configuration RNIS vous devrez sélectionnez la ligne 01 ou la ligne 02 ISDN Device Périphérique RNIS Cela dépend de celle que vous allez utiliser pour numéroter Puis cliquez sur Properties Propriétés 9 Une fois dans ISDN B Channel Protocol Protocole Canal B RNIS vous pouvez sélectionner le protocole RNIS en cliquant sur le triangle HDLC X 75 V 120 ...

Страница 119: ...ration Configuration RNIS vous devrez sélectionner ISDN Device line 01 Ligne Périphérique RNIS 01 et cliquer sur Properties Propriétés 11 Cochez Enable Multilink PPP Activer Multilink PPP sur cet écran et cliquez sur Advance Avancée 12 Cliquez sur Add Ajouter et sélectionnez ISDNDevice 00 2 PériphériqueRNIS 00 2 Puis cliquez sur OK Accepter À partir de maintenant vous serez connecté à 128 Kbps lor...

Страница 120: ...ran Configuration RNIS vous devrez sélectionner ISDN Device 00 Périphérique RNIS 00 et cliquer sur Properties Propriétés 14 Cliquez sur MSN list Liste MSN en bas de cet écran reportez vous au chapitre 5 15 Vous pouvez ici taper un de vos propres numéros de téléphone que vous souhaitez utiliser avec la carte RNIS Puis appuyez deux fois sur OK Accepter afin de revenir sur l écran de configuration RN...

Страница 121: ...riphériques RNIS 01 ou 02 que vous allez utiliser pour la numérotation Puis cliquez sur Properties Propriétés 17 Sur cet écran vous pouvez sélectionner le numéro de téléphone que vous souhaitez utiliser sous MSN Appuyez sur OK Accepter pour activer l installation ...

Страница 122: ...8 Reportez vous au point 13 19 Reportez vous au point 14 20 Cliquez sur Add Ajouter et tapez ici le numéro de téléphone que vous souhaitez utiliser pour le port analogue sans le zéro Puis appuyez deux fois sur OK Accepter pour revenir sur l écran ISDN Configuration Configuration RNIS ...

Страница 123: ...us Pots voice Pots Vocal et cliquez sur Properties Propriétés 22 Vous devez maintenant sélectionner le numéro de téléphone pour le port analogue dans MSN Reportez vous au chapitre 5 Puis appuyez sur OK Accepter pour activer l installation ...

Страница 124: ...nel Panneau de Configuration puis choisir Network Réseau Services et cliquer sur Add Ajouter Sélectionnez ensuite Remote Access Services Services d Accès à Distance Après cela vous devrez installer un modem tel qu un standard modem modem standard sur COM2 1 Allez dans votre Panneau de Configuration et cliquez Network Réseau Choisissez Adapters Adaptateurs et cliquez sur Add Ajouter 2 Cliquez sur H...

Страница 125: ...al WinNT D Interne WinNT Carte PCMCIA Carte PCI interne 4 Choisissez l adaptateur RNIS ISDN 128k PH adapter Adaptateur PH 128k RNIS pour la carte PCI ou ISDN128k PC adapter Adaptateur PC 128k RNIS pour la carte PCMCIA Puis cliquez sur OK Accepter 5 Choisissez PCI ou PCMCIA et cliquez sur OK Accepter d PCMCIA winnt ...

Страница 126: ...mmutateur est Euro ISDN et cliquez sur OK Accepter 7 Vous entrerez maintenant dans RAS Cliquez sur Add Ajouter pour ajouter le RNIS 1 et 2 et cliquez sur Configure Configurer 8 L adaptateur RNIS est maintenant installé Cliquez sur Close Fermer ...

Страница 127: ...tallation et remplissez votre Numéro MSN et d appelant si vous le souhaitez Les numéros doivent toujours comporter 9 chiffres avec l indicatif régional sans le zéro Puis cliquez sur OK Accepter Vous pouvez maintenant utiliser l adaptateur par exemple pour Internet avec le réseau commuté ...

Страница 128: ...ionner un de vos numéros de téléphone à utiliser avec votre adaptateur RNIS Appelant Lorsque vous sélectionnez Caller party Appelant vous séparez sur votre facture téléphonique les numéros que vous avez utilisés avec votre adaptateur RNIS BOD L option Enable BOD Activer BOD signifie Bandwith on demand Largeur de Bande sur Demande Lorsque vous activez cette option cela raccrochera une ligne RNIS lo...

Отзывы: