background image

- 15 - 

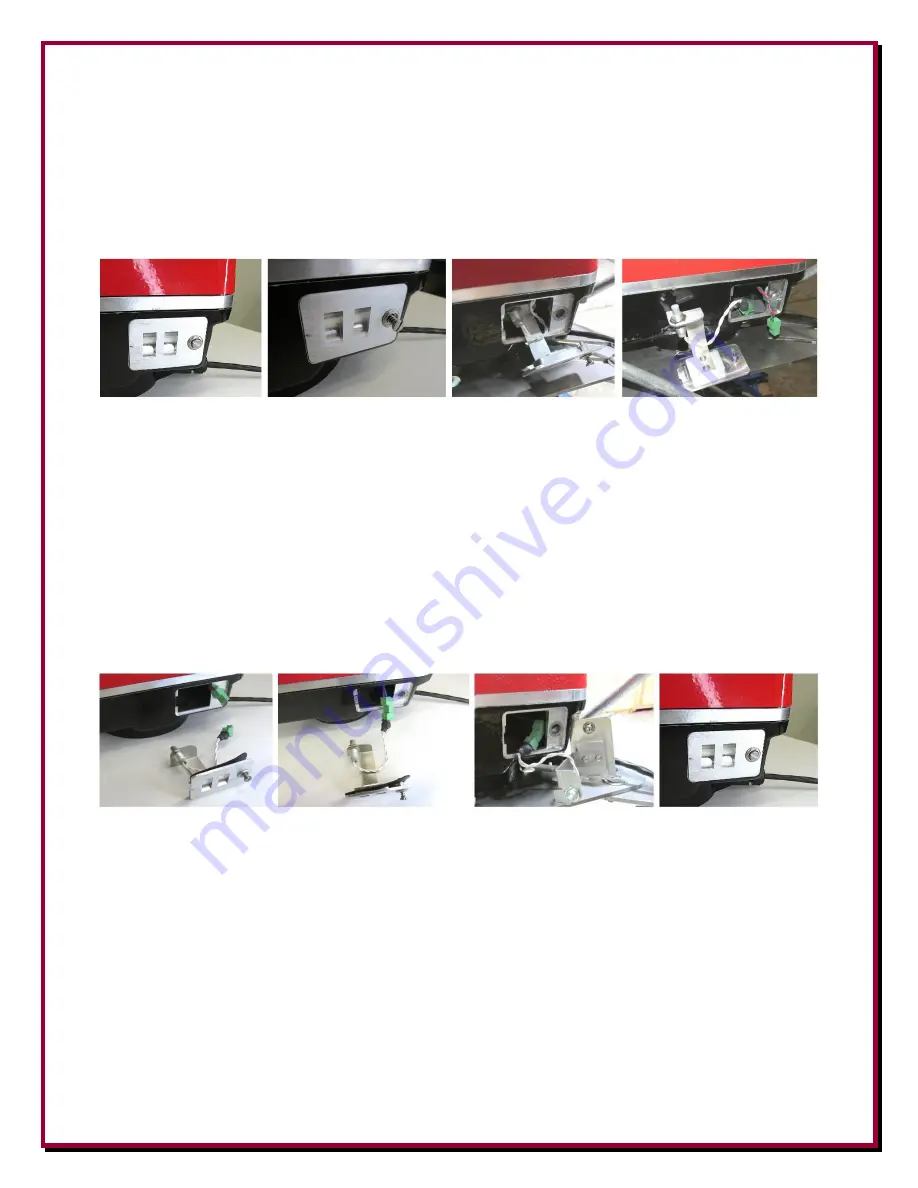
1.  On the side of the rotator body, you will notice an aluminum hatch or door.  

 
2.  Using a straight slot screwdriver, rotate the 1/4 turn screw counter-clockwise to open the door.  

 
3.  You can then carefully pull out the magnetic pulse sensor assembly until you see the green connector.  
 
4.  Unplug and remove the old pulse sensor assembly. 


                   1                                           2                                         3                                         4 


5.  Position the new replacement Pulse Assembly as shown. 

 
6.  Plug in the new replacement pulse sensor assembly.  

 
7. When tucking the connector and wires into the rotator, push them toward the right side (as you are looking 

at the opening in the rotator). This ensures the wires are kept away from any moving parts inside the rotator,  
 
8.  Carefully push the assembly in place and use a straight slot screwdriver and turn the 1/4 turn door screw 
clockwise to lock it and the gasket in place. 


                      5                                         6                                              7                                        8 


Содержание DXE-RT-4500HD

Страница 1: ...XE RT4500HD DXE RT4500HD INS Revision 0 DX Engineering 2022 1200 Southeast Ave Tallmadge OH 44278 USA Phone 800 777 0703 Tech Support and International 330 572 3200 Fax 330 572 3279 E mail DXEngineeri...

Страница 2: ...p Mount Mast Clamps available for 2 inch OD or 3 inch OD masts Precision Movement accuracy within 0 1 degrees with high resolution magnetic pulse sensor controller Easy Maintenance access panel allows...

Страница 3: ...bearing shelf or flat tower top The rotator mounting shelf must be installed so it is level and centered to the tower which will then be in line with the rotator to eliminate any undue stress The Rot...

Страница 4: ...holds the top plate in position and it is not designed to hold the weight of the rotator If you hold the rotator by the top plate you risk having the snap ring fail and the rotator will then drop away...

Страница 5: ...Stainless Steel 4 DXE LP20 F 4 pin control female cable connector with 6mm and 8 12mm water tight grommet 1 Rotator Lift Strap Aluminum 3 5 1 4 x 1 x 1 4 1 Rotator Lift Strap Bolt 3 5 16 18 x 3 4 Sock...

Страница 6: ...XE AS455G Tower Accessory Shelf for Rohn 45 and 55 tower Mast Clamp Select One DXE RTMC 2 DX Engineering Rotator Top HD Mast Clamp for 2 in OD mast DXE RTMC 3 DX Engineering Rotator Top HD Mast Clamp...

Страница 7: ...Pre made Rotator Control Extension Cable assembly with connectors installed 10 feet long DXE RTC 025PE Pre made Rotator Control Extension Cable assembly with connectors installed 25 feet long DXE RTC...

Страница 8: ...n above The cable needed for controlling the DX Engineering Rotator uses four wires Two 12AWG wires for DC supply to the motor and two 18AWG wires for the Pulse Sensor For cable runs over 300 feet use...

Страница 9: ...moisture drainage from the weep holes on the bottom of the DXE RT4500HD The following installation example uses a Rohn 45G tower DXE AS455G Rotator Shelf DXE RTMC 2 Two Inch Mast Clamp DXE TB300 Thrus...

Страница 10: ...ed Rotator Connections to the Rotator Control Box The RT4500HD uses four wires Two 12AWG wires for DC supply White Pin 1 and Black Pin 2 to the motor and two 18AWG wires for the Pulse Sensor Red Pin 3...

Страница 11: ...he rotator in the tower Using a Gin Pole raise the mast to the point that it can pass though the Thrust Bearing Keep in mind there is not a lot of play between the Thrust Bearing and Mast so alignment...

Страница 12: ...ctite is needed Torque specs for the patch bolts are actually 12 foot lbs BUT because of the patch compound this will vary considerably It is up to the installer to insure they are actually tight NOTE...

Страница 13: ...Hex Head Bolts securely in place to hold the Mast in place The four bolts squeeze the clamp securely around the steel mast Torque for the clamp bolts is 11 foot lbs tightening from the inside to the o...

Страница 14: ...p Incl Clamps for 2 in OD Mast Fasteners 3 4 in D x 4 ft L Rod DXE LRMM 2 458BS Lightning Rod Kit for Mast Top Incl Clamps for 2 in OD Mast Fasteners 5 8 in D x 4 ft L Rod DXE LRMM 2 458B Lightning Ro...

Страница 15: ...c pulse sensor You can order and keep on hand a spare magnetic pulse counter from DX Engineering DXE RT PULSE ASM Magnetic Pulse Sensor Assembly Kit Includes Magnetic Sensor Component Door Cover and G...

Страница 16: ...lse sensor assembly 1 2 3 4 5 Position the new replacement Pulse Assembly as shown 6 Plug in the new replacement pulse sensor assembly 7 When tucking the connector and wires into the rotator push them...

Страница 17: ...eet use appropriate size wire for 24 VDC at 3 1 A operation power requirements at the rotator Weight 22 lbs without hardware or mast clamp 27 lbs with hardware and 2 in Mast clamp Width 7 970 in apex...

Страница 18: ...17 Appendix Reference Information Overall dimensions of Rotator Top Plate Dimensions Bottom Rotator Mounting Bolt Pattern...

Страница 19: ...th the DXE RG4500HD Calibration Procedure 1 Install antenna if not already installed Since there are no hard limit switches in the DXE RT4500HD you can point the antenna at any known direction to comp...

Страница 20: ...allation damaged from severe weather including floods or abnormal environmental conditions such as prolonged exposure to corrosives or power surges or by the performance of repairs or alterations outs...

Отзывы: