


4.0 SECURITY (continued)
Note:
If the Supervisor Password has been setup and forgotten, the only recovery
method is to perform a factory reset of the unit, which will wipe out all configuration
settings. To perform a factory reset, press and hold the button located on the back of
unit above terminal block pins 4 and 5. The connector for the second terminal block
may need to be removed for easier access.
Passcode Setup
The Operator security level allows access only to alarm acknowledgement and to
change the room modes from occupied, unoccupied and cleaning. The operator
should be defined as the person(s) that has day-to-day interaction with the monitor to
change room operating modes (when no alarms are active). The operator and staff can
also respond to local audible and visual alarms. If Operator Password is enabled then
a password will be needed before changes can be made. The Supervisor Level allows
full access to all levels of the menu structure. This mode, if enabled, is used during
initial configuration and follow-up reconfiguration.
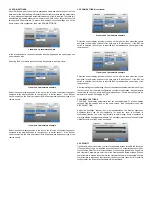
5.1 DIAGNOSTICS
The Diagnostics menu performs I/O and BACnet tests on the unit. The Diagnostics
menu can be accessed by clicking the settings icon on the home screen, then selecting
Diagnostic.
I/O Testing
In the I/O Testing menu, the screen will show the Inputs and Outputs selections. The
unit has the capability to choose the input desired from the pull-down menu; the input
value (volts or mA) and the corresponding calculated output value (in the Eng. units
selected) will be displayed if a sensor is properly connected.
5.1 DIAGNOSTICS (continued)
If the user chooses the Output BI1 they can view the output value and the user can
also change the state.
6.0 MAINTENANCE
The Maintenance menu provides several functions that help ensure the RSMC
is configured and operating accurately with proper parameters. To access the
Maintenance menu from the home screen, press the Settings icon in the top right
corner and select the Maintenance button.
Within the maintenance menu, the following maintenance functions can be accessed:
• Calibration of the built-in pressure sensor
• Date and Time allows manual or BACnet setting of date/time and customization of
the date/time display
• Duplicate/Cloning permits copying the RSMC configuration to and from a USB
thumb drive – the purpose of this is to replicate the configuration on other devices or
units that may be replaced in the field
• Software Update – in the event of software upgrades or new features that could
become available from Dwyer Instruments
• Reset To Factory Default – restores the unit’s original factory configuration.
6.1 PRESSURE CALIBRATION
Pressure Calibration is used to ensure accurate and reliable pressure sensing occurs
continuously in the room environment. To access pressure calibration from the home
screen, press the Settings icon in the top right corner. From the Maintenance menu,
select Pressure Calibration.
Depending on connection, the unit will display the live value of the room pressure
being sensed at the time of menu access. Zero Adjustment can be used for either
an on-board sensor (DP) or external sensor (UI2 and UI3). To access the on-board
sensor, remove the RSMC display from the wall surface and remove the pressure
tubes from the “+” (HIGH) and “-” (LOW) side of the sensor on the back of the unit.
Let both the “+” and “-” ports open/unblocked and press the Apply the Zero Function
button. The same can be done for external pressure transmitters at their location.
Diagnostic screen


