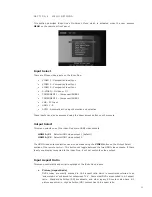
background image

13

14


5:4 

Set picture aspect ratio to 5:4


4:3 

Set picture aspect ratio to 4:3


16:9 

Set picture aspect ratio to 16:9


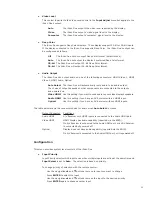
•  Active (Aspect Ratio) 


This is aspect ratio of content or movie.  For example, typical movie aspect ratios are    


1.85:1 or 2.35:1.


4:3 

Set active aspect ratio to 16:9


1.55:1  Set active aspect ratio to 1.55:1


1.66:1  Set active aspect ratio to 1.66:1


16:9 

Set active aspect ratio to 16:9


1.85:1  Set active aspect ratio to 1.55:1


2.35:1  Set active aspect ratio to 2.35:1


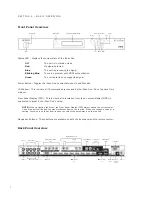
The iScan Duo scales the input image based on picture and active aspect ratio settings.


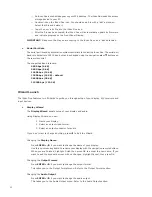
•  Stretch   


 Stretch 

gives you independent horizontal and vertical stretch control. The original aspect  


ratio is not maintained using this control. The Stretch control works differently from most  


other control screens.  It uses 

p

 and 

q

  navigation buttons to stretch vertically and 

t

 and 

u


buttons to stretch horizontally. The ENTER button takes you to the previous screen, or you  


can press the EXIT button on your remote to exit menus.


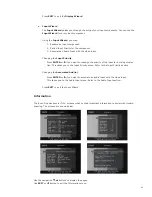
•  Shift  

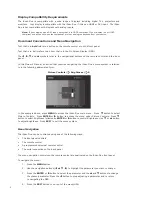
  Shift allows you to move around on a zoomed or stretched image. As you move around,  


you expose parts of the picture that were not visible.  Shift works only on a zoomed image.  


The controls work like Stretch described on the previous page.

Use the 

p

 and 

q

  navigation buttons to move the image vertically and 

t

 and 

u

 buttons 

to move the image horizontally. The ENTER button takes you to the previous screen, or you 
can press the EXIT button on your remote to exit menus.


•  Auto AR 


When Auto AR is enabled, the iScan Duo will set the input aspect ratio settings automatically.   


HDMI sources communicate this information to the iScan Duo.  Certain formats also have  


pre-defined aspect ratios.   For example, the (picture) aspect ratio of high-definition (HD)  


video formats is 16:9 while the (picture) aspect ratio of SXGA PC format is 5:4.


When Auto AR is disabled, use Picture and Active aspect ratio menus to manually select the  


correct aspect ratio.


•  Zoom

  The 

Zoom control allows you to magnify your picture while maintaining the aspect ratio of  


the input image.  As the picture magnifies, the area around the the iScan Duos becomes  


invisible off the sides, top and bottom of your display.


Use the 

p

 and 

q

 buttons on your remote to zoom up and down.


In addition, the remote control has a ZOOM 

p

  and a ZOOM 

q

 button to quickly zoom an  


image.


•  Presets

  Presets provides a short-cut to common aspect ratio settings.

16:9 Full Frame   
Select this mode when both the picture aspect ratio and the active aspect ratio of the 
input image are 16:9.  If the active aspect ratio is different, there will be black bars on 
the sides or on the top and bottom part of your display.

4:3 Full Frame   
Select this mode when both the picture aspect and the active format aspect ratio of the 
input image are 4:3.  For a 16:9 display there will be black bars on the left and right 
side of your display.

4:3 Letterbox   
Select this mode when the picture aspect ratio is 4:3 but the active format aspect ratio 
of the input image has a 16:9 or larger aspect ratio.  Some older DVDs are encoded 
in this manner. The iScan Duo will vertically stretch the input image to fill the screen.

Panorama   
This mode is a variation of the 4:3 Full Frame mode.  The iScan Duo stretches the input 
image to remove the black bars on both sides of the display.  The middle part of the image  
is not stretched. Only the left and right side of the image are stretched.
 
User Preset   
Custom aspect ratio settings including picture and active aspect ratios, zoom, stretch and  
shift functions will be saved in User Preset.


Input Adjust

This menu controls the settings on iScan Duo’s inputs. 


•  PReP

PReP

 is an exclusive DVDO processing technology developed by Simplay Labs.

Standard definition (SD) formats such as 480p, 576p were deinterlaced at some point before 
reaching iScan Duo. Deinterlacing is a complex processing technology that has a significant 
impact on image quality. The iScan Duo uses Simplay Labs’ high performance DVDO precision 
deinterlacing.

High definition (HD) formats such as 1080p50 and 1080p60 are also frequently created by 
deinterlacing 1080i50 and 1080i60.

PReP accepts one of the formats mentioned, and converts it back into an interlaced format. 
It can then be deinterlaced again using the DVDO technology in iScan Duo, which usually  
results in a higher quality picture.

The PReP control allows users to disable this function. 


480p/576p             Use this menu to enable or disable PReP for 480p/576p formats


1080p 50Hz/60Hz  Use this menu to enable or disable PReP for 1080p50/60 formats


•  DeInterlacer 

The deinterlacer control is relevant when the input is interlaced (480i, 576i, 1080i50 or 1080i60)  
or it is a deinterlaced format and PReP is enabled (480p, 576p, 1080p50 or 1080p60).

Содержание iScan Duo

Страница 1: ...O W N E R S M A N U A L D U A L O U T P U T H I G H D E F I N I T I O N V I D E O P R O C E S S O R ...

Страница 2: ... and allow Simplay Labs a reasonable opportunity to inspect the allegedly defective product b No Product may be returned without Simplay Labs consent Simplay Lab s Return Material Authorization must accompany all returns and all returns must be delivered to Simplay Labs within the warranty period c Owner may then at its own expense return the allegedly defective Product freight pre paid and in the...

Страница 3: ... Panel Overview 7 Back Panel Overview 7 Video Inputs 8 Video Outputs 8 Audio Inputs 8 Audio Outputs 9 12V Trigger Outputs 9 RS232 Serial Connection 9 Power Supply Input 9 Mini USB Port 9 IR Remote Control Jacks 9 S e c t i o n 3 I n i t i a l S e t u p 10 Initial Setup 10 STEP 1 Power Up 10 STEP 2 Connect the iScan Duo to the Display 10 STEP 3 Connecting the Sources to the iScan Duo 11 STEP 4 Conf...

Страница 4: ...16 Audio Delay 16 Picture Controls 16 Brightness 17 Contrast 17 Color Saturation 17 Hue Tint 17 Detail Enhancement 17 Edge Enhancement 17 Mosquito NR 17 Output Setup 18 Test Patterns 18 Video Format 18 Underscan 18 1 1 Frame Rate 19 Frame Lock 19 Aspect Ratio 19 Color Space 19 Colorimetry 19 Video Level 20 Deep Color 20 Audio Output 20 Configuration 20 Input Priority 20 Rename Inputs 21 Auto Wake ...

Страница 5: ...mponent Inputs 21 Select RGBS 22 LED Brightness 22 Factory Defaults 22 Update Firmware 22 Serial Port Rate 23 Wizard Launch 23 Display Wizard 23 Input Wizard 24 Information 24 TA B L E O F C O N T E N T S ...

Страница 6: ......

Страница 7: ...o HDMI 1 3 Outputs One HDMI 1 3 Audio Output for direct connection to an A V Receiver Multi standard high definition analog video decoder with 3D comb filter Two 12V Triggers to control other devices This Owner s Manual will help you set up your iScan Duo and provide the necessary information required to get the best picture quality to your displays and A V receiver It will also show you how to pr...

Страница 8: ...o in the following abbreviated form Picture Controls _ Brightness _ 0 In the example above press MENU to access the iScan Duo main menu Press q button to select Picture Controls Press ENTER or button to access the menu under Picture Controls Press q button to select Brightness followed by ENTER or u button to control Brightness Use q or p button to adjust brightness Press EXIT to exit the menu sys...

Страница 9: ...ion indicated 3 Remove the old batteries if applicable 4 Insert two new AAA batteries in the compartment as shown on the inside of the battery compartment Make sure the batteries are correctly inserted observing the proper polarity 5 After installation replace the cover and recycle the old batteries if applicable Remote Control The supplied remote control is used to operate the iScan Duo The table...

Страница 10: ...tios are 1 85 1 or 2 35 1 11 PRESETS Selects preset aspect ratios including 16 9 Full Frame 4 3 Full Frame 4 3 Letterbox and Panorama 12 MENU Use this button to access the on screen main menu 13 EXIT Use this button to exit the current menu or the exit the on screen menu 14 t u pq ENTER Menu Navigation buttons Press ENTER to confirm a selection or to enter a new menu 15 ZOOM pq Use these buttons t...

Страница 11: ...roducing equipment such as power amplifiers or other components that generate heat during use Expose the iScan Duo to high temperatures humidity steam smoke dampness or excessive dust Avoid installing the iScan Duo near radiators and other heat producing appliances Install the iScan Duo near unshielded TV or FM antennas cable TV decoders and other RF emitting devices that might cause interference ...

Страница 12: ...ter 1 2 3 4 5 6 7 8 VGA SERIAL PORT VIDEO 3 Y G Pb B Pr R VIDEO S 12VDC 5A 1 2 1 2 1 2 1 2 3 L R L R D I G I T A L A U D I O I N P U T S AUDIO OUT TRIGGER OUT A N A L O G A U D I O I N P U T S 12VDC 50mA MAX 1 2 1 2 I N O U T S VIDEO AUDIO A N A L O G V I D E O I N P U T S H D M I I N P U T S H D M I O U T P U T S USB POWER IR HDMI Inputs 1 8 HDMI Outputs 1 2 Power Remote Control Jacks Mini USB Po...

Страница 13: ... to a display that has a DVI input use either an HDMI to DVI cable or an adapter Audio Inputs There are fourteen 14 audio inputs on the iScan Duo Three 3 Optical Digital inputs One 1 Coaxial Digital inputs Two 2 Analog L R inputs Eight 8 HDMI 1 3 inputs While the digital and analog audio inputs can be assigned to any one of the video inputs the HDMI audio inputs are tied directly to the HDMI video...

Страница 14: ...when system is on Signal is low when system is off 12V Trigger 2 port Signal is high when HDMI Video Output 1 is selected Signal is low when HDMI Video Output 2 is selected RS232 Serial Connection This connection is used as an interface to control the iScan Duo with an automation system Power Supply Input The iScan Duo comes with a 12V 5A AC to DC converter power supply which accepts 100 240 VAC a...

Страница 15: ...white border around the edge of the screen otherwise the display is overscanning the signal from the iScan Duo This is very common and is known for cutting off sports scores at the bottom of the screen Use the Underscan control to shrink the size of the output image so that you can see the white border Press MENU button and use the on screen menu as shown Output Setup _ Underscan _ Adjust Value Ch...

Страница 16: ... available Similarly use HDMI for audio if available otherwise use Digital Optical or Coaxial Finally use Analog Stereo output STEP 4 Configuring the Input Sources to Get Maximum Performance The basic rule for getting the best performance from input sources is to configure the sources to output the native resolution of the content and to let the iScan Duo perform the video processing necessary to ...

Страница 17: ...DMI video outputs HDMI A V 1 Selects HDMI video output 1 default HDMI A V 2 Selects HDMI video output 2 The HDMI video output selection can also be made using the VIDEO button on the Output Select section of the remote control This button will toggle between the two HDMI video outputs If there is only one display connected to the iScan Duo it will not switch the video output Input Aspect Ratio Thi...

Страница 18: ...d image As you move around you expose parts of the picture that were not visible Shift works only on a zoomed image The controls work like Stretch described on the previous page Use the p and q navigation buttons to move the image vertically and t and u buttons to move the image horizontally The ENTER button takes you to the previous screen or you can press the EXIT button on your remote to exit m...

Страница 19: ...aspect ratio settings including picture and active aspect ratios zoom stretch and shift functions will be saved in User Preset Input Adjust This menu controls the settings on iScan Duo s inputs PReP PReP is an exclusive DVDO processing technology developed by Simplay Labs Standard definition SD formats such as 480p 576p were deinterlaced at some point before reaching iScan Duo Deinterlacing is a c...

Страница 20: ...ed for interlace video based content Game Mode This mode is intended for use with game consoles like those from Sony Microsoft and Nintendo It minimizes video processing delay through the iScan Duo The total amount of delay is about half a frame of delay when the output frame rate is locked to the input frame rate Unlocked frame rates may increase this delay Deep Color Deep Color mode allows the i...

Страница 21: ...video The iScan Duo will then treat them as a pair when switching inputs so that they switch together When you choose an audio input on this menu you are as sociating that audio input with the currently selected video input If your source device uses DVI for video output and you are connecting to the iScan Duo using a DVI to HDMI adapter cable you will have to connect audio via a separate cable an...

Страница 22: ...nhancement Increase Detail Enhancement to enhance or sharpen the fine details in an image such as grass or the texture of a plaster wall Decrease Detail Enhancement to reduce noise in a noisy image Edge Enhancement Increase Edge Enhancement to sharpen object edges in an image Decrease Edge Enhancement to soften object edges in an image Mosquito NR The term noise in the context of video images refe...

Страница 23: ...rred format is not on the list of standard formats shown on the Video Format menu listed below Use the INFO button on the remote or the Information screen in the menu to see the cur rent output format If you prefer not to use Auto Select you can choose one of the standard formats from the list on the Video Format menu List of formats in the Video Format menu Auto Select this is the default setting...

Страница 24: ...sources or formats Aspect Ratio Aspect Ratio sets the display aspect ratio If you have an HDMI display Auto default is the safe choice Auto The iScan Duo outputs the preferred aspect ratio reported by the display 16 9 Sets the display aspect ratio to 16 9 4 3 Sets the display aspect ratio to 4 3 Color Space Color Space provides four choices for output color space If you are unsure what to use Auto...

Страница 25: ...uts and powered up Video HDMI Use this setting if you want to send audio to your video display s speakers Audio HDMI Use this setting if you have an AV Receiver with an HDMI input Optical Use this setting if you have an AV Receiver without HDMI inputs The table below shows the connector choice for audio when Auto Select is chosen Output Connector Conditions Audio HDMI A V Receiver with HDMI inputs...

Страница 26: ...cally power on If the iScan Duo is powered down with the remote then Auto Wake Up is turned off Mode 2 The iScan Duo will always automatically power on whenever an input signal is present on any input Auto Standby Auto Standby gives you control over the conditions in which the iScan will power itself down Off The iScan Duo never goes into standby mode This is useful in cases where you may not have...

Страница 27: ...imum brightness off both LED and FPD Factory Defaults Factory Defaults is a quick way to undo any settings that have been made and restore the iScan Duo s original default settings Video Output Restores video format setting to Auto In Auto mode the iScan Duo will automatically communicate with your display and output your display s preferred format Picture Controls Restores default settings to Pic...

Страница 28: ...K Wizard Launch The iScan Duo features two Wizards to guide you through setup of your display A V receivers and input devices Display Wizard The Display Wizard assists setup of your display and audio Using Display Wizard you can 1 Name your display 2 Select an output video format 3 Select an output connector for audio If you don t want to change anything press t to Exit the Wizard Changing the Dis...

Страница 29: ...n the priority of the input for Auto input selec tion This takes you to the Input Priority menu Refer to the Input Priority section Changing the Associated Aud io Press ENTER or u if you want to associate an audio input with the video input This takes you to the Audio Input menu Refer to the Audio Input section Press EXIT to exit the Input Wizard Information The iScan Duo has several Info screens ...

Страница 30: ... V 1 A new menu item is added in the Output Setup menu Main Menu _ Output Setup _ Second Output Off Secondary output is not activated On Secondary output is activated The secondary output always follows the resolution and other format characteristics of the primary output including audio The secondary output is also not deep color to ensure maximum compatibility 3 Day and Night Modes Added CMS Day...

Страница 31: ...s in iScan Duo s CMS 1 1 Secondary Color Gamut Controls Cyan Magenta Yellow Secondary Color Adjustments x y Y are enabled in the Color Gamut menu For example Main Menu _ Output Setup _ Color Gamut _ Cyan x 1 2 Luminance Control for Color Gamut Color Gamut adjustments now come with luminance control Y The primary colors Red Green Blue and White each comes with a new luminance Y control For example ...

Страница 32: ...r Zoom 0x46 only accepted integer values Front panel menu text and back light remained on when exiting main menu At 1080p output lower part of gamut selection menu remained at bottom of screen when opening edit control Changing the output resolution from SXGA to VGA and cancelling the operation would cause the system to be unresponsive CEC pass through did not work Info screen page rolled over on ...

Страница 33: ... a Use the menu system Main Menu _ Output Setup _ Test Patterns _ On b Use the Test Pattern On Off button on the remote control 3 Set all Color Gamut Offset and Gray Scale offset values to zero Alternatively turn on CMS Bypass see below 4 Go to the User menu and select the first item Red x Main Menu _ Output Setup _ User _ Red x The TPG automatically generates only the Red primary 75IRE 5 Enter th...

Страница 34: ...ated as one format 576i 288p treated as one format 480p 576p 720p50 720p60 1080i50 1080i60 1080p24 1080p25 1080p30 1080p50 1080p60 VGA SVGA XGA SXGA The input settings that are saved include Picture Controls Deinterlacer Modes Game Mode Picture Aspect Ratio Active Aspect Ratio Panorama H V Zoom H V Pan Input Chromaticity Input color space Input colorimetry Audio delay 3 New Picture Controls Severa...

Страница 35: ...only The iScan Duo will override the color space information that is obtained from the HDMI source from the HDMI link and use the color space specified by the user instead This new control is available in the Input Adjust menu Main Menu _ Input Adjust _ Input Color Space The menu selection is as follows Auto default RGB YCbCr 422 YCbCr 444 4 2 Input Colorimetry This control is for HDMI inputs only...

Страница 36: ...order Level A border is created when the active aspect ratio of the input does not match the display aspect ratio For example if the active aspect ratio is 4 3 and the display aspect ratio is 16 9 the iScan Duo creates a left and right border on the resulting image The border level can now be adjusted from 0 IRE black to 100 IRE white with a slider bar control The default setting is 0 IRE This con...

Страница 37: ...ault commands See Updated Serial Automation command document for more details IMPROVEMENTS Added 1080p30 pre defined output format Front Panel displays firmware version when Info Screen About is selected Zooming range is increased to 16x the input image size Improved input switching by reducing flashing and flickering Improved analog video performance by reducing noise levels Info Screen provides ...

Страница 38: ... based on BT 709 The chromaticity can also be manually set from this menu which contains standard profiles in cluding RGBs 709 NTSC PAL SECAM SMPTE C CIE1931 AppleRGB and Adobe 1998 When the Chromaticity is selected the hint area of the on screen display shows corresponding color and white point x y values red xr yr blue xb yb green xg yg and white xw yw Note This control is currently not updating...

Страница 39: ...signal from the CMS processor The units for these indicators as well as the adjustment values are in percentage of full range gamma corrected RGB 3 There are 8 chromaticity offset controls Red x Red y Green x Green y Blue x Blue y White x White y 4 When Red is being adjusted the Duo automatically generates a red test pattern Similarly when Green Blue and white are being adjusted the green blue and...

Страница 40: ...u as described in the previous section 1 Support for Audio only optical and coax sources This feature is for users who have digital audio only coax and optical source i e no video source and want to use it with Duo Previously this feature is not available because the Duo goes into standby mode when there is no video input auto standby on The Duo now detects the presence of digital audio coax and o...

Страница 41: ...36 ...

Страница 42: ...www simplaylabs com Contact us directly at admin simplaylabs com Toll Free 1 888 436 4411 75 0300 02 ...

Отзывы: