background image

PRECAUTIONS

To reduce the risk of serious injury, read the following safety instructions before using the product.
They contain important information for use and maintenance of the equipment as well as for your
personal safety. Keep these instructions in a safe place for maintenance purposes or for ordering
spare parts.

The exerciser may not be used by persons with a weight of over 110 kg.

The device must be constructed in one or two adults.

Owner responsibility is to ensure that all users of this product are properly informed about 
how to safely use this product.

This product is designed for the physical exercise by adults. Do not leave children or pets 
unattended in the room with the machine.

Provide adequate space for safe use of equipment.

Place the device on non-slip surface. If you want to protect your floor, place the protective 
pad device.

Keep the equipment indoors, away from moisture and dust. Do not put the equipment in a 
covered patio or near water.

The product is made for home use only. Warranty and manufacturer's liability do not extend 
to any product or damage to the product caused by commercial purposes.

Consult your physician before starting with any exercise programs to receive advice on the 
optimal training.

Incorrect/excessive training can cause health injuries.

If you feel sickness, chest pain, fits of dizziness or breathlessness during your training, 
immediately stop the training and consult your physician.

Ensure that training only starts after correct assembly, adjustment and inspection of the 
home exerciser. 

Follow the steps of the assembly instruction carefully.

Use only original parts DUVLAN (see checklist).

Tighten all adjustable parts to prevent sudden movement while training.

Do not use the home exerciser without shoes or with loose fitting footwear. During the 
training, do not wear loose clothing. Before starting training take off all jewelry. Properly 
adjust your hair, so you do not obstruct during exercise.

Damaged components may endanger your safety or reduce the lifetime of the equipment.

For this reason, worn or damaged parts should be replaced immediately and the equipment 
taken out of use until this has been done.

Check all nuts and bolts, whether they are tight.

Any assembly/disassemble of the product must be done carefully.

Keep your hands and feet away from moving parts.

Do not try to repair this product yourself.

Do not exceed the limits of the adjusting mechanisms.

Care and maintenance:

In order to prevent perspiration from damaging the seat cover,use a towel or wipe off the 
seat cover after each use.

Lightly grease the moving parts to improve their functioning and prevent unnecessary wear 
and tear.

29

EN

Содержание loki DVL2011

Страница 1: ...N vod na pou itie Posil ovacia ve a DUVLAN Loki k d DVL2011 N vod k pou it Posilovac v DUVLAN Loki k d DVL2011 User manual Home Gym DUVLAN Loki code DVL2011 1 CZ EN SK...

Страница 2: ...spr vnou manipul ciou so zariaden m V pr pade reklam cie n s kontaktujte Z ru n doba za na plyn d tumom predaja uschovajte preto doklad o k pe Z kazn cky servis Aby sme V m mohli o najlep ie pom c s p...

Страница 3: ...a obmedzeniach konzultujte V tr ning s Va im lek rom Povie V m ktor tr ning je pre V s vhodn Nespr vny tr ning a precenenie Va ich schopnost m e po kodi Va e zdravie Pokia po as tr ningu poc tite nevo...

Страница 4: ...ou troch es hrann ch skrutiek M10x15 mm 85 a troch podlo iek M10 88 Rovnak m sp sobom pripojte spodn pevn r m 2 aj na av stranu z kladn ho r mu 1 2 Do z kladn ho r mu 1 vlo te vodiace ty e z va ia 7 k...

Страница 5: ...vodiace ty e z va ia 7 nasu te 9 z va 40 3 Na v berov hriade 21 nasu te obj mku hriade a 63 a v prvej hornej diere ho zabezpe te s kol kom 44 4 Vlo te v berov hriade 21 do stredn ho otvoru na posledno...

Страница 6: ...0 88 ktor ste pred t m odstr nili 4 Potom pripojte horn kr ov nosn k 7 k nosn mu r mu 5 pomocou dvoch es hrann ch skrutiek M10x70 mm 75 tyroch podlo iek M10 88 a dvoch mat c M10 94 5 Nakoniec pripojte...

Страница 7: ...rukov te 70 5 Z r rky rukov te kr tka 19 vyberte es hrann skrutku M10x20 mm 79 a podlo ku M10 88 6 Na prav rameno Butterfly 10 pripevnite r rku rukov te kr tku 19 pomocou es hrannej skrutky M10x20 mm...

Страница 8: ...r mu sedadla 12 pripevnite r m na posil ovanie n h 13 pomocou es hrannej skrutky M12x75 mm 73 dvoch podlo iek M12 87 a matice M12 93 3 Do r mu na posil ovanie n h 13 vlo te bicepsov podperu 14 pou ite...

Страница 9: ...ky M10 88 4 Na VKR 16 pripevnite r rky rukov te kr tku 19 pomocou dvoch es hrann ch skrutiek M10x20 mm 79 a dvoch podlo iek M10 88 5 Z r rky rukov te dlh 20 vyberte es hrann skrutky M10x20 mm 79 a po...

Страница 10: ...tiek M8x15 mm 83 a dvoch podlo iek M8 90 4 Na VKR r m 16 pripevnite VKR operadlo 33 a dve VKR vank e na ruky 34 pomocou iestich es hrann ch skrutiek M8x50 mm 81 a iestich podlo iek M8 90 5 Na bench z...

Страница 11: ...Krok 8 11 SK...

Страница 12: ...12 SK...

Страница 13: ...nn ch skrutiek M10x45 mm 77 tyroch podlo iek M10 88 a dvoch mat c M10 94 c Do sp tn ho dr iak U 25 namontujte kladku NO 6 38 pomocou es hrannej skrutky M10x45 mm 77 dvoch podlo iek M10 88 a matice M10...

Страница 14: ...u U 28 pomocou dvoch es hrann ch skrutiek M6x15 mm 84 tyroch podlo iek M6 91 a dvoch mat c M6 97 2 Tieto bezpe nostn kryty 29 pripojte na spodn pevn r m 2 a horn pevn r m 8 pomocou smich es hrann ch s...

Страница 15: ...y zp soben nespr vnou manipulac se za zen m V p pad reklamace n s kontaktujte Z ru n doba za n b et datem prodeje Uschovejte proto doklad o koupi Z kaznick servis Abychom V m mohli co nejl pe pomoci s...

Страница 16: ...konzultujte V tr nink s l ka em ekne V m kter tr nink je pro V s vhodn Nespr vn tr nink a p ecen n Va ich schopnost m e po kodit Va e zdrav Pokud b hem tr ninku poc t te nevolnost bolest na hrudi nebo...

Страница 17: ...r m 2 pomoc t estihrann ch roub M10x15 mm 85 a t podlo ek M10 88 Stejn m zp sobem p ipojte spodn pevn r m 2 i na levou stranu z kladn ho r mu 1 2 Do z kladn ho r mu 1 vlo te vod c ty e z va 7 koncem...

Страница 18: ...2 Na vod c ty e z va 7 nasu te 9 z va 40 3 Na v b rov h del 21 nasu te obj mku h dele 63 a prvn horn d e ho zajist te s kol kem 44 4 Vlo te v b rov h del 21 do st edn ho otvoru na posledn m z va 40 5...

Страница 19: ...dvou podlo ek M10 88 4 Pot p ipojte horn k ov nosn k 7 k nosn mu r mu 5 pomoc dvou estihrann ch roub M10x70 mm 75 ty podlo ek M10 88 a dvou matic M10 94 5 Nakonec p ipojte horn k ov nosn k 7 k zadn m...

Страница 20: ...dr adlo rukojeti 70 5 Z trubky rukojeti kr tk 19 vyberte estihrann roub M10x20 mm 79 a podlo ku M10 88 6 Na prav rameno Butterfly 10 p ipevn te trubku rukojeti kr tkou 19 pomoc estihrann rouby M10x20...

Страница 21: ...2 K r mu sedadla 12 p ipevn te r m na posilov n nohou 13 pomoc estihrann rouby M12x75 mm 73 dvou podlo ek M12 87 a matice M12 93 3 Do r mu na posilov n nohou 13 vlo te bicepsovou podp ru 14 pou ijte p...

Страница 22: ...podlo ky M10 88 4 Na VKR 16 p ipevn te trubky rukojeti kr tkou 19 pomoc dvou estihrann ch roub M10x20 mm 79 a dvou podlo ek M10 88 5 Z trubky rukojeti dlouh 20 vyberte estihrann rouby M10x20 mm 79 a p...

Страница 23: ...tihrann ch roub M8x15 mm 83 a dvou podlo ek M8 90 4 Na VKR r m 16 p ipevn te VKR op radlo 33 a dv VKR pol t e na ruce 34 pomoc esti estihrann ch roub M8x50 mm 81 a esti podlo ek M8 90 5 Na bench z kla...

Страница 24: ...Krok 8 24 CZ...

Страница 25: ...25 CZ...

Страница 26: ...estihrann ch roub M10x45 mm 77 ty podlo ek M10 88 a dvou matic M10 94 c Do zp tn ho dr k U 25 namontujte kladku NO 6 38 pomoc estihrann rouby M10x45 mm 77 dvou podlo ek M10 88 a matice M10 94 3 Mont d...

Страница 27: ...desku typu U 28 pomoc dvou estihrann ch roub M6x15 mm 84 ty podlo ek M6 91 a dvou matic M6 97 2 Tyto bezpe nostn kryty 29 p ipojte na spodn pevn r m 2 a horn pevn r m 8 pomoc osmi estihrann ch roub M6...

Страница 28: ...y are wearing parts and damages caused by misuse of the product In the case of claim please contact us The warranty period starts at the date the product was purchased please carefully retain your sal...

Страница 29: ...ning Incorrect excessive training can cause health injuries If you feel sickness chest pain fits of dizziness or breathlessness during your training immediately stop the training and consult your phys...

Страница 30: ...ower Fixed Tube 2 to the Base Frame 1 using six M10X15mm Hex Bolts 85 and six M10 Washers 88 2 Insert the end without nut welded of the Weight Guide Tube 7 into the Base Frame 1 3 Slide two Rubber Cus...

Страница 31: ...s 40 down the Weight Guide Tube 7 3 Slide the Selector Shaft Bushing 63 down the Selector Shaft 21 at first hole fix with Selector Shaft Pin 44 4 Insert the Selector Shaft 21 into hole of the Weight P...

Страница 32: ...Weight Guide Tubes 7 using two M10X20mm Hex Bolts 79 and two M10 Washers 88 4 Attach the Upper Cross Beam 6 to the Support Frame 5 using two M10X70mm Hex Bolts 75 four M10 Washers 88 and two M10 Nylon...

Страница 33: ...he Right Butterfly Arm 10 5 Remove one M10X20mm Hex Bolt 79 and one M10 Washer 88 from the Handle Tube Short 19 6 Attach the Handle Tube Short 19 to the Right Butterfly Arm 10 using one M10X20mm Hex B...

Страница 34: ...h the Leg Extension Frame 13 to the Seat Frame 12 using one M12X75mm Hex Bolts 73 two M12 Washers 87 and one M12 Nylon Nut 93 3 Insert the Arm Cushion Frame 14 into the Leg Extension Frame 13 using on...

Страница 35: ...ndle Tubes Short 19 4 Attach two Handle Tubes Short 19 to the VKR 16 using two M10X20mm Hex Bolts 79 and two M10 Washers 88 5 Remove one M10X20mm Hex Bolt 79 and one M10 Washer 88 from the Handle Tube...

Страница 36: ...o M8X15mm Hex Bolts 83 and two M8 Washers 90 4 Attach the VKR Backrest Cushion 33 and two VKR Arm Cushions 34 to the VKR 16 using six M8X50mm Hex Bolts 81 and six M8 Washers 90 5 Attach the Bench Cush...

Страница 37: ...STEP 8 37 EN...

Страница 38: ...38 EN...

Страница 39: ...locks 27 using two M10X45mm Hex Bolts 77 four M10 Washers 88 and two M10 Nylon Nuts 94 c Install Pulley No 6 38 to Reverse U 25 using one M10X45mm Hex Bolt 77 two M10 Washers 88 and one M10 Nylon Nut...

Страница 40: ...rs 29 using four M6X15mm Hex Bolts 84 eight M6 Washers 91 and four M6 Nylon Nuts 97 2 Attach two Safety Covers 29 to the Lower Fixed Tube 2 and the Upper Fixed Tube 8 using eight M6X15mm Hex Bolts 84...

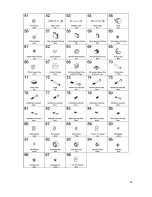
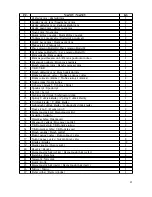
Страница 41: ...ZOZNAM DIELOV SEZNAM D L PARTS LIST 41...

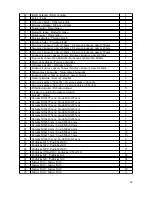
Страница 42: ...42...

Страница 43: ...rukojeti kr tk 4 20 No n r rka No n trubka 1 21 V berov hriade V b rov h del 1 22 Spodn ty Spodn ty 1 23 Lat ty Lat ty 1 24 Stabiliza n dr iak Stabiliza n dr k 2 25 Sp tn U dr iak kladky Zp tn U dr k...

Страница 44: ...r ok Gumov krou ek 2 68 tvorcov z tka 38x 26 tvercov z tka 38x 26 2 69 tvorcov z tka 50x 45 tvercov z tka 50x 45 1 70 Dr adlo rukov te Dr adlo rukojeti 11 71 lenkov popruh Kotn kov popruh 1 72 Hriade...

Страница 45: ...96 Matica M8 Matice M8 2 97 Matica M6 Matice M6 12 98 Podlo ka 17x 6 Podlo ka 17x 6 4 SCHEMATICK POH AD SCHEMATICK POHLED EXPLODED VIEW 45...

Отзывы: