47
(EN)
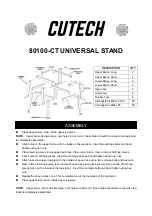
Attach each Side Panel
(SP1 )
on top to the Roof Structure
(RS1LW, RS1RW,RS3LQ)
. Using a dia. 3mm
(1/8”) drill with a power drill, make two equal distance holes on the Side Panel through the Roof Structure. Drive a self
tapping screw
(S4)
through the Side Panel to the Roof Structure. Repeat this for every Side Panel. See blowup.
(ES)
Fije cada panel lateral
(SP1 )
en la parte superior de la estructura del tejado
Usando un día. 3 mm (1/8 ") perfore con un taladro eléctrico, hacer dos agujeros a la misma distancia en el panel lateral
a través de la estructura del techo. Introduzca un tornillo auto-roscante
(S4)
a través del panel lateral a la estructura del
techo. Repita esto para cada panel lateral. Ver ampliación.
(FR)
Fixez chaque panneau latéral
(SP1 )
au-dessus de la structure de toit
. Avec un
foret de 3 mm (1/8’’) et une perceuse électrique, percez deux trous à égale distance sur le panneau latéral dans la
structure de toit. Insérez une vis auto-fôrante
(S4)
à travers le panneau latéral dans la structure de toit. Répétez cette
opération avec chaque panneau latéral. Voir le zoom ci-contre.
3
S4
S4
(EN) Base ‘U’channel
(ES) Base canal ‘U’
(FR) Profilé en U
(EN) Side Panel
(ES) Panel Lateral
(FR) Panneau De Cote
(EN) Roof Structures
(ES) Estructuras de techo
(FR) Structure Du Toit
Ø3.0mm. (1/8”)
S4
SP1
SP1
SP1
3
S4
SP
RS1LW
RS3LQ
SP
SP
SP
SP
Ø3.0mm. (1/8”)
SP
RS1LW
RS3LQ
SP1
SP1
SP1
SP1
(RS1LW, RS1RW,RS3LQ).
(RS1LW, RS1RW,RS3LQ)
Содержание StoreAll
Страница 10: ...8 1 9 11 2 12 3 13 24 4 25 36 5 37 42 EN Quick Start ES Inicio r pido FR D marrage rapide 6 42 43 1 2 3 4 5 6...
Страница 13: ...11 4 S1 F13B F13B F13B S1 x6 F13B x3...
Страница 38: ...36 S1 x4 20 RS8W RS15Q S1 RS15Q RS8W RS15Q RS15Q x2...
Страница 45: ...43 2 S2 DL L L S2 R DR 1 2 S2 x4 L R L x1 R x1 1 2 3 L...
Страница 52: ...U S Polymers Inc 1057 S Vail Ave Montebello CA 90640 United States of America RD 1 0 2015 09 16 SKU 30115 1 3...