background image

*            *


Digital Audio Matrix 

19 

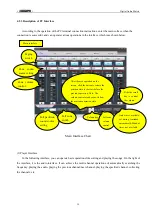
4.2.3 Description of PC Interface 


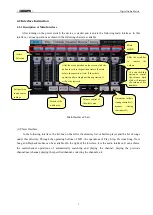
        According to the operation of the PC terminal connection instructions, enter the main surface when the 

connection is successful, and can operate various operations in the interface which is as shown below. 


Main Interface Chart


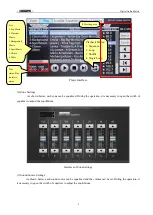
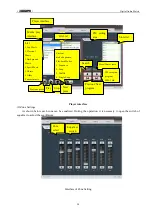
(1) Player Interface 

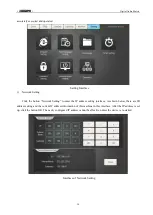
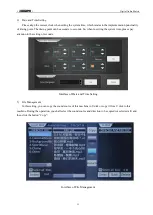
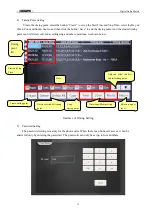
        In the following interface, you can operate basic operations like sorting and playing the songs. On the right of 

the interface, it is the audio interface. It can achieve the multi-channel operations of automatically searching the 

frequency, playing the audio, playing the previous channel/next channel, playing the specified channel, collecting 

the channels, etc.


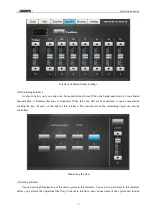
Main interface 

Paging 

switch 

Zone 

sound 

source setting 

Zone  volume 

control 

Full  partition 

sound  source 

setting 

Full zone 

switch 

After the area operation on the 

screen, click the button to restore the 

partition state to the state before the 

previous operation. Note: The 

volume control area does not follow 

the previous operation state 

Volume key 

Full  zone 

volume 

control 

Slide the scroll 

bar  to  control 

the volume 

Auto:timer  available,

set  timing  reminded 

automatically;Manual:

timer  not  available 

Содержание MAG-808

Страница 1: ...m Digital Audio Matrix MAG808 User s Manual Welcome to DSPPA Public Address System Please read the Instructions carefully before operating this device Guangzhou DSPPAAudio CO Ltd http www DSPPA com ht...

Страница 2: ...instructions and other contents of the digital audio matrix MAG808 device The user shall read the Instructions carefully and operate the device following the indications in the Instructions before th...

Страница 3: ...the device Do not impose an excessive force when operating the switch buttons or connecting the external audio equipment Avoid any foreign matter paper metal etc from entering the device through gap...

Страница 4: ...EAR PANEL 3 C INSTALLATION INSTRUCTION 5 3 1 INSTALLATION IN PHONE 5 3 2 INSTALLATION IN PC 5 D OPERATING GUIDE 5 4 1 LINKAGE INSTRUCTION 5 4 1 1 PHONE 5 4 1 2 PC 6 4 2 INTERFACE INSTRUCTION 7 4 2 1 D...

Страница 5: ...P3 display built in program or extrapolated U disk with individual icon equalizer and individual volume control 1 channel FM with individual icon equalizer and individual volume control 1 channel fixe...

Страница 6: ...d source button and indicator 5 Full emergency button and indicator It can send the warning signals to all zones simultaneously by pressing the full warning button of the system and meanwhile the indi...

Страница 7: ..._IN RESERVE 230 12 13 14 15 16 17 18 1 2 3 4 5 6 7 8 9 10 11 AC 110V 220V Selector Switch Use to select the operating voltage AC Power Input Socket Plug the AC power cord into this socket DC 24V conne...

Страница 8: ...C1 MIC2 MIC1 and MIC2 are individually controlled Turn left the switch to open this power source when the 48V phantom power supply microphone is used Volume Control Knob Line Input Interface As shown...

Страница 9: ...host device 2 Connect the host device to LAN 3 Connect the desired Android phone to the WIFI in the LAN where the host device is connected and set the static IP address of the phone The static IP addr...

Страница 10: ...st device and PC to LAN 3 Set the IP address of PC and host device in the same network segment e g the host device IP is 192 168 0 220 the PC IP should be 192 168 0 10 As shown below 4 Enter the softw...

Страница 11: ...ight of the interface it is the audio interface It can achieve the multi channel operations of automatically searching and playing the channel playing the previous channel next channel playing the spe...

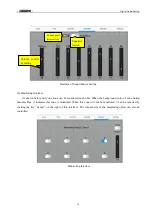
Страница 12: ...of Zone Settings 3 Sound Source Settings As shown below each sound source can be equalized and the volume can be set During the operation it is necessary to open the switch of equalizer to adjust the...

Страница 13: ...is zone will not be monitored it can be canceled by clicking the key Cancel on the right of this interface The volume size of the monitoring object can also be controlled Monitoring Interface 5 Settin...

Страница 14: ...g to enter the IP address setting interface As shown below there are ID address setting and the current IP address information of this machine in this interface After the IP address is set up click th...

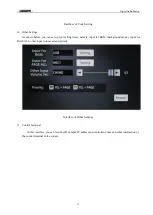
Страница 15: ...econds So when re setting the system time please pay attention to the setting of seconds Interface of Date and Time Setting 3 File Management In this setting you can copy the sound source of this mach...

Страница 16: ...es setting ring and other operations As shown below Interface of Timing Setting 5 Password Setting The password setting is mainly for the phone calls When there is a phone call access it can be answer...

Страница 17: ...four setting items namely input for BGM background music input for PAGE ALL other input volume set and priority Interface of Other Settings 7 Control Terminal In this interface you can view the ID nu...

Страница 18: ...art Main interface Paging switch Zones sound source setting Zones volume control Full partition sound source setting Full partition switch After the area operation on the screen click the button to re...

Страница 19: ...ry to open the switch of equalizer to adjust the equilibrium Interface of Zone Setting 3 Sound Source Settings As shown below each sound source of control panel device can be equalized and the volume...

Страница 20: ...ckground color of zone button becomes blue it indicates this zone is monitored When this zone will not be monitored it can be canceled by clicking the key Cancel on the right of this interface The vol...

Страница 21: ...Timing Point Setting As shown below can create timing point and the created timing point can be deleted edit zones setting ring and other operations Timing point setting Interface Set timing point li...

Страница 22: ...all access it can be answered only by entering the password The password can only be set up to four numbers Interface of Code Setting 3 Other Setting As shown below you can set up four setting items n...

Страница 23: ...lti channel operations of automatically searching the frequency playing the audio playing the previous channel next channel playing the specified channel collecting the channels etc Main interface Pag...

Страница 24: ...Zone Setting Player interface Media play interface List 1 Pop Music 2 Classical Music 3 Background Music 4 Sport Music 5 Chime 6 Other Can sort music Previous piece Play Stop Next piece Current mode S...

Страница 25: ...und Source Setting 4 Monitoring Interface As shown below only one zone can be monitored each time When the background color of zone button becomes blue it indicates this zone is monitored When this zo...

Страница 26: ...of the system in this interface Setting Interface 1 Network Setting Click the Network setting button to enter the IP address setting interface which is shown as below and set the IP address as the cu...

Страница 27: ...ssword Setting The password setting is mainly for the phone calls When there is a phone call access it can be answered only by entering the password The password can only be set up to four numbers Int...

Страница 28: ...Digital Audio Matrix 24 4 Password Setting As shown below you can set up four setting items namely input for BGM background music input for PAGE ALL other input volume set and priority...

Страница 29: ...to repair the device without authorization in case of any fault in order to avoid the accident or aggravate the damage of the device Do not put any corrosive chemicals on or near the device 2 Precaut...

Страница 30: ...9P green plug 2 pieces 7 FM antenna 1 set 8 2A fuse 1 piece 9 4A fuse 1 piece 10 1500MM dual cat audio cable 1 set 11 10A MP P power cord 1 set 12 Washer black 4 pieces 13 5 19 cross recessed counters...

Страница 31: ...this device Do not open the cover of the machine to prevent the electric shock If necessary it shall be repaired by the professional with the professional certificate The terminal marked with a symbo...

Отзывы: