background image

User Manual Nitro

5

Drive Medical GmbH & Co. KG | As per: 12.03.2018 | Subject to error and change

EN

Indication / Contraindication

This walking aid is suitable for a single user with limited 
mobility. It is suitable for indoor and outdoor use.

The purpose of walking devices is to compensate for or 
at least improve restricted walking ability in users (ex-
pansion of range and/or mobility).

Persons with restricted hand/arm functions require spe-
cial adjustments/versions of handgrips or hand rests/
armrests.

For persons with balance disorders are walking frames 
not recommended, this is to be checked by an experi-
ment in an individual case. if it is necessary a compa-
nion must be present.

Sope of delivery contents

1.  Rollator Nitro
2.  Bag
3.  Back Rest
4.  Cane Holder
5.  Operating instructions

Indikati Lieferumfang 

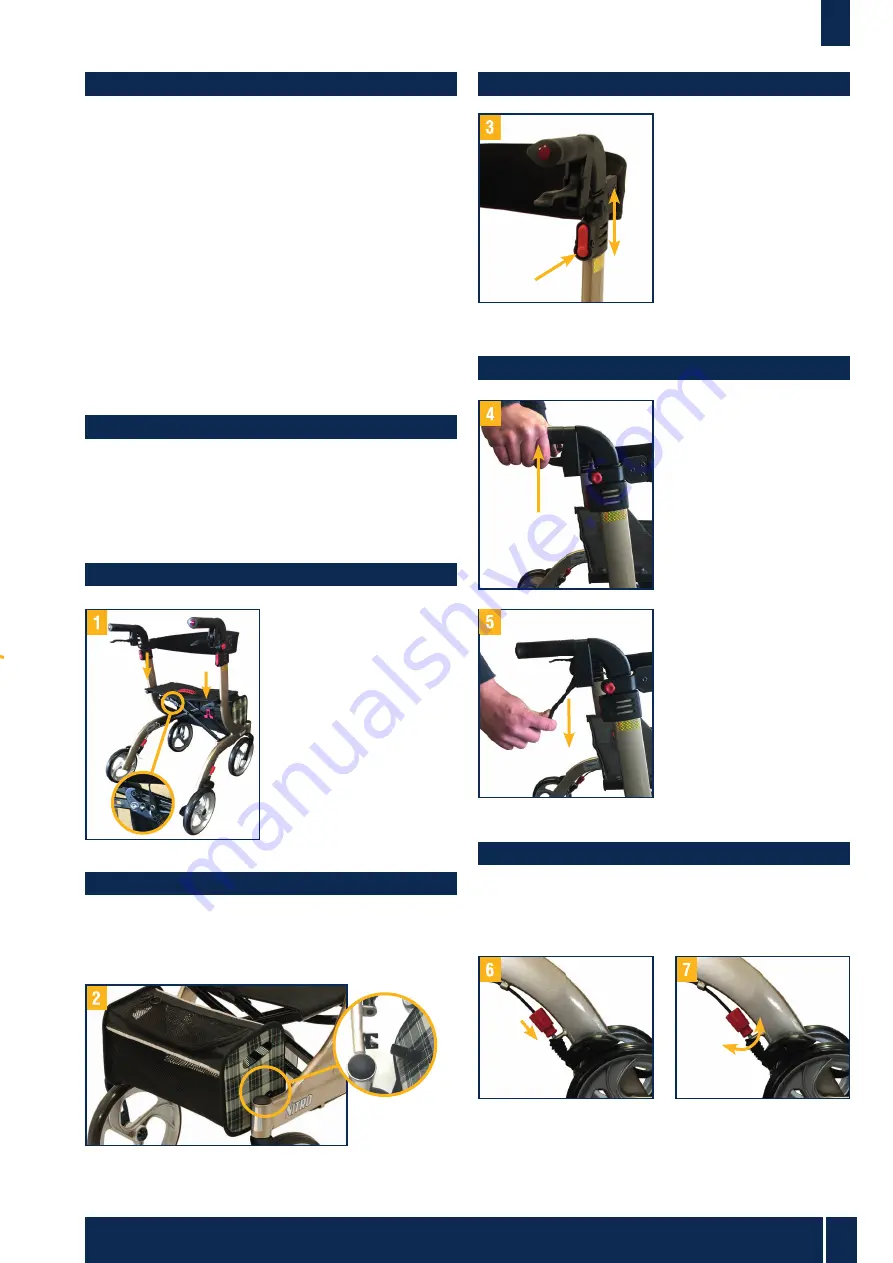
Unfolding

Position the Rollator on its 
wheels. Open the Rollator. 

Press the tubes attached 
to the seat downwards 
until they lock into positi-
on. (picture 1)

The rollator is correctly 
unfold when the locking 
hook is engaged.

Removing / Attaching the Carry Bag

To attach the bag, fold the Rollator a little and push the 
sliding block  from bag into guiding part on the Rollator, 
unfold the Rollator – ready. (picture 2).

Hight adjustment handgrips

Press and hold down the 
red release buttons as 
shown in picture 3.

Simultaneously move the 
handgrip up or down.

When the desired height 
is reached, let go of the 
red release buttons and 
the handgrip will automa-
tically lock into the next 
possible height position.

Breaking / Parking

Pull both brake levers up-
wards to apply the bra-
kes whilst the rollator is 
moving (see picture 4). 
Always brake slowly and 
steady.
To lock the brakes, ensu-
re the Rollator is stationa-
ry and press both brake 
levers down until they 
lock into position (see 
picture 5). 
To release the brakes 
from the locked position,
pull up on the brake 
levers.
The effect of the brakes 
can be affected by abra-
sion of the wheels. There-
fore regularly test the 
brakes.

Adjustment of brakes

To adjust the braking strength, adjust the brake by pres-
sing the screw housing downwards (picture 6)
and then turn left or right (picture 7). 

Содержание Rollator Nitro

Страница 1: ...Gebrauchsanweisung Operating instructions Manuel d utilisation Gebruiksaanwijzing Rollator Nitro Größe Size Modèle Formaat XS S M L ...

Страница 2: ...em 13 Achterwiel 14 Stokhouder 1 Handgrip 2 Adjustable tubing handgrip 3 Rear reflector on handgrip 4 Brake lever 5 Interlock Button for handgrip 6 Side reflector 7 Back rest 8 Seat 9 Bag 10 Front reflector 11 Front wheel 12 Brake adjust screw 13 Reat wheel 14 Cane Holder 1 Poignée 2 Poignée de frein 3 Catadioptre intégré à la poignée 4 Frein 5 Bouton de verrouillage de la poignée 6 Bande réfléchi...

Страница 3: ...en dann die Tasche mit den Nutensteinen in die Führungen links und rechts ein Rollator wieder entfalten fertig Höheneinstellung Schiebegriffe Drücken Sie unten auf den Rastknopf für die Hö heneinstellung des Schie begriffes und ziehen Sie dabei gleichzeitig nach oben Sobald sich der Griff bewegt lassen Sie den Knopf los Dieser arretiert dann automatisch in der nächstmögli chen Höhe Wiederholen Sie...

Страница 4: ...und die Sitzauflage aufheizen was zu Verbrennungen führen könnte Die Bremswirkung kann durch die Abnutzung der Reifen beeinträchtig werden Deshalb Bremswirkung regelmäßig prüfen Reinigung Wartung Von Hand mit einem feuchten Tuch regelmäßig reini gen Keine aggressiven Reinigungsmittel verwenden Wiedereinsatz Dieses Produkt ist für den Wiedereinsatz geeignet Bei der Aufbereitung sind die Vorgaben de...

Страница 5: ...he rollator is correctly unfold when the locking hook is engaged Removing Attaching the Carry Bag To attach the bag fold the Rollator a little and push the sliding block from bag into guiding part on the Rollator unfold the Rollator ready picture 2 Hight adjustment handgrips Press and hold down the red release buttons as shown in picture 3 Simultaneously move the handgrip up or down When the desir...

Страница 6: ...rts to overheat and burns to the user The effect of the brakes can be affected by abrasion of the wheels Therefore test regulary the brakes Cleaning Maintenance Clean regularly by hand with a damp cloth Do not use any aggressive detergents Reprocessing The product is suitable for reprocessing in line with man ufacturer s recommendations Warranty We issue a warranty of 24 months from date of purcha...

Страница 7: ... est enclenché Retirer fixer le sac de transport Pour fixer le sac Repliez légèrement le rollator et insérez ensuite les coulisseaux de la sacoche dans les glissières situées à gauche et à droite Déplier de nouveau le rolla tor c est terminé voir Figure 2 Ajustement de la hauteur Appuyez sur les boutons de déclenchement rouge et maintenezles enfoncés comme indiqué à la Figu re 3 Déplacez les poign...

Страница 8: ...casionner des brûlures L action des freins peut être influencée par l usure des pneus Il est donc nécessaire de contrôler régulière ment les freins Nettoyage Entretien Nettoyer régulièrement le rollator à la main à l aide d un chiffon humide N utilisez pas de détergent agressif Recyclage Ce produit peut être recyclé Garantie La garantie est valable 24 mois à compter de la date d achat Cette garant...

Страница 9: ... samen en schuif dan de schuifblokken van de tas in de geleiders links en rechts Vouw de rollator weer open en u bent klaar zie afb 2 Hoogte van handgrepen verstellen Druk aan de onderkant op de vergrendelknop voor hoogteverstelling van de handgreep en trek de handgreep gelijktijdig naar boven Zodra de handgreep be weegt laat u de knop los De handgreep wordt dan automatisch op de vol gende hoogte ...

Страница 10: ...peraturen bo ven 40 C worden blootgesteld Anders kunnen de stalen buizen en de zitting heet worden wat kan lei den tot brandwonden De remmen kunnen minder goed gaan werken wan neer de wielen afslijten Controleer daarom regelma tig of de rollator goed remt Reiniging Reinig dit product regelmatig met de hand met een vochtige doek Gebruik geen agressieve reinigingsmiddelen Hergebruik Dit product is g...

Страница 11: ...lich überschritten werden wenn das Produkt sorgfältig behan delt gewartet gepflegt und genutzt wird und sich nach der Weiterentwicklung der Wissen schaft und Technik nicht techni sche Grenzen ergeben Die Lebensdauer kann sich durch extremen Gebrauch und unsachgemäße Nutzung allerdings auch erheblich ver kürzen Die Festlegung der Le bensdauer durch unser Unter nehmen stellt keine zusätzliche Garant...

Страница 12: ...562 9724 25 www drivemedical de info drivemedical de 1 Produktname 2 Artikelnummer 3 Seriennummer 4 Produktionsdatum Jahr Monat 5 Gebrauchsanweisung beachten 1 Product name 2 Article number 3 Serial number 4 Date of manufacturing year month 5 Attention See operating instructions 1 Nom du produit 2 Numéro d article 3 Numéro de série 4 Date de production année mois 5 Consulter le manuel d utilisatio...

Отзывы: