Dräger PEX 1000
31
Menu
4.3
Calibration menu
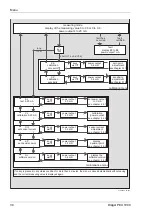
To enter the calibration menu press the
▼
key for more than one second but less than
3 seconds. The display shows a flashing point in the right bottom corner indicating the
calibration mode.
4.3.1
ZE – Zero point calibration
To calibrate the zero point, see Chapter 5.1.1 on Page 33.
4.3.2
SP – Sensitivity calibration
To calibrate the sensitivity,see Chapter 5.1.2 on Page 34.
4.4
Configuration menu
To enter the configuration menu press the
▼
key for more than 3 seconds until the display
shows “SL” and the point in the right bottom corner flashes to indicate the maintenance
mode.
4.4.1
SL – Set power output to X mA
By means of this function the output signal of the PEX 1000 can be set to
certain constant values for test purposes.
1. Navigate by means of keys
▲
or
▼
until the display shows SL (“Set
Loop“) and press keys (
▲
+
▼
) to confirm.
The power output is set to 4mA, the display shows “04“.
2. By means of the keys
▲
or
▼
the power output can be adjusted to
values between 1 and 22 mA in steps of 1 mA. Pressing the keys for longer activates the
repeat function.
3. Press keys (
▲
+
▼
) to terminate this function. The display shows SL again.
4. Press key
▲
once to return to measuring mode.
4.4.2
CL – Calibrating the power signal
By means of this function the power output of the PEX 1000 can be
calibrated such that a current of 4 mA corresponds to 0 %LEL and a current
of 20 mA corresponds to 100 %LEL.
Generally the output signal can be measured at the controller side as voltage
drop across the input resistance; otherwise the 4 to 20 mA-loop has to be
interrupted to install an amp meter for this purpose.
1. Navigate by means of keys
▲
or
▼
until the display shows CL (“Calibrate Loop“).
2. Press keys (
▲
+
▼
) to adjust the lower reference point, the display shows “04“
corresponding to 4 mA.
3. Measure the current by means of the amp meter or the controller unit.
4. Press the keys
▲
or
▼
to adjust the current output such that the amp meter reads a current
of 4 mA as accurately as possible (between 3.95 and 4.05 mA). Pressing the keys for
longer activates the repeat function.
5. Press keys (
▲
+
▼
). This saves the lower reference point, and the menu switches to the
upper reference point. The display shows “20“ corresponding to 20 mA.
NOTICE
This function can trigger alarms at the controller unit!
i
i
00633445.eps
00733445.eps

