8
DR
®
TRIMMER/MOWER™ BEAVER BLADE
®
Chapter 4: Maintaining The DR
®
TRIMMER/MOWER™ BEAVER BLADE
®
Regular maintenance is the way to ensure the best performance and long life
of your BEAVER BLADE. Please refer to this manual for maintenance
procedures.
Use the BEAVER BLADE for cutting wood, brush and small trees ONLY.
It's a good practice to sharpen the BEAVER BLADE before each use. This
allows you to maintain the proper cutting angle of the teeth before the
chain gets too dull. See the following page for sharpening instructions.
The BEAVER BLADE does not need to be oiled.
To avoid premature dulling, keep the blade out of contact with the
ground.
If you are planning to do heavy brush cutting, please consider purchasing
the aluminum Mow-Ball™ Support, which better withstands the heat
created by the BEAVER BLADE and is more durable under heavy use.
If you have any questions at all, please feel free to contact us at
www.DRpower.com or call toll-free 1(800) DR-OWNER (376- 9637) and one
of our Customer Service Representatives will be happy to help you.
Sharpening the BEAVER BLADE
Tools Needed:
3/16" (4.8mm) saw chain file.
Flat file
Gloves
Safety Glasses
1.
Remove the BEAVER BLADE from the cutting (or trimming) head.
Leave the chain on the blade.
2.
Draw a mark on the chain or BEAVER BLADE where you will begin
sharpening.
TIP:
Using a vise to hold the Beaver Blade while sharpening will make it
easier to make consistent sharpening strokes.
Note:
File the chain with a light pressure into the cutting edge of the tooth. Do not bear down on the file. Give each tooth the same
number of strokes. The teeth are made of a relatively soft metal. It is not necessary to remove a lot of metal.
3.
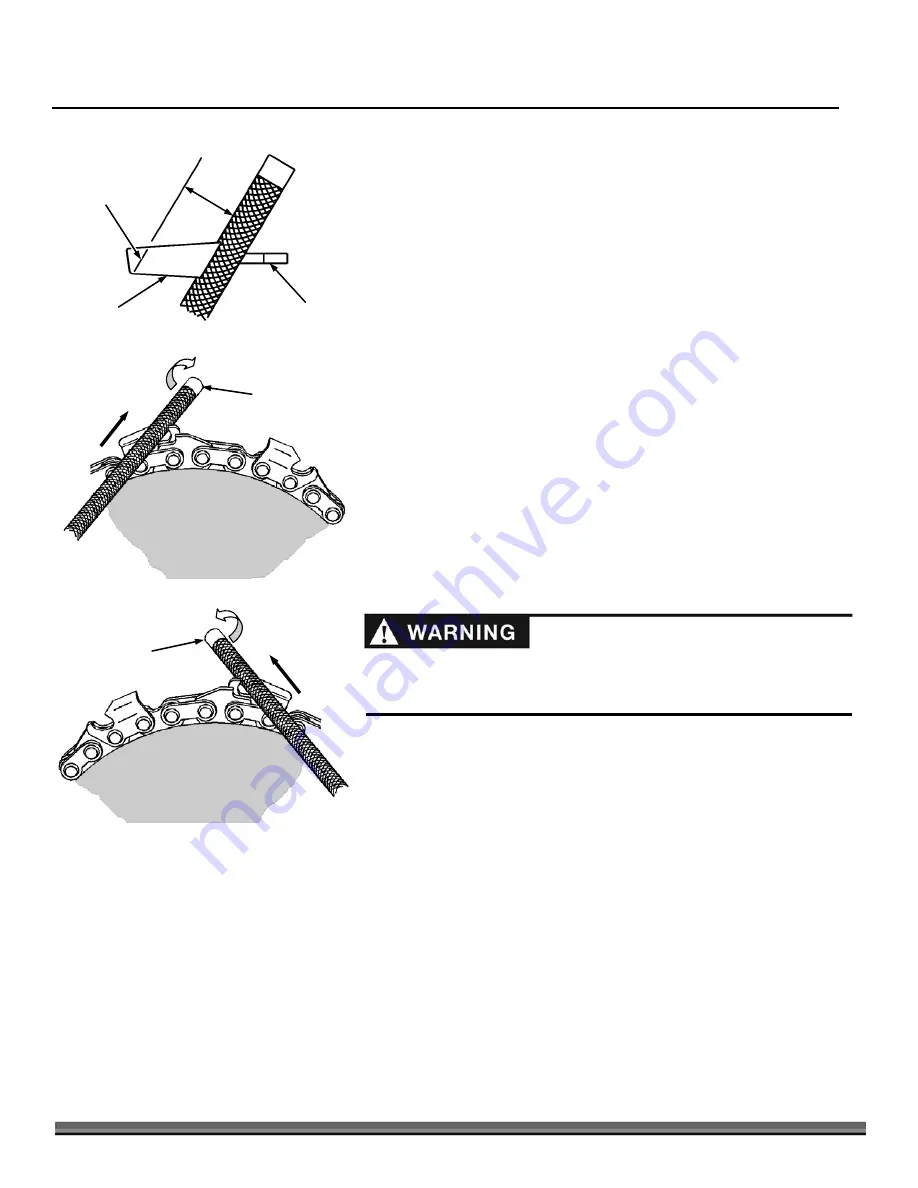
While holding the beaver blade in a standing (vertical) position, Place the round file into the tooth at the same angle as
the cutting edge of the tooth
(Figure 7)
. Lightly push the file across the cutting edge and through the tooth, twisting the
file a half turn with each stroke
(Figure 8)
.
4.
Skip the next tooth (because it is facing the opposite direction), and sharpen the following tooth and so on. When you get
back to your mark, you are finished with ONE side of the BEAVER BLADE.
5.
Turn the BEAVER BLADE around to sharpen the other side. Change the angle of the round file to follow the angle of the
cutting edge for teeth on this side
(Figure 9
). Start sharpening at your mark. Sharpen the teeth that have not yet been
touched. Remember to pay attention to the angle of the file on the tooth and use the same number of strokes per tooth.
File at Same
Angle as Mark
Tooth
Raker
Figure 7
Sharpen Angle/
Wear Mark
Round File
First Side
Figure 8
Round File
Second Side
Figure 9
Before performing any maintenance procedure or inspection, stop the engine,
wait five minutes to allow all parts to cool. Disconnect the spark plug wire,
keeping it away from the spark plug.
Содержание TRIMMER/MOWER BEAVER BLADE
Страница 11: ...CONTACT US AT www DRpower com 11 Notes...


