background image

Before You Start

01

6

Replacing the Fuse

Make sure the amperage matches the 
specified value when replacing the fu-
ses. If the fuse is blown, check the po-
wer connection and replace with a n-
ew one. If the same problem occurs, 
it would be subjected to the malfun-
ction. In such cases, please consult 
to the nearest service dealer.

When the range of the operation of t-
he card remote control becomes short 
or doesn't   function while operating. 
Replace the lithium battery with a new
 button cell (CR2025). Make sure the 
battery polarity before replace.

Precautions on Using Lithium 
Battery 

Gently pull out the Battery Holder while
pressing the Stopper. 

Put the button-type battery with mark(+) 
upward into the Battery Holder.

Replacing the Battery

Insert the Battery Holder into the Remote 
Control.

!

Maintenance

    Warning

Never use the fuse with the rated 

amperage more than that supplied to 

your unit, otherwise it will damage the 

unit.

       Warning!

Improper handle with the battery may 

lead to explosion.

It cannot be charged , disassembled or 

thrown into a fire.

!

43

10

IPOD  

Repeat Playing

During playback, press      

 Press it again to 

cancel this function.

RPT

 to track

repeat, disc repeat, off.

  *   This function is operated by using the remote
       control only.

15

Note: 

Playing Tracks at Random


During IPOD playback, when 

RDM

 button, 

Shuffle off, 

pressing

Shuffle Track, 

Shuffle Album

 will be activated.

16

Note:

  *   This function is operated by using the remote
       control only.

IPOD play

During IPOD playback, connect the IPOD 
wire (5V) to the one in backside of main 
unit. The unit will play the track from the 
IPOD.If a IPOD is loaded, you can go back 
to the source status, press IPOD to enter into 
IPOD setup:

Pause Playback

During

 IPOD 

mode, press           


button to 

pause the playback, Press it again to return 
to normal playback. 

Pressing          in the monitor also performs 
the same function.

Note: 

*

27

20   

110/133   

05 10KHz

06 20KHz

07 mute

08 1KHz L

09 10KHz L

07 MUTE

Unknown Artist

Test signal

00:00:49

1

2

4

5

6

7

8

9

10

3

1

2

3

4

5

6

7

8

9

10

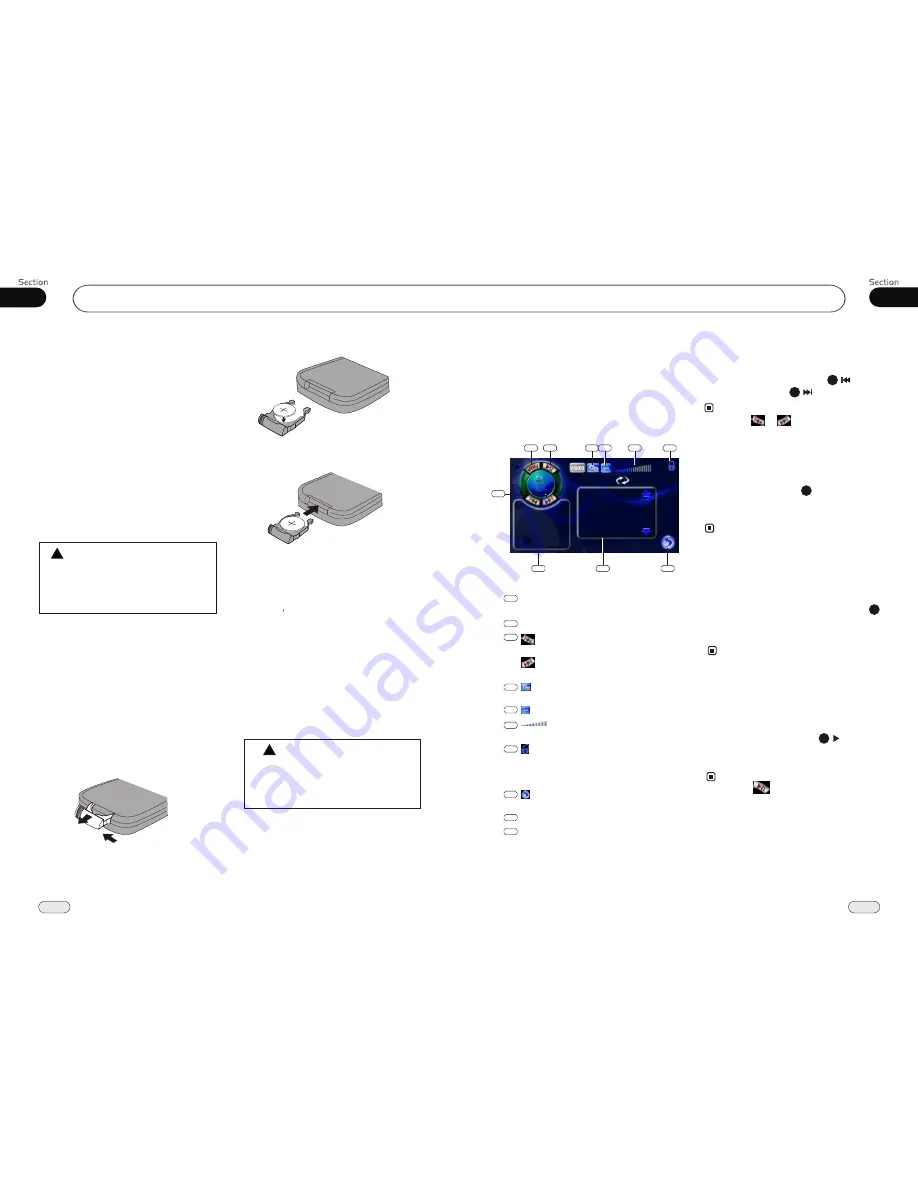
Back to the previous menu. Press and 
hold it to go back to root if first connection.

Play/ pause

Briefly press to play previous track,
press and hold to 

fast forward.  

Briefly press to play next track,
press and hold to 

fast reverse.

     AUDIO setup menu

To adjust AUDIO please refer to pages 19.

     Press this button to mute.

           You can adjust the volume by
gliding this strip horizontally.

Press this button to lock or unlock

the touch screen

During unlock status, glide up and down or 
left and right on the blank space of screen
to switch to the previous or next mode.

       Press this button to go back to the 
select  menu.

Current playing information

Current file directory list box

Selecting Tracks Fast

 *   Pressing          /         in the monitor to perform 
      the same function

Note:

During IPOD playback,  press            to play
previous track ,press            to play next track .

21

21

Always keep the lithium battery beyond 
children s reach. If   swallowed, see a 
doctor immediately.

Clean the battery with a dry cloth, 
to ensure it's perfectly connected.

Make sure the polarity is correct   when
loading with the battery.

To prevent short circuit, do not use 
metal tweezer to clip the battery. 

Содержание dp745nav

Страница 1: ...ing is illegal inmost states There is a safety feature on this device which enables viewing videos only when parked All other features may still be used while driving such as audio and radio etc but must be done with care Please contact an authorized installer for professional installation DP745NAV ...

Страница 2: ...autions 5 Maintenance 6 Location function of the controls 7 Remote control 9 Specifications 11 1 5 Main Menu Main Menu Setup 18 Video Adjust 18 Audio Adjust 19 Source Setup 19 System Adjust 19 4 DVD VCD MP4 5 5 DVD VCD MP4 Setup 23 DVD VCD MP4 Play 23 Selecting Tracks Fast 23 Pause Playback 23 Stop Playback 23 Number Buttons 24 Play tracks at Random 24 Repeat Playing 24 Skip backward forward 24 Sy...

Страница 3: ...emorizing Stations Automatically 38 Number Buttons 38 Additional Information Simple Troubleshooting Guide 45 11 Bluetooth Mode 9 Bluetooth Operational Interface 40 Using a Bluetooth Wireless connection 40 Pairing Your Unit and Bluetooth Phone 40 Pairing in Handsfree Mode 40 Cellphone Pairing Mode 41 Bluetooth Connection and Disconnection 41 Using the Unit as a Handsfree Device 41 Last Number Diali...

Страница 4: ...the left and right channel speaker c ables to each other or to the vehicle body Make sure all the connections are comp letely correct before turning on your unit When replacing the fuse s the replace ment must be of the same amperage as shown on the fuse holder Do not block vents or radiator panels B locking them will cause heat to build up inside and may result in fire This unit features a number...

Страница 5: ...ional clean ing cloth Wipe each disc from the center out Shown as the picture PRECAUTIONS This unit can play the following discs only Recorded material Sound and moving pictures Sound and moving pictures Sound only Sound only Size of disc MPEG 4 Sound and moving pictures 44 10 IPOD During IPOD mode press BACK button on the remote control to go back to the previous catalog During IPOD mode press RO...

Страница 6: ...ay During IPOD playback connect the IPOD wire 5V to the one in backside of main unit The unit will play the track from the IPOD If a IPOD is loaded you can go back to the source status press IPOD to enter into IPOD setup Pause Playback During IPOD mode press button to pause the playback Press it again to return to normal playback Pressing in the monitor also performs the same function Note 27 20 1...

Страница 7: ...ss to pause play Stop play press to stop play and press the PLAYto play the current track again 21 Note 17 18 30 Pressing on the unit or performs the same function Audio Transfer between the Unit and Phone Press to change the conversation from the unit to the cellphone Note This function will disconnenct bluetooth link for some phones but it does not affected the operation 6 8 This function is onl...

Страница 8: ...nit and the cellphone bluetooth icon on the display appears in red Press POWER in the monitor to turn off the bluetooth and Power OFF appears on the display Press PAIR to turn off bluetooth con nection and appears in green Press Pair Success appears on the display then display shows SLC Connect when bluetooth connected display shows Pair Timeout when bluetooth disconnected 29 29 Note Please keep t...

Страница 9: ...best sound with minimal distortion the cellphone or network brings Full duplex conversation Bluetooth ver2 0 compliant Please dial up the device before connecting bluetooth Pairing in Handsfree Mode 1 Press PAIR and Pairing shows on the screen 2 To get into CELLPHONE CONNECTION to search fixtures 3 If the cellphone has connected Pair Success appear and then SLC Connect in order will change from gr...

Страница 10: ...s to pair 30 During bluetooth press to dial dial again or answer a phone 31 During bluetooth press to hang up or refuse a call 43 10 39 08 AUX Optional Press SRC to turn to AUX 1 or press icon in the select menu to appear as follow AUX Touch Screen Menu To adjustAUDIO please refer to pages 19 Press SRC in the monitor to turn to AUX 2 39 39 Press icon in the monitor of AUX 1 or AUX 2 to appear menu...

Страница 11: ...s GOTO and the monitor shows FREQ then press the Number to input the valid frequency then the TV program will be played Note It is only valid on the remote control It is only valid when GOTO FREQ is on in main menu LOC ON appears on the display and only local station is available When it disappears both distance and local stations can be received DX LOC Selector During radio status press LOC butto...

Страница 12: ...ion hold and press to save the current station to one of the 6 stations Pressthisbuttontolockorunlock thetouchscreen During unlock status glide up and down or left and right on the blank space of screen to switch to the previous or next mode 4 7 BACK Press it to go back to the select menu Touching the blank space in the bottom right corner of picture 1 changes to picture 2 8 Press it to adjust the...

Страница 13: ...umber and then press to move the cursor to START press ENTER to start program playing move the cursor to EXIT and press ENTER to exit the program playing Move the cursor to and press ENTER to the previous page move the cursor to and press ENTER to the next page During this process press to cancel the program playing 13 18 The function is only valid on the remote control Note 27 Press CLEAR to clea...

Страница 14: ...stake 22 During CD playback first press GOTO and TFT shows disc go to press your desired time of the playback by using num ber buttons Second press GOTO button track go to appears on TFT also input your desired numbers to play the current time of your selection During MP3 SD USB mode first press GOTO and the TFT shows Then press NUMBER BUTTONS to input the MP3 SD track s Number to play it secondly...

Страница 15: ... play Note 12 19 Press SOURCE on the main unit to switch to DVD mode When SD card and USB were inserted into press this key again and again to switch among USB SD card and disc Press to turn to mode switch MODE 01 18 CD 01 Track 02 Track 03 Track 04 Track 05 Track 06 Track CD CD CD CD CD CD Track 03 16 Track Region Press this region and the screen shows the following menu number keys appears touch...

Страница 16: ...t also performs the same function 14 14 Note 7 7 Turning the Unit On Off Briefly press PWR button to turn on the unit press it again the unit is still in waiting status Press and hold to turn off the 1 Pressing PWR button on the main unit also performs the same function Note 14 TREBL BALAN BASS VOL FAD SUBWO During CD MP3 mode pressing SEL to performs the same function 33 05 DVD VCD MP4 Preference...

Страница 17: ...le Function 16 16 Note Pressing and holding on the main unit also performs the same function 12 Press on the main unit to adjust the screen to your desired angle Adjust Angle Note Do not force to adjust the angle please or the unit will break 5 This function is only operated by the unit 05 32 DVD VCD MP4 Preferencespage DVDMenu Example showing howto set Disc Menu Language Press or thenpressENTER P...

Страница 18: ...tal ChangePSW Default Auto Eng Eng Eng PreferencePage TVType Audio Subtitles DVDMenu Parental ChangePSW Default Auto Eng Eng Eng Auto English French Spanish Chinese Japanese Korean Russian Set up Main Menu Press the icon on the menu the monitor will display main menu as follows You can touch a choice directly on the screen including RESET VIDEO SYSTEM AUDIO SAVE You can slide up and down to select...

Страница 19: ... Audio Adjust After selecting AUDIO the sub menu will appear as follows You can adjustVOLUME BALANCE FAD BASS TREBLE For example press SUBWOOFER BASS the setting menu will appear as follow Press and or press the long strip to adjust the size then press SAVE to save the setup press RESET to go back to the default value on the screen Note Adjusting other options performs the same operation Pressing ...

Страница 20: ...tions on off ScreenSaver Example showing howto set Screen Saver on off LogoType Example showing howto set LogoType Press Press or thenpressENTER GeneralSetupPage TvDisplay AngleMark Osd Lang Wide On Eng GoToGeneralSetupPage GeneralSetupPage TvDisplay AngleMark Osd Lang ScreenSaver Wide On Eng On LogoType Default Captured LogoType Def LogoType Def Off Captions Off Press Press or thenpressENTER Gene...

Страница 21: ...On Eng On Def LogoType Normal PS4 3 Normal LB4 3 Wide16 9 GeneralSetupPage GoToGeneralSetupPage SetTVDisplaymode Press Press or thenpressENTER Captions OSDLang GeneralSetupPage TVDisplay TvDisplay AngleMark Osd Lang ScreenSaver Wide On Eng On LogoType Def GeneralSetupPage AngleMark ScreenSaver Wide On Eng On LogoType Def GeneralSetupPage TvDisplay Osd Lang On Off GoToGeneralSetupPage SetAngleMark ...

Страница 22: ... confirms to version 2 0 of SVCD DVD disc only 3 Selecting MENU Selecting Menu During DVD status press MENU to return tothe root menu all ofthe chapters willappear on monitor You can press or button to selectyour desired chapter 4 27 23 Selecting Title During DVD status press TITLE to return thetitle menu all of thetitles will appearon monitor Youalso can press or button to select your desiredchap...

Страница 23: ...and pause During stop mode press this button to resume playback mode Pause Playback 17 Note Pressing in the monitor or on the main unit performs the same function Stop playback During DVD VCD playback first press then press or on the remote control to replay press twice to stop playing completely then press to return to the beginning of the current track During MP4 playback press first then press ...

Страница 24: ...low play The speed as follows 10 The function is only valid on the remote control Note 4 Increase the size of picture No Change The function is only valid on the remote control Note 2X 3X 4X To remove the image by pressing button 27 On Screen Display During DVD status press OSD button The display shows 8 Title elapsed Chapter elapsed Chapter remaining Title remaining Display off During DVD mode pr...

Отзывы: